


- 48 -
[List of Alarm setting parameters]
Parameter
Function
Default
Set value
Level
Select level for setting
1 to 4
Mode
Select alarm type
None
None, H (upper), L (lower), B (diff upper), S (diff lower),
U (rate-of change upper), D (rate-of-change lower)
Value
Set alarm judgment value
*
-30000 to 99999
Decimal point position is the same as scale setting.
D.Band
Set alarm deadband
*
0 to 99999
Decimal point position is the same as scale setting.
Comp.CH
Set CH (reference CH) compared with
the setting CH
(Diff upper/lower alarm only)
*
1 to 6
“-“ Not set
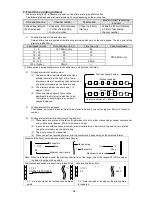
Std.TIME
Set reference period for calculating
variation width
(rate-of-change upper/lower alarm only)
*
0 to 6000
Minimum set value is 1sec.
Set period can be narrower than measuring interval. In
this case, alarm judgment is made using the
measuring interval.
Delay
Set delay time to output after alarm
detection
*
0 to 6000
Minimum set value is 1sec.
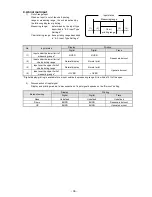
Relay No.
Specify output relay No.
*
- (No output), 99 (internal circuit output), 1 to 6
And/Or
Select circuit type for output
*
And, Or
Message No.
Activation
Specify message No. printed at alarm
activation
*
- (Message not printed at alarm activation), 1 to 20
Message No.
Reset
Specify message No. printed at alarm
reset
*
- (Message not printed at alarm reset), 1 to 20
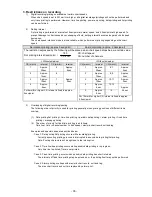
Hold-DISP
Select whether to hold the status of
display and
“ALM” status LED at alarm
activation
*
Not Hold,
Hold:Reset by KEY (hold until reset by key operation)
Hold:Reset by EX (hold until reset by remote contact)
Hold-OUT
Select whether to hold the status of
alarm output at alarm activation
*
Not Hold,
Hold:Reset by KEY (hold until reset by key operation)
Hold:Reset by EX (hold until reset by remote contact)
Hold-EX
Specify remote contact No. used when
“Hold:Reset by EX” is selected for
"Hold-DISP" or "Hold-OUT"
*
- (Not used), 1 to 5
If alarm condition is cleared, on-hold alarm output
status is reset when the specified remote contact No.
turns ON.
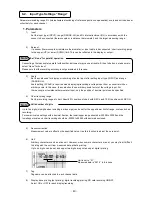
5. Copying settings
Pressing the
key on the list of alarm set contents displays the copy window for alarm settings.
Move the cursor to the alarm level you want to copy w
Press the
key to check
the check box
of desired alarm level.
After selecting alarm levels to be copied, specify the source and destination. Move the cursor to the source
(Src.CH) and select CH with the ▲/▼ keys (forward/reverse) and then press the
key to register. When the
cursor moves to the destination (Dest.CH), select CH likewise.
Settings can be copied to specified channels collectively.
When the destination setting is completed, move the cursor to Copy and press the
key to start
copying.
A level selected for copying alarm settings includes all the parameters set for the level.
About alarm level
Reference


