Installation Instructions
MTTU
9
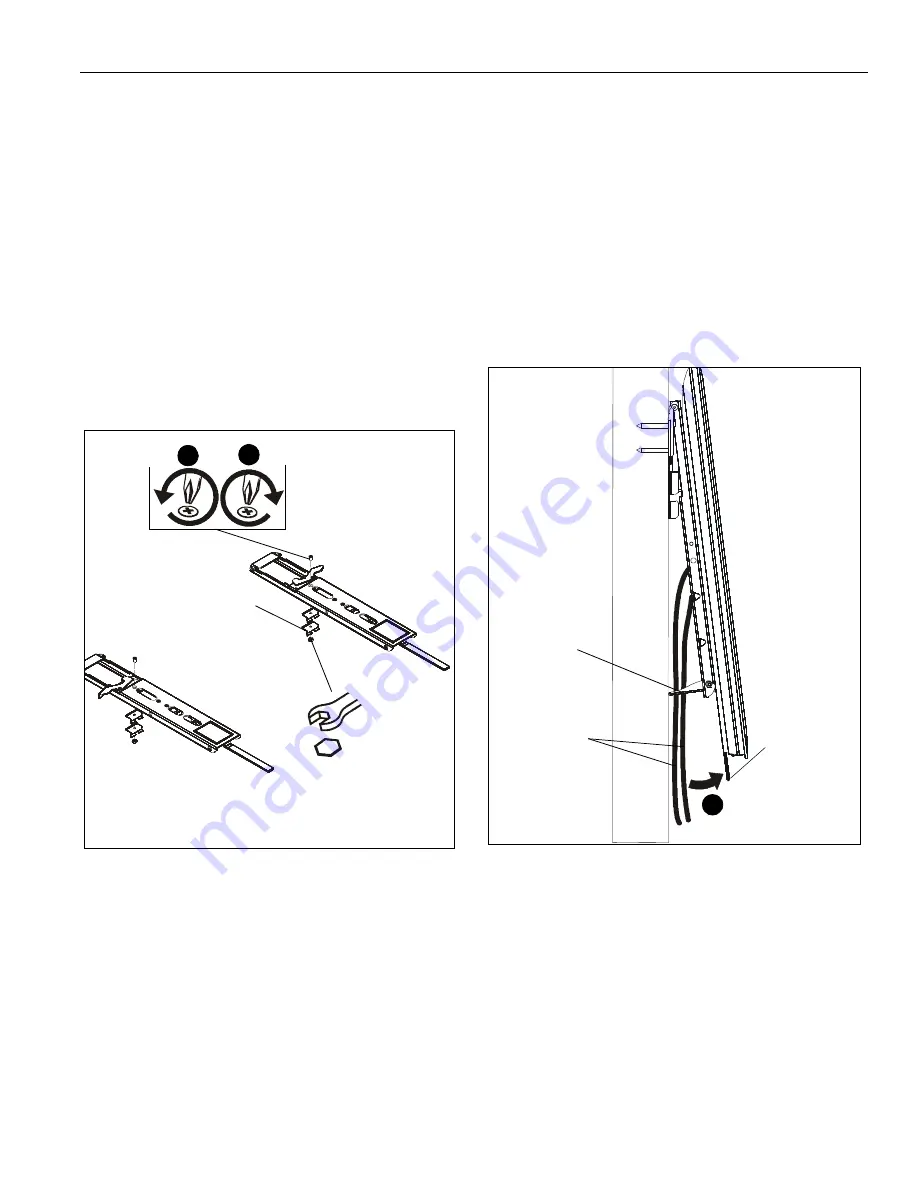
Extra Spring Clip Installation (for larger displays)
IMPORTANT ! :
Display should be held in vertical
position by spring clips. Listen for clicking sound when
returning display to the full vertical position. For larger
displays, a second spring clip (DD) may be added to
each upright so that the display can be held in the full
vertical position by these clips. Follow steps below to
install the extra spring clip.
1.
Remove display and attached uprights from wall plate (A) to
gain access to spring clip screws.
2.
Pull out display from uprights to expose existing spring
clips.
3.
Remove hex nuts and screws holding spring clips to
uprights. (See Figure 8)
4.
Use removed hex nuts and screws to install additional
spring clips (DD) along with removed spring clips onto
uprights. (See Figure 8)
Figure 8
Cable Management
NOTE:
For attaching and adjusting cables, the MTTU mount
features a kickstand to allow access without having to
remove display from the wall.
1.
Ensure mount and display are in the upright position.
2.
Slowly pull bottom of display away from wall until kickstand
fully reaches its down position. (See Figure 9)
3.
Slowly release display until kickstand locks against the wall.
4.
Attach or adjust cables as necessary on back of display.
5.
To disengage kickstand, slightly pull display away from wall
and pull down on cable management straps to release
kickstand. Slowly allow display to return to the wall. (See
Figure 9)
Figure 9
NOTE:
Due to the low-profile design of the Thinstall Series,
displays with cable connections coming straight out of
the back may require 90-degree cable connectors.
Chief offers in-wall accessories that can assist with
recessing cables and connections.
NOTE:
Certain displays may have limited space available for
cable management.
display not shown for clarity
(DD) x 2
3
4
WALL
cable
management
cables (typical)
2
straps
kickstand in down
position


