


42
43
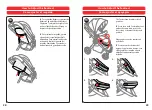
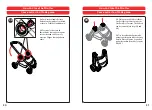
32. To Place the Carriage in Parent
Facing position, squeeze and pull up
on the Buttons on each side of the
Seat, shown in red. To re-attach
the Carriage line up the Hubs and
insert them into the corresponding
openings on the frame, as shown in
Step 7.
32. Para colocar el moisés en
posición mirando hacia los padres,
apriete y tire de los botones a cada
lado del asiento (se muestran en
rojo) hacia arriba. Para volver a
colocar el moisés, alinee los cubos
e insértelos en los orificios
correspondientes en la estructura,
como se muestra en el paso 7.
32
How to Convert to a Carriage
Cómo convertirlo en moisés
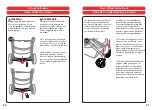
WARNING
The Carriage must only be used in a
horizontal position. Do not adjust to
a Lounge or Upright position.
ADVERTENCIA
El moisés se debe utilizar
únicamente en posición horizontal.
No lo coloque en posición reclinada
o vertical.
33
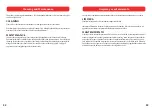
Assemble KeyFit
®
Attachment
Armado del accesorio KeyFit
®
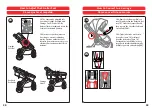
33. Lay out the Side Hubs with the longer tube sides to the left of the Hubs.
Then place an end on each side of the Side Hub, making sure the End with the
KeyFit® Logo is on the right. Insert the Side Hub tubes into both Ends until the
snap buttons click into place.
33. Coloque los cubos laterales con los lados más largos del tubo hacia la
izquierda de los cubos. Luego ponga un extremo en cada costado del cubo
lateral y asegúrese de que el extremo con el logotipo de KeyFit® esté a la
derecha. Inserte los tubos del cubo lateral en ambos extremos hasta que los
botones de broche hagan clic.
Ends
Extremos
KeyFit®
Logo
Longer
Tube
Side
“CLICK!”
“CLIC”
“CLICK!”
“CLIC”
“CLICK!”
“CLIC”
“CLICK!”
“CLIC”
Side Hubs
Cubos laterales
Lados más
largos del
tubo
Logotipo
de KeyFit®
Summary of Contents for Urban
Page 29: ...www chiccousa com ...


