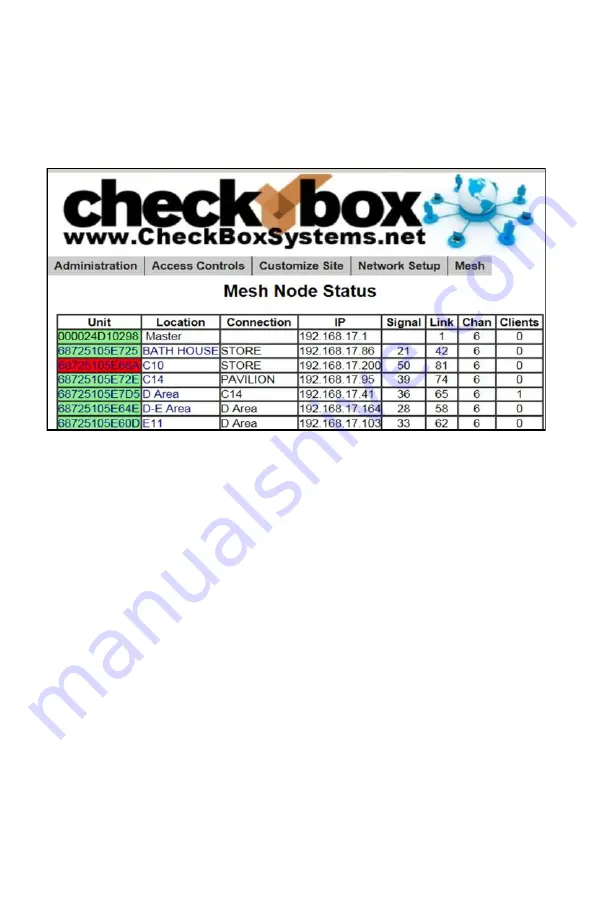
Check box HSv430 Setup & User Manual Download Page 24

24 

number used to identify network devices.  

The second column shows the units name or location; you can change this label 

by clicking in  this box and entering a name or location. By default it is a row of  

“*****” You also will click on the row of”*****” the first time a repeater is added to 

a system to allow it into the mesh.  

The third column shows the name or location of the unit from which this unit gets 

it’s connection, this  may be the CheckBox or another repeater if the units have 

daisy  chained  themselves.  Mesh  repeaters  are  constantly  evaluating  their 

connections and “talking” to other repeaters and the to determine the best route 

back  to  the  and  the  internet.  You  may  see  this  change  occasionally  as  the 

system reconfigures itself to deal with changing conditions. 

The fourth column shows the IP (network) address of the unit. 

The fifth column shows the current signal strength of this unit to it’s upstream 

connection.  The signal strength is a 5 minute average, and it is normal for this to 

fluctuate. Any unit with a low signal strength will be highlighted in Yellow or Red. 

Units highlighted in yellow will have slower connections that will be unreliable. 

Units in Red are not able to support traffic or users as they have a very low or no 

connection (often as the result of issues with power or wiring at the unit). 

The 

signal is only displayed for access points running in wireless mode (access points 

without a wired Ethernet connection to the CheckBox), any wired units will display 

"wired" in this column.


The sixth column shows the Link speed, the maximum speed data can travel over 

this link. Other factors may cause actual throughput to be lower.


The seventh column indicates what channel the access point is operating on.  

Systems with multiple wired access points can change the channel of each wired 

access point by clicking on the unit name and adjusting the preferred channel 

accordingly.


The last column shows how many clients are using this access point. 

Summary of Contents for HSv430

Page 1: ...Wireless Systemstm are designed to be Easy to Install Easier to Manage and Easiest to Afford To make set up as easy as possible please take a moment to completely read through these instructions befor...

Page 2: ...s with S A F E 31 S A F E Guest Contact Information 34 System Alerts 33 Included Optional Services 34 Privacy Policies and disclosures 35 Warranty Information Back Cover Hello We have designed CheckBo...

Page 3: ...strikes can also spread through your system through long runs of Ethernet cables that run outside For long outdoor cable runs or cable runs between building use fiber optic cables instead of Ethernet...

Page 4: ...s and wired devices such as computers point of sale systems security cameras etc These devices may connect directly through the CheckBox or through Ethernet switches CheckBox Access points receive pow...

Page 5: ...rk hotspot the default name for the CheckBox wireless network You can change this name later Open your web browser and you should see a generic welcome screen This is the welcome screen your guests wi...

Page 6: ...a traffic that each connection will carry and will adjust this percentage on the fly Clicking on the Eth3 Eth2 or Eth1 will take you to an Internet Access Setup screen for that connection If the Inter...

Page 7: ...k Setup Wireless MultiNet Here you will see a sub menu By default only Guest Network 1 is enabled Here you disable or ena ble the network change the SSID the name the network broadcasts to devices and...

Page 8: ...te key or password used by devices connecting to the admin network This key should never be shared with guests and only shared with employees that need it to set up and manage devices on the Admin Net...

Page 9: ...are using access points connected wirelessly to your system allow 10 minutes after pressing update for the wireless access points to re configure their SSID During this period Do Not make any other s...

Page 10: ...ickets for your guests that allow them an amount of time online that you determine These tickets can be good for an amount of time ranging from 15 minutes to one year You can give these tickets away o...

Page 11: ...xt step We strongly suggest that you copy this token into a blank document to store for safekeeping Once you have completed setting up your PayPal account and have copied your identity token open the...

Page 12: ...y setting the Trial Time and Trial Period both to 60 minutes your clients will see the welcome page once every hour To enable Free Access select Access Controls in the top menu and then Free Access Se...

Page 13: ...te your code word s and select the amount of time each code word is valid for and press update Guests now need to simply type the code into the box on the welcome page and they will be let on line for...

Page 14: ...th html you can customize fonts and colors with the html tags After your guests successfully login they will see a Welcome Message If their ticket number is invalid they will see a Failed Login Mes sa...

Page 15: ...e It may look fine on your screen but may not fit on somebody else s screen File size refers to the amount of data used to record the picture information Too little data and the picture looks course b...

Page 16: ...tion marked Internet Connections you will see the IP address listed immediately under eth3 for modems plugged into port 3 eth2 for modems plugged into port 2 and eth1 for modems plugged into port 1 Th...

Page 17: ...how to enable static routing or virtual servers Due to variations between different router models CheckBox support can not assist with making changes to your office router In order to access your Chec...

Page 18: ...mote Access go to www checkboxsystems net and click on the Login on the top of the page In the Site Lookup box enter your 4 digit site ID number then press site lookup A login box will pop up requesti...

Page 19: ...a ticket number of none Here you can manually allow them online by clicking on that ticket number and selecting the amount of time you would like the client to be authorized for The third column for e...

Page 20: ...educed to a slower speed calculated to prevent them from exceeding the hourly limit you have set in the Client Usage Policy To set the Client Usage Policy select Administration on the top menu and the...

Page 21: ...from the Internet Data highlighted in brown and marked as tx is data that was uploaded to the Internet By selecting the Hourly link at the bot tom of the page you can view the total system usage for a...

Page 22: ...e from 10 to 30 However they can introduce two new problems the case of the WiFi device seeing the CheckBox but the CheckBox not being able to WiFi device mentioned above or a case where the donut is...

Page 23: ...d after a unit has joined the system it will be remembered by the system even after power failures or prolonged storage Labeling the repeaters here makes it easier to remember where they are located O...

Page 24: ...is unit to it s upstream connection The signal strength is a 5 minute average and it is normal for this to fluctuate Any unit with a low signal strength will be highlighted in Yellow or Red Units high...

Page 25: ...connected to power Outdoor units only Access points are mounted at least 20 feet off of the ground Access points are mounted at least 4 feet away from other antennas Serial number of each repeater is...

Page 26: ...he CheckBox Survey and Feedback Engine routes messages between you and your guests to any desktop or portable devices you designate allowing easy and quick follow up a great way to save time while inc...

Page 27: ...utton marked Enabled to turn on the S A F E feature The CheckBox Welcome page will now have a field where guests can enter either their email address or mobile phone number for texting You can make it...

Page 28: ...your system status You will see the name of your property the names of your access points and the status of your system Any device highlighted in red is having issues and is not online Navigate to Su...

Page 29: ...be sending The Welcome Message Title Email Subject box is the subject line of emails sent The Text Message Content box is where you enter the text message that will be sent Text messages are limited t...

Page 30: ...consolidated and sent to youremailbox Fromyour emailbox youcanreply to guest emails directly If the message from the guest originated as a text messaging there will be a link in your email to click o...

Page 31: ...rvey To create a survey navigate to Surveys AddSurvey Youcancreate andsave multiple surveys but only onesurveycanbeactive ata time Give yoursurvey a title andcreate a message to goabove yoursurvey Sur...

Page 32: ...sages Guest Contact Info Here you find a list of when the guest first and last connected to your CheckBox and their email or mobile number You can download this information to use in a spreadsheet or...

Page 33: ...ox units which may take up to 4 hours to complete Setting alerts to Aggressive will generate an alert if a CheckBox mesh node or a controller unit is late for any of it s scheduled check in cycles Thi...

Page 34: ...ntract required Guest support is provided 24 7 by professional support staff at a dedicated support number Support staff are available to assists guests connecting to the wireless service configuring...

Page 35: ...re environment In addition to technical protections only CheckBox employees who need access to the information to perform job specific tasks are granted access to guest information CheckBox claims nei...

Page 36: ...components of the system as we determine necessary The warranty does not cover damage due to improper installation use of unauthorized accessories including but not limited to external antennas and po...

Reviews: