BEAMbar™ User Manual (Rev. 1)
Page 5 of 18
2.
I
NTRODUCTION
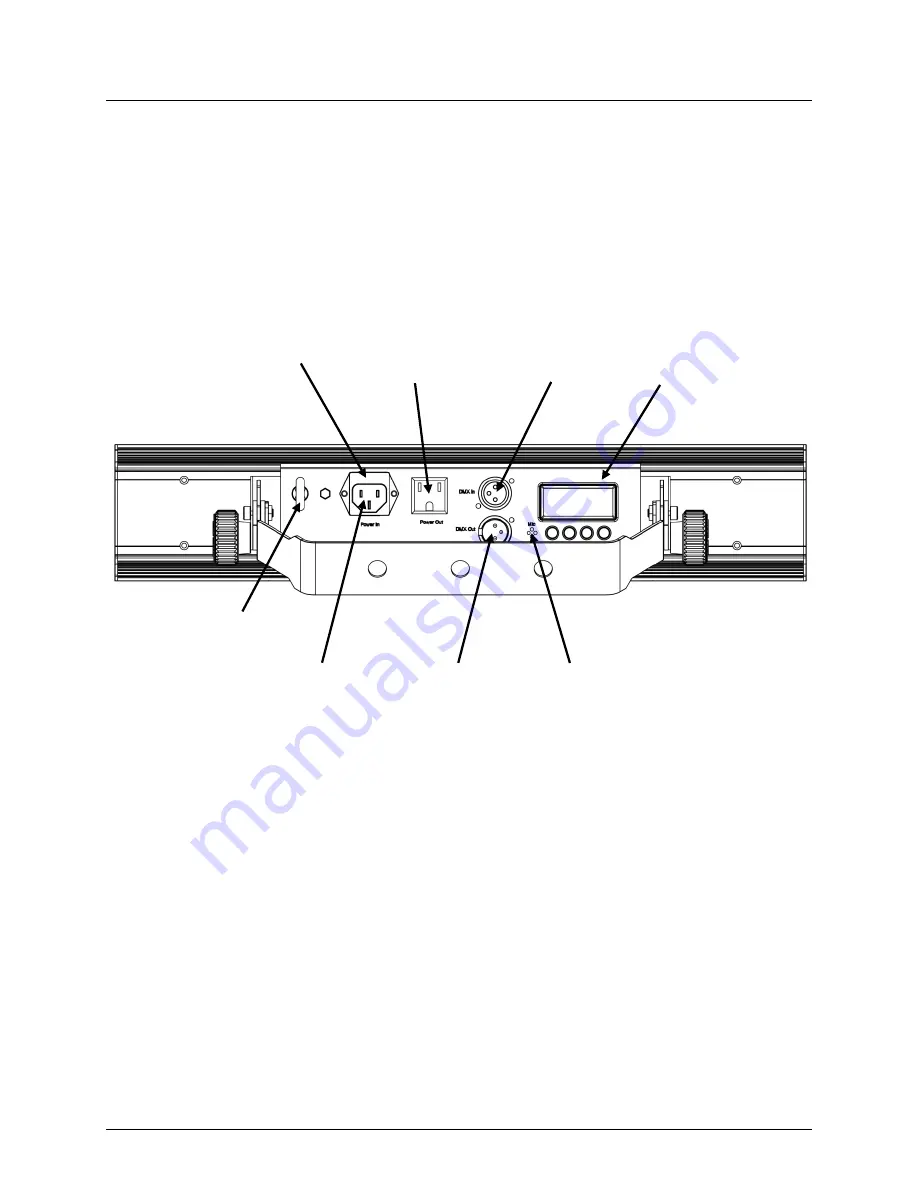
Overview
Back Panel View
Display and
Control Buttons
Safety Loop
Power In
Fuse Holder
DMX Out
DMX In
Power Out
Microphone
Page 1: ...User Manual ...
Page 2: ...9 Orientation 9 Rigging 9 4 Operation 10 Control Panel Operation 10 Menu Map 10 Configuration DMX 11 Starting Address 11 DMX Channel Modes Assignments and Values 12 5 Channel 12 4 Channel 12 Configuration Standalone 13 Show Mode Sound Active Programs 13 Sound Sensitivity 13 Automatic Mode and Speed 13 Master Slave Mode 14 Master Slave Runway Effect 14 Dimmer Speed 15 Display Background Light 15 In...
Page 3: ... one can be chosen Settings A menu option not to be modified Menu Settings A sequence of menu options to be followed ENTER A key to be pressed on the product s control panel ON A value to be entered or selected Symbols Symbol Meaning Critical installation configuration or operation information Not following these instructions may make the product not work cause damage to the product or cause harm ...
Page 4: ...make sure that the voltage of the outlet to which you are connecting the product is within the range stated on the decal or rear panel of the product The product is for indoor use only IP20 To prevent risk of fire or shock do not expose the product to rain or moisture Always install the product in a location with adequate ventilation at least 20 in 50 cm from adjacent surfaces Be sure that no vent...
Page 5: ...BEAMbar User Manual Rev 1 Page 5 of 18 2 INTRODUCTION Overview Back Panel View Display and Control Buttons Safety Loop Power In Fuse Holder DMX Out DMX In Power Out Microphone ...
Page 6: ...Page 6 of 18 BEAMbar User Manual Rev 1 Dimensions ...
Page 7: ...round to avoid the risk of electrocution or fire Never connect the product to a rheostat variable resistor or dimmer circuit even if the rheostat or dimmer channel serves only as a 0 100 switch Fuse Replacement Disconnect the product from power before replacing the fuse 1 Disconnect the product from power 2 Wedge the tip of a flat head screwdriver into the slot of the fuse holder 3 Pry the fuse ho...
Page 8: ...21 BEAMbar units on 120 VAC or up to 39 BEAMbar units on 230 VAC The power linking diagram shown above corresponds to the North American version of the product ONLY If using the product in other markets you must consult with the local CHAUVET distributor as power linking connectors and requirements may differ in your country or region 1 st Product 2 nd Product 3 rd Product Additional Products ...
Page 9: ... such as an elevated platform or a truss When rigging the product onto a truss you should use a mounting clamp of appropriate weight capacity The bracket has 13 mm holes which are appropriate for this purpose When power linking multiple products you must always consider the length of the power linking cable and mount the products close enough for the cable to reach The bracket adjustment knobs all...
Page 10: ...Selects the DMX starting address ChMd 5Ch 5 channel mode 4Ch 4 channel mode SLMd MASt Master mode SL 1 Slave mode 1 SL 2 Slave mode 2 SenS 0 100 Sound sensitivity control Auto Au 1 Au12 S 0 S100 Selects automatic program and automatic program speed slow to fast ShMd Sh 0 Sh12 Show mode Sound Active programs diMd diM1 Dimmer fast speed diM2 Dimmer middle speed diM3 Dimmer slow speed oFF Dimmer spee...
Page 11: ...ghest configurable address to 508 If unfamiliar with DMX download the DMX Primer from www chauvetlighting com To select the starting address do the following 1 Press MENU repeatedly until Addr shows on the display 2 Press ENTER and 1 509 shows on the display Note The highest starting address that shows on the display is determined by the DMX personality that is currently selected 3 Use UP or DOWN ...
Page 12: ...nel Function Value Setting 1 Dimmer 000 ó 255 0 100 2 Shutter 000 ó 010 No function 011 ó 255 Strobe slow to fast 3 Chase 000 ó 010 No function 011 ó 030 Chase 1 031 ó 050 Chase 2 051 ó 070 Chase 3 071 ó 090 Chase 4 091 ó 110 Chase 5 111 ó 130 Chase 6 131 ó 150 Chase 7 151 ó 170 Chase 8 171 ó 190 Chase 9 191 ó 210 Chase 10 211 ó 230 Chase 11 231 ó 250 Chase 12 251 ó 255 Sound Active mode 4 Speed 0...
Page 13: ...h 0 Sh12 shows on the display 3 Use UP or DOWN to select the desired Sound Active program 4 Press ENTER The product will only respond to low frequencies of music bass and drums Sound Sensitivity To set the sound sensitivity do the following 1 Press MENU repeatedly until SenS shows on the display 2 Press ENTER and 0 100 shows on the display 3 Use UP or DOWN to select the desired sound sensitivity 4...
Page 14: ...Slave operation because the controller may interfere with the signals from the master unit Do not connect more than 31 slave units to the master unit Master Slave Runway Effect The Master Slave Runway effect enables a single BEAMbar unit the master to control the actions of one other BEAMbar unit the slave in sequential order for a runway effect without the need of a DMX controller Once set and co...
Page 15: ...ty To select the time for the display s background light follow the instructions below 1 Press MENU repeatedly until Led shows on the display 2 Press ENTER and 30S 20S 10s or on shows on the display 3 Use UP or DOWN to select 30S off after 30 seconds 20S off after 20 seconds 10S off after 10 seconds or on remains on 4 Press ENTER Information With the BEAMbar you can access information on the produ...
Page 16: ...from power Wait until the product is at room temperature Use a vacuum or dry compressed air and a soft brush to remove dust collected on the external surface vents Clean all external optics and glass transparent surfaces with a mild soap solution ammonia free glass cleaner or isopropyl alcohol Apply the solution directly to a soft lint free cotton cloth or a lens cleaning tissue Softly wipe any di...
Page 17: ...A 0 3 A Power linking current units 8 A 21 units 8 A 39 units Fuse T 1 A 250 V T 1 A 250 V Power I O US Worldwide UK Europe Power input connector IEC IEC Power output connector Edison IEC Power Cord plug Edison US Local plug Light Source Type Power Lifespan LED 6 W 50 000 hours Color Quantity Current White 5 1 9 A Photo Optic Parameter Illuminance 2 m 17 300 lx per pod Beam angle 4º Strobe rate 0 ...
Page 18: ...ET will refuse any product returned without an RMA number Write the RMA number on a properly affixed label DO NOT write the RMA number directly on the box Before sending the product clearly write the following information on a piece of paper and place it inside the box Your name Your address Your phone number The RMA number A brief description of the problem Be sure to pack the product properly An...