background image

Ergostyle ™ FX Tables

26

8 SCHEMATICS

Daughter Board- 58543

1 of 1

Summary of Contents for ERGOSTYLE FX 5820

Page 1: ... 2006 Encore Medical L P Model 5820 Manual Drops Model 5822 Auto Drops Applies to Serial numbers 1000 and above SERVICEMANUAL ISO 13485 Certified ...

Page 2: ...T INTERRUPT SWITCH TEST 9 4 7 AUTO FLEXION AND AUTO DROP TESTS 9 5 REMOVAL AND REPLACEMENT 10 5 1 POWER SUPPLY REMOVAL AND REPLACEMENT 10 5 2 DAUGHTER BOARD REMOVAL AND REPLACEMENT MANUAL TABLE ONLY 12 5 3 DRIVER BOARD REMOVAL AND REPLACEMENT 13 5 4 CONTROL BOARD ASSEMBLY REMOVAL AND REPLACEMENT AUTO FLEXION ONLY 14 5 5 MOTOR REMOVAL AND REPLACEMENT 15 5 6 DROP ASSEMBLY REMOVAL AND REPLACEMENT 17 ...

Page 3: ...m in lieu of reprinting a complete manual prematurely These service bulletins will provide updated service information and technological improvements to the Ergostyle FX Tables for use by certified service technicians Due to the complex nature of the technology utilized by Chattanooga Group the recommended troubleshooting techniques are to determine Bad Board and board replacement only No board co...

Page 4: ...t or recommended by Chattanooga Group The safety of other products has not been established and their use could result in injury to the patient This unit should be transported and stored in temperatures between 0 F and 140 F 18 C and 60 C to prevent damage to the unit or its components DO NOT operate this unit in an environment where other devices are being used that intentionally radiate electrom...

Page 5: ...lts nuts and screws used to assemble the Ergostyle FX are SAE Therefore it will be necessary to obtain SAE tools for removal and replacement of components The table base should never be operated in an out of level position to the horizontal ground plane greater than 5 Always use both hands when changing the angle of any section up or down Never place your hands or feet near the working mechanism o...

Page 6: ...ire or personal injury Your unit was constructed to operate only on the electrical voltage specified on the Voltage Rating and Serial Number Plate Contact the Chattanooga Group dealer if the unit is not properly rated Power Supplies retain High Voltage The Ergostyle FX is a prescription device to be used only under the supervision of and by the order of a physician or other licensed health care pr...

Page 7: ...le Flexion Lock Pelvic Drop Cocking Lever Lateral Flexion Lever Power Supply Control Board Housing Foot Control Fixed Glide Levelers Lumbar Drop Cocking Lever Thoracic Drop Cocking Lever Lower Frame Assembly 1 2 3 4 5 6 7 8 9 10 11 12 13 Adjustable Glide Leveler Safety Covers Forward Toggle Drop Tension Control Forward Drop Cocking Lever Head Cushion Width Adjustment Head Cushion Chest Section Tho...

Page 8: ...inuous Use Maximum Flexion Angle Manual 17 Maximum Extension Angle Manual 14 Maximum Flexion Angle AutoFlexion 15 Maximum Extension Angle AutoFlexion 12 Side Bending 40 AutoFlexion Speed 0 5 second to 6 5 second Length Head to Toe 69 5 76 177 cm 193 cm Height 19 32 48 81 cm Width 28 5 72 cm Air Compressor Not Provided 100 psi Minimum Operating Capacity Meets Directives 93 42 EEC IEC UL EN 60601 1 ...

Page 9: ...neral Tests and Repair Procedures 1 Certain tests and repair procedures may require the use of special tools and or fixtures These will be listed at the particular test where they are required Testing with any other special tool or fixture other than those stated could give erroneous readings or test results Always perform the tests exactly as stated to ensure accurate results 2 Test equipment set...

Page 10: ...osed metal or screw on the unit See Figure 4 1 NOTE U S A Power Cord Illustrated 4 4 LEAKAGE TESTS Test Voltage Spec 1500 V Conduct all necessary leakage tests as required per Chapter 7 Electrical Equipment of the 1999 or later edition of the NFPA National Fire Protection Association Health Care Facilities standards See Figure 4 2 NOTE The NFPA Health Care Facilities standards are specific to the ...

Page 11: ... completely seated in the Patient Interrupt Switch receptacle See Figure 2 1 item 26 3 Set up a treatment refer to User Manual and press the START STOP button 4 Press the Patient Interrupt Switch to stop the treatment D Test Result 1 If table stops when the Patient Interrupt Switch is depressed unit passed test 2 If unit does not stop repeat test with a known good Patient Interrupt Switch 3 If kno...

Page 12: ...2 3 Remove the wires from the input side of the Power Supply See Figure 5 3 NOTE Make note of the wire color and locations for installation to new Power Supply 5 REMOVAL REPLACEMENT FIGURE 5 1 FIGURE 5 2 5 1 POWER SUPPLY REMOVAL AND REPLACEMENT Unplug the unit from the power source before attempting removal or replacement procedures to prevent electrical shock Power Supplies retain High Voltage FI...

Page 13: ... prevent electrical shock 3 Tilt the table so that access to the Power Supply Mounting Screws can be obtained Remove the four Power Supply Mounting Screws using the 2 Phillips Screwdriver See Figure 5 4 D Replacing Power Supply Replace in reverse order of removal Refer to Figures 5 2 and 5 3 for wire installation Power Supplies retain High Voltage FIGURE 5 4 POWER SUPPLY MOUNTING SCREWS ...

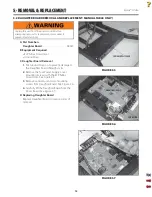
Page 14: ...Removal 1 Put Ground Strap on to prevent damage to the Daughter Board through static 2 Remove the four Power Supply Cover Mounting Screws with the 2 Phillips Screwdriver See Figure 5 5 3 Remove connector and two mounting screws from Daughter Board See Figure 5 6 4 Carefully lift the Daughter Board from the Driver Board See Figure 5 7 D Replacing Daughter Board Replace Daughter Board in reverse ord...

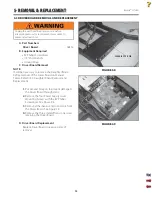
Page 15: ...move the Daughter Board before removal of the Driver Board on Manual Tables Refer to 5 2 Daughter Board Removal and Replacement 1 Put Ground Strap on to prevent damage to the Driver Board through static 2 Remove the four Power Supply Cover Mounting Screws with the 2 Phillips Screwdriver See Figure 5 8 3 Remove all harnesses and connectors from the Driver Board See Figure 5 9 4 Remove the three sta...

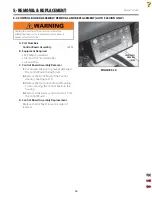
Page 16: ...ips Screwdriver 3 8 and 7 16 End Wrenches Ground Strap C Control Board Assembly Removal 1 Put Ground Strap on to prevent damage to the Control Board through static 2 Remove the Front Panel of the Control Housing See Figure 5 10 3 Remove the four Control Board Mounting Screws securing the Control Board to the housing 4 Remove all harnesses and connectors from the Control Board D Control Board Assem...

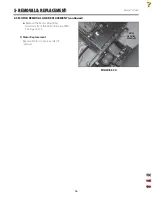
Page 17: ...e in the Up position as shown in Figure 5 11 to remove all possible tension from the spring mechanism 2 Raise or remove the cushion to allow access to the motor mounting hardware 3 Remove the four Power Supply Cover Mounting Screws with the 2 Phillips Screwdriver See Figure 5 12 4 Disconnect the Motor Connector from the Driver Board Tension Connector See Figure 5 13 5 Remove Motor Cable from the P...

Page 18: ...REPLACEMENT 5 5 MOTOR REMOVAL AND REPLACEMENT continued 6 Remove the Motor Mounting Hardware from the Motor Base and Rod See Figure 5 14 D Motor Replacement Replace Motor in reverse order of removal FIGURE 5 14 MOTOR MOUNTING HARDWARE ...

Page 19: ...on a Manual Drop Table go to step 3 2 Remove the four screws from top of the Pneumatic Cylinder See Figure 5 16 3 Remove the hardware securing the Drop Assembly to the frame See Figure 5 17 D Drop Assembly Replacement Replace Drop Assembly reverse order of removal 5 REMOVAL REPLACEMENT 5 6 DROP ASSEMBLY REMOVAL AND REPLACEMENT Unplug the unit from the power source before attempting removal or repl...

Page 20: ...3 degrees If 13 degrees cannot be obtained raise the Pelvic Section to the mechanical limit Manually hold the Pelvic Section in position 7 Press the START STOP button 8 When the display reads Move Table to 16 then press start manually adjust the Flexion Angle down until the Digital Inclinometer reads 16 0 degrees If 16 degrees cannot be obtianed lower the Pelvic Section to the mechanical limit Man...

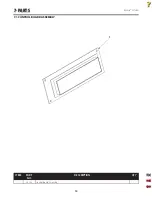
Page 21: ...19 Ergostyle FXTables 7 1 CONTROL BOARD ASSEMBLY 7 PARTS ITEM PART NO DESCRIPTION QTY 1 58554 Control Board Assembly 1 1 ...

Page 22: ...20 Ergostyle FXTables 7 PARTS 7 2 DROPS ITEM PART NO DESCRIPTION QTY 1 95544 Lumbar and Pelvic Drop Assembly 1 2 95524 Thoracic Drop Assembly 1 1 2 ...

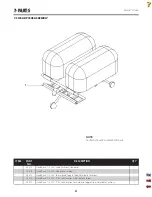
Page 23: ...Piece Tilt 20 Adjustable Cushions 1 58475 Head Piece Tilt 20 Forward and Toggle Drop Adjustable Cushions 1 58473 Head Piece Tilt 20 9 23cm Elevation Adjustable Cushions 1 58472 Head Piece Tilt 20 9 23cm Elevation Forward and Toggle Drop Adjustable Cushions 1 7 3 HEAD PIECE ASSEMBLY 1 NOTE Cushions must be replaced in pairs ...

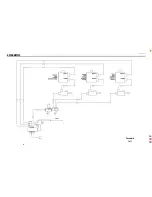
Page 24: ...Ergostyle FXTables 22 8 SCHEMATICS Block Diagram 1 of 1 ...

Page 25: ...Ergostyle FXTables 23 8 SCHEMATICS Pneumatic 1 of 1 ...

Page 26: ...Ergostyle FXTables 24 8 SCHEMATICS Driver Board 58432 1 of 1 ...

Page 27: ...Ergostyle FXTables 25 8 SCHEMATICS Control Board 58433 1 of 1 ...

Page 28: ...Ergostyle FXTables 26 8 SCHEMATICS Daughter Board 58543 1 of 1 ...

Page 29: ... product misuse including but not limited to the failure to provide reasonable and required maintenance or any use that is inconsistent with the Product User s Manual COMPANY SHALL NOT BE LIABLE IN ANY EVENT FOR INCIDENTAL OR CONSEQUENTIAL DAMAGES Some locations do not allow the exclusion or limitation of incidental or consequential damages so the above limitation or exclusion may not apply to you...

Page 30: ...duct misuse including but not limited to the failure to provide reasonable and required maintenance or any use that is inconsistent with the Product User s Manual COMPANY SHALL NOT BE LIABLE IN ANY EVENT FOR INCIDENTAL OR CONSEQUENTIAL DAMAGES Some locations do not allow the exclusion or limitation of incidental or consequential damages so the above limitation or exclusion may not apply to you To ...

Page 31: ...7343 U S A 1 423 870 2281 1 800 592 7329 U S A 1 800 361 6661 CANADA 1 423 870 7200 OUTSIDE U S A 1 423 870 2046 OUTSIDE U S A FAX chattgroup com Medical Device Safety Service MDSS Burckhardtstr 1 D 30163 Hannover Germany Telephone 49 5103 939430 0413 ISO 13485 Certified ...

Reviews: