background image

11


REV 92500-20140519

ENGLISH


92500

ASSEMBLy

The recommended oil type is 10W-30 automotive 
oil. 

NOTE

Weather will affect engine oil and engine 
performance. Change the type of engine oil used 
based on weather conditions to suit the engine 
needs.

NOTE

The engine is equipped with a low oil shut-off and 
will stop when the oil level in the crankcase falls 
below the threshold level.

CAUTION

Add Engine Oil

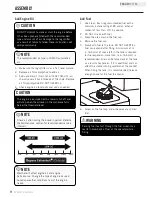
1.  Make sure the log splitter is on a flat, level surface.
2.  Remove oil fill cap/dipstick to add oil.
3.  Add upto 0.6 qt. (0.6 L) of oil (SAE 10W-30) - oil 

should cover all but 2 threads of filler hole. Replace 
oil fill cap/dipstick. DO NOT OVERFILL.

4.  Check engine oil level daily and add as needed.

DO NOT attempt to crank or start the engine before 
it has been properly filled with the recommended 
type and amount of oil. Damage to the log splitter 
as a result of failure to follow these instructions will 
void your warranty.

CAUTION

Check oil often during the break-in period. Refer to 
the Maintenance section for recommended service 
intervals.

NOTE

Add Fuel

1.  Use clean, fresh, regular unleaded fuel with a 

minimum octane rating of 85 and an ethanol 
content of less than 10% by volume.

2.  DO NOT mix oil with fuel.
3.  Clean the area around the fuel cap. 
4.  Remove the fuel cap.
5.  Slowly add fuel to the tank. DO NOT OVERFILL. 

Fuel can expand after filling. A minimum of ¼ 
in. (6.4 mm) of space left in the tank is required 
for fuel expansion, more than ¼ in. (6.4 mm) is 
recommended. Fuel can be forced out of the tank 
as a result of expansion if it is overfilled, and can 
affect the stable running condition of the product. 
When filling the tank, it is recommended to leave 
enough space for the fuel to expand.

Pouring fuel too fast through the fuel screen may 
result in blow back of fuel at the operator while 
filling.

WARNING

6.  Screw on the fuel cap and wipe away any spilled 

fuel.

Summary of Contents for 92302

Page 1: ...on LOG SPLITTER SAVE THESE INSTRUCTIONS Important Safety Instructions are included in this manual MADE IN CHINA REV 92500 20140519 92500 MODEL NUMBER 12039 Smith Ave Santa Fe Springs CA 90670 USA 1 87...

Page 2: ...t contains chemicals known to the State of California to cause cancer birth defects or other reproductive harm AN IMPORTANT MESSAGE ABOUT TEMPERATURE Your Champion Power Equipment product is designed...

Page 3: ...15 Operation at High Altitude 16 Maintenance and Storage 17 Engine Maintenance 17 Oil 17 Spark Plugs 17 Air Filter 17 Log Splitter Maintenance 17 Cleaning 18 Maintenance Schedule 18 Storage 18 Log Spl...

Page 4: ...date and place of purchase for future reference Have this information available when ordering parts and when making technical or warranty inquiries Accessories Champion Power Equipment manufactures an...

Page 5: ...tween different kinds of information The safety symbol is used with a key word to alert you to potential hazards in operating and owning power equipment Follow all safety messages to avoid or reduce t...

Page 6: ...your log splitter Failure to follow instructions could result in serious injury or death WARNING WARNING Sparks can result in fire or electrical shock DANGER When servicing the engine Disconnect the s...

Page 7: ...ights heat and other sources of ignition In most states towing on public streets is either prohibited or would require further licensing or modifications Please check with your local authorities or DM...

Page 8: ...erious infection or reaction can develop if proper medical treatment is not administered immediately 8 Keep the operator zone and adjacent area clear for safe secure footing 9 If your log splitter is...

Page 9: ...use It is possible for connections to vibrate loose over time 3 Never leave the machine unattended with the power source operating 4 Never operate the machine when under the influence of alcohol drugs...

Page 10: ...cm x 22 6 in 57 5 cm stroke Rated to 3900 psi 4 Control Valve Handle Controls the movement of the cutting wedge 5 Wedge 6 Splitting Beam 7 Engine 224cc OHV 8 Tires Maximum travel speed is 45 MPH 72 K...

Page 11: ...plastic shipping caps from the wheel hubs 2 Slide the wheel 59 onto the axle a Be sure the tire valve stem is facing out 3 Thread the castle nut 57 on the axle and tighten by hand Use a wrench to tigh...

Page 12: ...top of the pump A 3 Connect hose to control valve first then connect the other end to the pump Connect one end of the 4 Block the wheels to prevent the frame from rolling 5 Pivot the beam to the horiz...

Page 13: ...s on the control valve and the oil filter Both ends are secured with hose clamps Notice how the hose is placed through the retainer ring on the beam This holds the hose close to the frame so it does n...

Page 14: ...e log splitter as a result of failure to follow these instructions will void your warranty CAUTION Check oil often during the break in period Refer to the Maintenance section for recommended service i...

Page 15: ...ed by using improper fuel improperly stored fuel and or improperly formulated stabilizers are not covered by manufacture s warranty It is advisable to always shut off the fuel supply run the engine to...

Page 16: ...45 mph 72 kph could result in serious injury or death Always adjust your towing speed according to the terrain and conditions 5 Always disconnect the log splitter from the towing vehicle before operat...

Page 17: ...otate the fuel valve to the ON position Item B 4 Move the throttle lever Item C to the Fast position 5 Move the choke lever Item D to the Choke position 6 Pull the starter cord slowly until resistance...

Page 18: ...mbedded or will not split completely push the control handle in the reverse direction and allow the splitter to strip the log from the wedge ALWAYS keep hands clear of the log and wedge while it is re...

Page 19: ...n the Technical Bulletin area of the Champion Power Equipment internet site The part number and recommended minimum altitude for the application of the high altitude carburetor main jet is listed in t...

Page 20: ...t clean and stored properly Only operate the unit on a flat level surface in a clean dry operating environment DO NOT expose the unit to extreme conditions excessive dust dirt moisture or corrosive va...

Page 21: ...air compressor 25 PSI to clear dirt and small debris Wipe all metal parts with an oily rag to help prevent rust and corrosion Storage Refer to the Maintenance section for proper cleaning instructions...

Page 22: ...nance Valve Clearance Intake 0 13 0 17 mm 0 005 0 007 in Exhaust 0 18 0 22 mm 0 007 0 009 in Note Tech bulletin regarding the valve adjustment procedure is on www championpowerequipment com Spark Plug...

Page 23: ...ated area Wedge movement is slow or erratic Air in the hydraulic oil system Purge air by extending and retracting the wedge several times until motion is smooth Debris lodged in beam guides Clear debr...

Page 24: ...7 67 51 50 22 65 19 5 25 21 22 27 28 24 23 5 26 30 31 32 33 34 33 47 48 46 42 44 43 40 39 49 52 54 12 11 64 59 58 60 58 57 56 61 20 62 5 TO A A TO B TO C TO D B C D 18 55 4 TO E E TO F F 41 37 36 35...

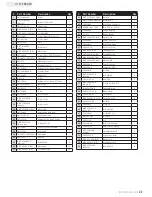
Page 25: ...22G 17 Oil Pipe 1 35 GB T 5783 2000 M8 30 Bolt M8 30 4 36 GB T 95 2000 8 Washer 8 16 37 GB T 93 1987 8 Lock Washer 8 16 Part Number Description Qty 38 GB T 6170 2000 M8 Nut M8 10 39 GB T 77 2000 M6 10...

Page 26: ...40 41 42 43 44 45 46 47 48 49 50 51 52 53 54 55 56 57 58 59 60 61 62 63 64 65 66 67 68 69 70 71 72 73 74 76 77 78 79 80 81 82 83 84 85 86 87 88 89 90 91 92 93 94 95 96 97 98 100 101 102 103 104 105 10...

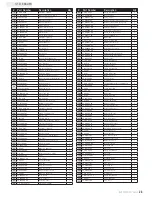
Page 27: ...0 14 2 65 23 040002 02 Valve Intake 1 66 23 040006 02 Valve Exhaust 1 67 26 080400 00 Air Guide Lower 1 68 2 15 002 F6RTC Spark Plug F6RTC 1 Part Number Description Qty 69 1 5789 0855 Flange Bolt M8 5...

Page 28: ...se and Maintenance This warranty will not apply to parts and or labor if this log splitter is deemed to have been misused neglected involved in an accident abused loaded beyond its limits modified and...

Page 29: ...l system is warranted for two years subject to provisions set forth below If during the warranty period emission related part on your engine is defective in materials or workmanship the part will be r...

Page 30: ...ement point for that part If the part fails prior to the first scheduled replacement the part shall be repaired or replaced by CPE according to Subsection d below Any such emissions related part repai...

Page 31: ...ets Carburetor Purge Port Connector TO OBTAIN WARRANTY SERVICE You must take your CPE engine or the product on which it is installed along with your warranty registration card or other proof of origin...

Reviews: