background image

Initial Operation:

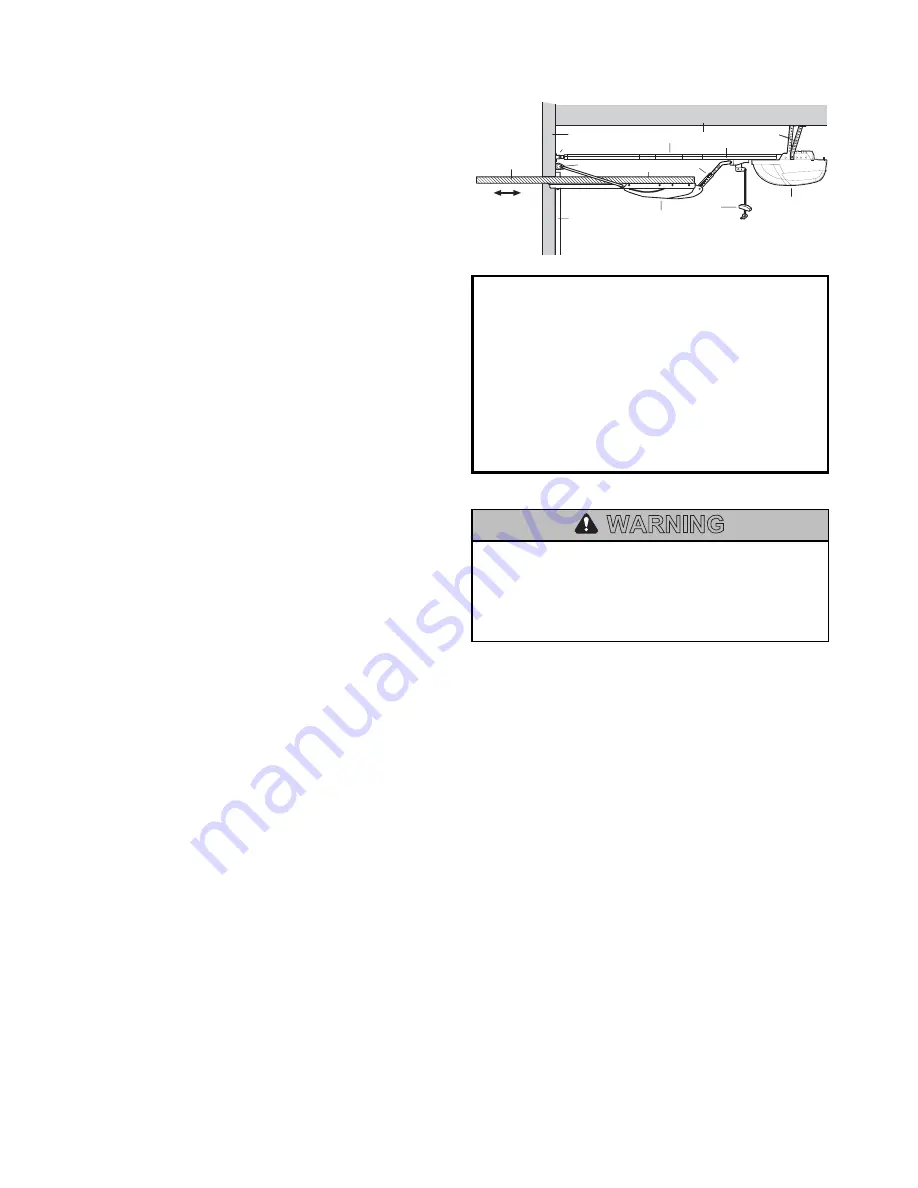
The Chamberlain Arm™ has been designed so that, when used

with a Chamberlain manufactured operator, the door will open to

a fully horizontal position (Figure 16).

Note:

The door may be designed in such a way that it does not

open to the full horizontal. Adjust the UP limit so that the door

stops at a slightly downward angle when open.

Note: 

Safety reversing sensors (Protector System) must be

installed, please refer to your owner´s manual before

proceeding to Setting the limits and learning the force:
Setting the limits and learning the force:
When returning to your Owner’s Manual, adjust the trolley travel

limits as follows:
1. With the inner and outer trolley sections still disconnected,

manually open your door to the horizontal position. Make a

mark on the rail where the end of trolley nearest to the

operator stops.

2. Manually close the door and mark the rail where the end of

the trolley nearest the door stops.

3. With the inner and outer trolley sections still disconnected,

activate the operator and adjust the limits following the

owners manual of the garage door opener, until the inner

trolley stops on the marks you made. For models ML700,

ML750, ML850 please read section #15, setting limits

manually as found in the HAVING A PROBLEM section in

your owner’s manual. While setting the door limits manually,

leave door and operator disconnected at all times.

4. Reconnect the inner and outer trolley sections so the door is

connected to the operator.

5. Force must be learned after completion of the limit settings.

For models ML700, ML750, ML850 please read section #26

in Garagedoor Opener Manual. 

6. Run the operator again to ensure the door is opening and

closing correctly.

Continue with the instructions in your Owner’s Manual.

Having a problem?

1. Pull the manual release handle to disengage the trolley.
2. Lift the door about halfway. Release the door. It should stay in

place, supported entirely by its springs.

3. Raise and lower the door to see if there is any binding or

sticking. If your garage door binds, sticks or is out of balance,

call a professional garage door service engineer.

Note:

Lubricate the inside and outside of the rail. 

Note:

In some cases you may find the door will not open fully

until the force has been set.

Note:

In rare installations, the canopy door may touch the

operator rail when closing. This is NOT the fault of the operator

or arm. If this occurs:
1. Manually check the operation of the canopy door to ensure

that it is closing easily. The door must have a slight drop at

the start of closing.

2. If the door is not running easily, check that the side wires are

not catching or binding on the wire guides. Move the guides

until the wires run free.

3. Raise the operator head by about 50mm (2”) vertically so

there is a slight downward angle on the rail. 

4. The door spring may be over tensioned.

6

8

3

12

2

9

13

11

7

14

15

4

5

10

1

1. Header wall
2. Header bracket
3. Garage door opener rail
4. Ceiling
5. Garage door opener

hanging brackets

6. Trolley
7. Extension arm
8. Garage door
9. Garage door spring

10. Operator

11. Garage door opener

manual release 

12. Chamberlain Arm™
13. Garage door track
14. Garage door, should be

horizontal in fully open

position

15. Use limit adjustment of

garage door opener to

level the garage door

FIGURE 16

Do not attempt to adjust the spring. Call a local

garage door installing professional. 

The Protector System™ (a safety reversing sensor

accessory) must be installed, if the Chamberlain

Arm is used (model 770EML).

WARNING

114A3167C-GB

7

Summary of Contents for MotorLift 1703EML

Page 1: ...n benutzen Bitte alle Sicherheitsvorschriften auf Seite 1 der Montageanleitung für Garagentorantriebe beachten Prüfen ob das Tor und alle beweglichen Teile in gutem Betriebszustand sind und einwandfrei funktionieren wenn das Tor von Hand betätigt wird Vor Einbau des Torarms alle beweglichen Teile des Garagentors gut einfetten Das Holzrahmenwerk zu beiden Seiten des Garagentors und über dem Tor muß...

Page 2: ...oppelschienentoren ist die Laufschienenbefestigungskonsole wie in der Betriebsanleitung gezeigt 50mm über dem höchsten Punkt des Torlaufs anzubringen Canopy Kipptor in Standardausführung Canopy Kipptore sind zur Montage am Holzrahmenwerk bestimmt und werden normalerweise ohne Torrahmen geliefert Wenn diese Situation zutrifft ist zunächst festzustellen ob die Laufschienenbefestigungskonsole wie in ...

Page 3: ...eferten Verriegelungsmechanismen betätigt wird VORSICHT 1 1 3 4 ABB 3 Handentriegelungsseil bzw Griff fest nach unten und hinten ziehen und damit den äußeren vom inneren Laufschlitten trennen Abb 6 Verbindungsarm unter Benutzung des mit der Antriebseinrichtung für das Garagentor gelieferten Befestigungsbolzens und des Befestigungsrings mit dem äußeren Laufschlitten verbinden und sichern Verbindung...

Page 4: ...ten dargestellt nach jeweiligen speziellen Erfordernisse anlegen und markieren Tor ohne stehende Kante Lappen der Schablone nach hinten biegen Abb 7 Um die richtige Anordnung der Löcher in der Vertikalen zu erzielen Schablone mit Unterkante des Lappens wie in Abb 8 dargestellt auf Oberkante des Tors stellen Tor mit stehender Kante Um beim Tor mit stehender Kante die richtige Anordnung der Löcher i...

Page 5: ...ners und die Mittellinie des Torarms müssen übereinstimmen um zu verhindern daß der Arm während des Betriebs klemmt 3 Ausrichtung nochmals überprüfen und wenn ungenügend korrigieren 4 Bei ganz geschlossenem Tor den äußeren Laufschlitten mit anmontiertem Verbindungsarm an den Torarm heranführen Verbindungsarm ausrichten und in den Torarmschlitz einführen Abb 14 Wichtig Torarm nicht dem Verbindungsa...

Page 6: ...enen Arm verwenden der mit dem Chamberlain Torarm mitgeliefert wird 4 Den mitgelieferten gebogenen Torarm mit allen Teilen wie abgebildet verbinden Wenn Sie den Laufschlitten entriegeln können Sie ihn während der Installation mühelos in jede Richtung schieben M8 Schrauben und Kontermuttern nicht im Lieferumfang enthalten einlegen 5 Schrauben voll anziehen und daraufhin ein halbe Drehung zurückdreh...

Page 7: ...0 lesen Sie bitte Abschnitt Nr 26 der Bedienungsanleitung dieser Antriebe 6 Antrieb erneut laufen lassen um sicherzustellen dass das Tor korrekt auf und zufährt Daraufhin weiter den Anweisungen in Ihrem Benutzerhandbuch folgen Haben Sie ein Problem 1 Zur Entriegelung des Laufwagens Entriegelungsgriff ziehen 2 Tor etwa bis zur Hälfte auffahren Wenn das Tor losgelassen wird sollte es an dieser Stell...

Page 8: ...all safety warnings on Page one of your garage door operator owner s manual Ensure that the door and all its operating gear is in good condition and works easily when it is manually operated Lubricate all garage door working parts before installing the door arm Ensure that the timber or metal garage door frame on both sides and above the door is in good and sound condition and is securely fixed to...

Page 9: ...eader bracket to be fitted directly above the garage door you should see page 6 text with this instruction For dual track doors install the header bracket 50mm 2 above the high point of door travel as shown in the Owner s manual Standard canopy garage doors Canopy doors are normally provided without a frame for fixing to a timber frame In this case ensure header bracket is located as shown below 1...

Page 10: ...ator Ensure that turning the outside handle will not actuate ANY of the locking mechanisms supplied with the door CAUTION 1 1 3 4 FIGURE 3 Disengage the outer trolley from the inner trolley by pulling down the manual release rope and handle Figure 6 Connect and secure the extension arm to outer trolley with the clevis pin and ring fastener provided with the garage door operator Unbolt the extensio...

Page 11: ...ent types of doors Position and mark holes as directed below based on your requirements Door without a Lip Bend back tabs on the template Figure 7 Rest the bottom of the tabs on the top of the door as shown in Figure 8 door without a lip This provides proper vertical replacement of holes Door with a Lip For a door with a lip as shown in Figure 9 do not bend back the tabs on the template Instead po...

Page 12: ... of the garage door opener and the centerline of the door arm should match to prevent binding of the arm in operation 3 Recheck and if not aligned correct 4 With the door fully closed slide outer trolley with extension arm connected against door arm Line up the extension arm and insert into slot in door arm Figure 14 Note Do not move the door arm to meet the extension arm move the extension arm to...

Page 13: ...cut down door arm to the trolley as shown Do not use the slotted arm supplied with the Chamberlain Door Arm 4 Take the curved door arm supplied with the Garage Door Opener and fit all as shown together If you disconnect the trolley you can move it easily in any position for the installation Use M8 screws with lock nuts not supplied 5 Tighten the screws fully and back them off again 1 2 turn Open t...

Page 14: ...sure the door is opening and closing correctly Continue with the instructions in your Owner s Manual Having a problem 1 Pull the manual release handle to disengage the trolley 2 Lift the door about halfway Release the door It should stay in place supported entirely by its springs 3 Raise and lower the door to see if there is any binding or sticking If your garage door binds sticks or is out of bal...

Page 15: ...n première page du manuel d utilisation de votre opérateur de porte de garage Assurez vous que la porte et tous ses pignons sont en bonne condition et fonctionnent facilement en mode manuel Lubrifiez toutes les pièces motrices de votre porte de garage avant d installer le bras de porte Assurez vous que les deux côtés et le haut du cadre en tasseaux de votre porte de garage sont en bonne et solide ...

Page 16: ...u texte accompagnant ces instructions Dans le cas des portes à double glissières veuillez installer la cornière d en tête de 50mm au dessus du point mort haut de la porte comme illustré dans le manuel d utilisation Porte basculante standard Les portes basculantes sont en général fournies sans cadre afin d être installées sur un cadre en tasseaux Dans ce cas assurez vous que la cornière d en tête e...

Page 17: ... une rotation de la poignée extérieure n actionne AUCUN des mécanismes de verrouillage fournis avec la porte 1 1 3 4 FIGURE 3 Désengagez le chariot extérieur du chariot in térieur en tirant d un cou sec vers le bas et en relâchant la corde et la poignée de relâchement manuel comme illustré sur la figure 6 Attachez et serrez le bras d extension sur le chariot extérieur à l aide de la clavette et de...

Page 18: ...trous comme indiqué ci dessous en fonction de vos besoins Porte sans lèvre inférieure Pliez les languettes en arrière sur le modèle comme indiqué sur la figure 7 Faites reposer le bas des languettes sur le sommet de la porte comme indiqué sur la figure 8 pour les portes ne comportant pas de lèvre inférieure Ceci fournit un positionnement vertical correct pour les trous Porte avec lèvre inférieure ...

Page 19: ... médiane du bras de porte doivent être alignées pour éviter que le bras ne se torde pendant le fonctionnement de l opérateur 3 Vérifiez à nouveau et corrigez au besoin 4 La porte étant complètement fermée faites glisser le chariot extérieur le bras d extension étant connecté contre le bras de porte Alignez le bras d extension et insérez le dans la fente du bras de porte comme illustré sur la figur...

Page 20: ...tilisez pas le bras rainuré fourni avec le bras de porte Chamberlain Arm 4 Prenez le bras de porte courbé fourni avec l ouvre porte de garage et assemblez le tout comme illustré Si vous déconnectez le chariot vous pourrez le déplacer facilement dans n importe quelle position pour l installation Utilisez des vis M8 avec des écrous de blocage non fournis 5 Serrez les vis complètement puis faites les...

Page 21: ...rer que la porte s ouvre et se ferme correctement Poursuivre les opérations comme indiqué dans votre manuel utilisateur Dépannage 1 Tirer sur la poignée de déverrouillage pour déverrouiller le chariot 2 Ouvrir la porte environ jusqu à mi course Lorsque vous relâchez la porte à cet endroit elle doit rester en position en étant seulement maintenue par la force des ressorts 3 Lever et abaisser la por...

Page 22: ...urpost Bekijk alle veiligheids waarschuwingen op pagina één van de handleiding voor uw garagedeuropener Zorg ervoor dat de deur en alle werkende delen in goede staat verkeren en dat deze gemakkelijk met de hand te bedienen is Vet alle werkende delen van de garagedeur in voordat u de deurarm installeert Zorg ervoor dat het houten garagedeurkozijn aan beide kanten en boven de deur in goede en degeli...

Page 23: ...nstalleert u de kopsteun 51 mm 2 boven het hoogste punt waar de deur komt zoals in de handleiding is aangegeven Standaard overhead deur Overhead deuren worden meestal geleverd zonder kozijn om aan een houten kozijn bevestigd te worden In dat geval moet u ervoor zorgen dat de kopsteun zich bevindt op de plaats die in onderstaande afbeelding wordt aangegeven 113 5 mm 17 mm 1 2 3 4 5 5 3 7 If the doo...

Page 24: ...ndrijving te voorkomen zorg ervoor dat door het draaien van de buitenhandgreep GEEN van de vergrendelingsmechanismen die bij de deur geleverd zijn worden geactiveerd VOORZICHT 1 1 3 4 AFB 3 Koppel de buitenslede van de binnenslede los door scherp naar beneden en naar achteren aan het noodontkoppelingskoord te trekken Afbeelding 6 Verbind de armverlenging met de buitenslede en maak deze vast met de...

Page 25: ...de vereisten Deur zonder uitstekende rand Vouw de tabs aan de mal naar achteren Afbeelding 7 Laat de onderkant van de tabs bovenop de deur rusten zoals in Afbeelding 8 wordt aangegeven voor een deur zonder een uitstekende rand Dit geeft de juiste verticale plaatsing van de gaten Deur met uitstekende rand Voor een deur met een uitstekende rand zoals aangegeven in Afbeelding 9 moet u de tabs van de ...

Page 26: ...pener en de middellijn van de deurarm moeten hetzelfde zijn om te voorkomen dat de arm bij het gebruik klemt 3 Controleer dat opnieuw en als ze niet juist op één lijn staan moet u dat corrigeren 4 Met de deur volledig gesloten schuift u de buitenslede met de armverlenging daaraan bevestigd tegen de deurarm aan Zet de armverlenging in een rechte lijn en steek hem in de sleuf in de deurarm Afbeeldin...

Page 27: ...Gebruik niet de arm met de sleuven die bij de Chamberlain deurarm is geleverd 4 Neem de gebogen deurarm die bij de garagedeuropener is geleverd en bouw deze samen zoals getoond Wanneer u de slede losmaakt kunt u deze gemakkelijk in elke gewenste positie verplaatsen voor installatie Gebruik M8 schroeven met borgmoeren niet meegeleverd 5 Draai de schroeven volledig vast en draai ze vervolgens een 1 ...

Page 28: ...k 26 in deze gebruiksaanwijzingen 6 Laat de aandrijving opnieuw draaien om te controleren of de deur op de juiste wijze opent en sluit Ga verder met de instructies in uw handleiding Problemen oplossen 1 Trek het handvat voor de handmatige ontgrendeling om de trolley los te koppelen 2 Beweeg de deur tot ongeveer halverwege omhoog Laat de deur los De deur moet blijven hangen volledig ondersteund doo...

Page 29: ...nti della porta Si prega di osservare tutte le norme di sicurezza riportate a pagina 1 delle istruzioni di montaggio degli apriporta Azionando manualmente la porta garage verificare che la porta stessa e tutte le parti in movimento siano in buone condizioni e funzionino in modo ottimale Prima di procedere al montaggio del braccio adattatore lubrificare bene tutte le parti in movimento della porta ...

Page 30: ...te sostituiscono il paragrafo 13 delle istruzioni Se un architrave rivolto verso l interno impedisce l installazione della staffa di testa direttamente sopra la porta garage procedere secondo la pagina 16 e il relativo testo Nel caso di porte con doppio binario la staffa di testa deve essere fissata 50 mm al di sopra del punto più alto della corsa della porta come mostrato nelle istruzioni Porta b...

Page 31: ...iglia esterna 1 1 3 4 FIG 3 Tirare saldamente la fune o maniglia dello sblocco manuale verso il basso e all indietro e in tal modo staccare il carrello esterno da quello interno Fig 6 Unire e fissare il braccio di collegamento al carrello esterno servendosi del bullone di fissaggio e dell anello di fissaggio forniti insieme all automatismo per la porta garage Staccare il braccio di collegamento da...

Page 32: ...ato qui sotto secondo le specifiche esigenze Porta senza bordo rialzato Piegare all indietro le linguette della maschera di foratura Fig 7 Per ottenere la corretta disposizione dei fori in verticale posizionare la maschera di foratura con il bordo inferiore della linguetta sul bordo superiore della porta come illustrato nella Fig 8 Porta con bordo rialzato Per ottenere la corretta disposizione dei...

Page 33: ...braccio della porta devono coincidere al fine di evitare che il braccio si inceppi durante il funzionamento 3 Verificare ancora una volta l allineamento e correggerlo nel caso sia insufficiente 4 Con la porta completamente chiusa avvicinare il carrello esterno con il braccio di collegamento montato al braccio della porta Allineare il braccio di collegamento e inserirlo nella fessura del adattatore...

Page 34: ...arrello come illustrato Non utilizzare il braccio dotato di fessure che viene fornito in dotazione con il braccio Chamberlain 4 Collegare il braccio curvo fornito in dotazione con tutte le parti come illustrato Se si sblocca il carrello è possibile spingerlo agevolmente in ogni direzione durante l installazione Inserire viti M8 e controdadi non forniti in dotazione 5 Stringere completamente le vit...

Page 35: ...are la corretta apertura e chiusura della porta Seguire quindi le successive istruzioni del manuale Risoluzione dei problemi 1 Per sbloccare il carrello tirare la maniglia di sblocco 2 Alzare la porta fino a metà circa Se si lascia andare la porta essa deve rimanere ferma in questo punto ed essere sostenuta unicamente dalle molle 3 Alzare e abbassare la porta per verificare se si inceppa o si bloc...

Page 36: ...s de la puerta Respeten todas las normas de seguridad de la página 1 de las instrucciones de montaje para automatismos para puertas de garaje Compruebe si la puerta y todas las piezas móviles presentan un buen estado funcional y funcionan perfectamente cuando la puerta se acciona manualmente Antes de montar el brazo de la puerta engrasar bien todalas piezas móviles de la puerta de garaje El marco ...

Page 37: ...ando hacia el interior impidiera el montaje de la sujeción del dintel directamente por encima de la puerta de garaje proceda según la figura 16 y el respectivo texto En puertas de riel doble se requiere que el soporte del cabezal tal como se muestra en el manual de instrucciones se coloque 50 mm por encima del punto más alto del desplazamiento de la puerta Puerta basculante con toldo en la versión...

Page 38: ...ecanismos de bloqueo suministrados con la puerta VORSICHT 1 1 3 4 FIG 3 Tirar de la cuerda de desbloqueo manual y o de la manilla firmemente hacia abajo separando así el carro exterior del interior fig 6 Unir y fijar el brazo de unión utilizando el perno de fijación suministrado con el automatismo para el puerta de garaje y el anillo de fijación con el carro exterior Separar la unión del brazo de ...

Page 39: ... los requerimientos especiales en cada caso y señalar Puerta sin borde vertical Doblar la lengüeta de la plantilla hacia atrás fig 7 Para lograr la correcta disposición de los agujeros en las verticales colocar la plantilla con borde inferior de la lengüeta como se muestra en la fig 8 en el borde superior de la puerta Puerta con borde vertical Con una puerta con borde vertical y a fin de lograr la...

Page 40: ...coincidir a fin de evitar que el brazo se atasque durante el funcionamiento 3 Comprobar la alineación de nuevo y corregir si fuera insuficiente 4 Con la puerta completamente cerrada acercar el carro exterior con el brazo de unión acoplado en el brazo de la puerta Alinear el brazo de unión e insertar en la ranura del brazo de la puerta fig 14 Importante no insertar el brazo de la puerta en el brazo...

Page 41: ...anuras que se suministra con el brazo de la puerta Chamberlain 4 Unir el brazo de la puerta curvado suministrado con todas las piezas tal como se muestra Si se desbloquea el carro éste se puede deslizar durante la instalación sin problemas en cualquier sentido Insertar los tornillos M8 y contratuercas no se incluye en el volumen de suministro 5 Apretar los tornillos por completo y a continuación g...

Page 42: ...de alguno de los modelos ML700 ML700 ML750 ML850 lea el apartado nº 26 6 Volver a poner el automatismo en marcha para asegurarse de que la puerta se abra y cierra correctamente A continuación atender las indicaciones del manual de usuarios Tiene algún problema 1 Para desbloquear el carro tirar del mango de desbloqueo 2 Desplazar la puerta hasta la mitad del recorrido Cuando se suelte la puerta se ...

Page 43: ... 2006 Chamberlain GmbH 114A3167C All rights reserved ...

Reviews: