5
823-10-99
6
8
7
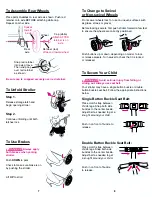
Step 1.
Turn stroller over as pictured above.
Step 2.
Position rear axle assembly as shown.
Step 3.
Push both brackets at the same time all the way on until
they snap onto the legs.
Pull firmly on each bracket to be sure they are securely
attached.
To Unpack Stroller
Step 1.
Remove stroller from
carton. Flatten carton to
protect floor.
Step 2.
Release
storage latch.
Step 3.
Open stroller on carton as
shown until locking latches
on both sides are locked.
Step 4.
Push the footrest down until it
snaps onto the bar beneath it.
Locking
latch
To Assemble Rear Axle
Brake levers
point UP
Rear legs
To Assemble Rear Wheels
Place parts
in order
on rear axle as shown. Push red
retainer onto axle BEFORE attaching white cap.
Repeat on other side.
Be sure cap is snapped securely over red retainer.
Retainer (red)
Wide end toward wheel
Wheel
Cap (white)
Attach AFTER
retainer is on
axle
Spokes
toward
inside
Rear
axle
Snap red retainer
into axle groove.
Then snap cap
over red retainer
as shown.
Step 1.
Line up pin on bottom of front
leg with the wheel assembly as
shown.
Plastic snap inside
wheel mount must be away
from pin.
Step 2.
Push wheel assembly onto pin
until it snaps in place.
Step 3.
Repeat for other wheel.
To Assemble Front Wheels
Pull firmly on each wheel assembly to be sure the
wheel assemblies are securely attached.
Plastic
snap
PARTS LIST
CHECK that you have all the parts listed below
BEFORE assembling your stroller.
If any parts are missing,
call Customer Service at 1-800-837-4044
or visit our Internet website, www.centuryproducts.com.
THIS PRODUCT REQUIRES ADULT ASSEMBLY
.
Retainer
(2, 1 extra)
Rear axle
assembly
Frame
Rear wheel (2)
Cap
(2, 1 extra)
Front wheel
assembly (2)
Childs tray
Parents tray
(screwdriver required
for assembly)
Flattened
carton
Storage
latch
To Unfold Stroller
Step 1.
Release storage latch and
begin opening stroller.
Step 2.
Continue unfolding until both
latches lock.
To Use Brakes
Always apply
both brakes when parking
stroller.
Push
DOWN
to park.
Check to make sure brake is on
by pushing the stroller.
Lift
UP
to stroll.
To Secure Your Child
Avoid serious injury from falling or
sliding out. Always use seat belt.
Your stroller may have a single button buckle or double
button buckle seat belt. Follow the appropriate instructions
below.
Double Button Buckle Seat Belt:
Place crotch strap between
childs legs. Snap both side
buckles to the center buckle.
Adjust belt as needed to get
a snug fit around your child.
Push in on front of buckle
to release.
Single Button Buckle Seat Belt:
Place crotch strap between
childs legs. Snap both side
buckles to the center buckle.
Adjust belt as needed to get a
snug fit around your child.
Push in on front of buckle to
release.
To Change to Swivel
or Non-swivel Wheels
Front swivel wheels lock for use on uneven surfaces such
as grass, stones or gravel.
Before locking swivels, first push stroller forward a few feet
to ensure the wheels are correctly positioned.
Push buttons up or down, depending on model, to lock
or release swivels. Turn swivel to check that it is locked
or released.


