


page 19
www.centsys.com
4.4. Installing loop detectors
The
SECTOR II
can use various
types of loop detector.
Centurion Systems (Pty) Ltd
recommends using the FLUX SA
(standalone) loop detector, as the
unit is easily clipped into place and
wired.
Loop detector variations:
• Single FLUX SA
• Dual FLUX SA
• Single FLUX 11-pin (Appendix 4)
• Dual FLUX 11-pin (Appendix 4)
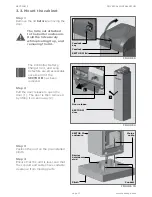
4.4.1. Installing a single
FLUX SA loop detector
Step 1
Clip the FLUX SA into the electronics
tray.
Step 2
Wire the FLUX SA to the controller
using the supplied harness as per
the wiring diagram (Figure 27).
Step 3
Run the TWISTED loop wires up
inside the enclosure through the
wiring clips to the FLUX SA
(Figure 26). Connect the twisted
loop wires to the FLUX SA.
FIGURE 24
FIGURE 25
FIGURE 26
FLUX SA
DIP switch
access cover
FLUX SA
FLUX SA
Twisted
loop wires
Wiring clips
Connection
terminals
Twisted
loop wires
running
through
opening
ONSITE ELECTRICAL WIRING
SECTION 4
Summary of Contents for SECTOR II
Page 82: ...page 82 www centsys com Notes...
Page 83: ...page 83 www centsys com Notes...


