Page 9
For technical questions, please call 1-800-444-3353.
Item 61373
SAFET
y
Op
ERA
TION
M
AINTENAN
c
E
SETU
p
Workpiece and Work Area Set Up
1. Designate a work area that is clean and well-lit.
The work area must not allow access by children
or pets to prevent distraction and injury.
2. Route the power cord along a safe route to reach
the work area without creating a tripping hazard or
exposing the power cord to possible damage. The
power cord must reach the work area with enough
extra length to allow free movement while working.
3. There must not be objects, such as utility lines,
nearby that will present a hazard while working.
4. Maximum log size for this Log Splitter is
20.5" long and 10" in diameter. Attempting to
cut logs that exceed those measurements is
dangerous and may damage the Log Splitter.
5. Use a chainsaw (not included) to cut logs
square on each end before splitting. Log ends
that are not cut square can slide out while
splitting and cause a safety hazard or cause
excessive force to Log Splitter components.
6. Never split a log that contains any foreign materials
(nails, for example). Do not use odd-shaped,
uneven logs or logs that are knotted or curved.
General Operating Instructions
1.
check the hydraulic fluid level; fill as necessary.
2. Place wheel chocks (not included) on each side of
the wheels to keep the Log Splitter from moving.
3. Make sure that the Power Switch is in the
off-position, then plug in the Log Splitter.
4. Press the Power Switch to turn on the tool.
5. Open the Vent Plug by turning it
counterclockwise 4 – 5 turns.
Note:
Operating the Log Splitter without the
Vent Plug open will cause pressure to build
up in the hydraulic reservoir which could
damage seals and affect normal operation.
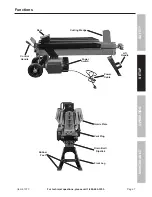
6. Position log lengthwise in the direction of the
grain on the Machine Body of the Splitter
between the Guide Plates. Place one end
of log against the Cutting Wedge. The log
must be stable so that it will split properly.
7. Push the Control Handle down to move
the Ram forward into the log, driving it onto
the Cutting Wedge, splitting the log.
8. Release the Control Handle to retract
the Ram automatically, remove split log
pieces, and begin loading the next log.
Note:
If difficulty is experienced splitting harder wood,
do not keep pressure on the log by trying to force
the Log Splitter. Release the Control Handle after
five seconds to retract the ram and avoid damage
to the tool. If the motor stops, turn off the motor and
then turn it back on again to continue operation.
9. To retract the Ram at any time,
release the Control Handle.
10. Close the Vent Plug whenever
moving the Log Splitter.
11. To prevent accidents, turn off the Log Splitter,
unplug from its electrical outlet, and close
the Vent Plug after use. Clean, then store
the tool indoors out of children’s reach.
Removing a Stuck Log
A log that is too stringy or tough to split completely
can become stuck on the Cutting Wedge if the
Wedge becomes embedded in the log and the
log doesn’t completely split and separate. If
this happens, follow the directions below.
1. Fully retract the Ram.
2. Turn off the Power Switch and
unplug the Power Cable.
3. Remove the stuck log from the Cutting
Wedge manually with a pry bar.
WARNING!
Be extremely careful when removing
the log as pieces may fly off as they separate from
the Wedge. Never attempt to remove a stuck log
by using the hydraulic force of the Log Splitter,
modifying the Log Splitter, or adding attachments
to the Log Splitter. Personal injury could result
from log or metal pieces flying out at high speed,
or the Log Splitter could become damaged.
4. Do not attempt to re-split a stuck log once it
has been removed from the Wedge. Manually
split with a maul, or cut with a chainsaw.
Summary of Contents for 61373
Page 1: ......

