Page 8
For technical questions, please call 1-800-444-3353.
Item 61373
SAFET
y
Op
ERA
TION
M
AINTENAN
c
E
SETU
p
Operating Instructions
Read the ENTIRE IMpORTANT SAFETy INFORMATION section at the beginning of this
manual including all text under subheadings therein before set up or use of this product.
Tool Set Up
TO pREVENT SERIOUS INJURy FROM AccIDENTAL OpERATION:
Turn the power Switch of the tool off and unplug the tool from its electrical outlet
before performing any procedure in this section.
TO pREVENT SERIOUS INJURy:
DO NOT OpERATE WITH ANy GUARD DISABLED, DAMAGED,
OR REMOVED. Keep guards in place and in good working order.
checking Hydraulic Fluid Level
IMpORTANT!
Before first use and before each use
thereafter, check the hydraulic fluid level of the Log
Splitter when fluid is cold. Operating without sufficient
fluid in the reservoir can badly damage the pump.
1. Unplug the Power Cable.
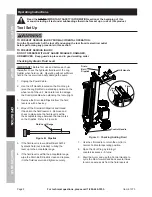
2. Use the Lift Handle located on the Front Leg to
raise the Log Splitter to a standing position on the
wheel end of the unit. Be careful not to damage
the Control Handle when standing the tool upright.
3. Remove the Drain Bolt / Dipstick from the fluid
reservoir with a hex key.
4. Wipe off the Drain Bolt / Dipstick and thread
it back into the fluid reservoir. Remove and
check to make sure the fluid level is within
the acceptable range between the two marks
on the Dipstick. Refer to Figure B.
Fluid Level Range
Figure B: Dipstick
5. If the fluid level is low, add sufficient AW32
hydraulic fluid (not included) to bring the
level up to the acceptable range.
6. If the fluid level is within the acceptable range,
wipe the Drain Bolt / Dipstick clean and replace
it in the fluid reservoir and tighten securely.
Lift Handle
control Handle
Drain
Bolt /
Dipstick
Fluid
Vent
plug
Figure c: checking / Adding Fluid
7. Use the Lift Handle to return the unit to its
normal, horizontal operating position.
8. Open the Vent Plug by turning it
counterclockwise 4 – 5 turns.
9. Start the motor and use the Control Handle to
cycle the Ram forward and back several times
to remove excess air from the fluid reservoir.
Summary of Contents for 61373
Page 1: ......

