background image

39

IT

ALIANO

  Per la sostituzione della batteria risulta agevole impugnare l'utensile come illustrato in Fig. 1; 

  premere il pulsante di sblocco (10) e spingere la batteria verso il basso sganciandola.

  Inserire la batteria carica dal basso facendola scorrere nelle guide fino al suo blocco.

  ll display permette di visualizzare i parametri operativi dell'utensile, per la sua personalizzazione 

  procedere come descritto al § 2.7.

  Scegliere la coppia di matrici adatta al tipo di connettore da comprimere consultando il relativo 

 catalogo.


Le operazioni di inserimento o di sostituzione delle matrici devono essere effettuate con 

        l'utensile privo di batteria.

 Azionare l'utensile per far avanzare 15-20 mm (0.6 - 0.8 in.) il pistone (16) in modo da premere 

  agevolmente il pistoncino (14) (Rif. a Fig. 2) quindi, rimuovere la batteria.

  Premere il pistoncino (14) e inserire una matrice nelle guide ricavate sul pistone fino al suo bloc-

  caggio col pistoncino (15).

 Premere il pistoncino (12) e inserie l’altra matrice nelle guide superiori della testa fino al suo 

  bloccaggio col pistoncino ferma matrice (13)  quindi, inserire la batteria. 

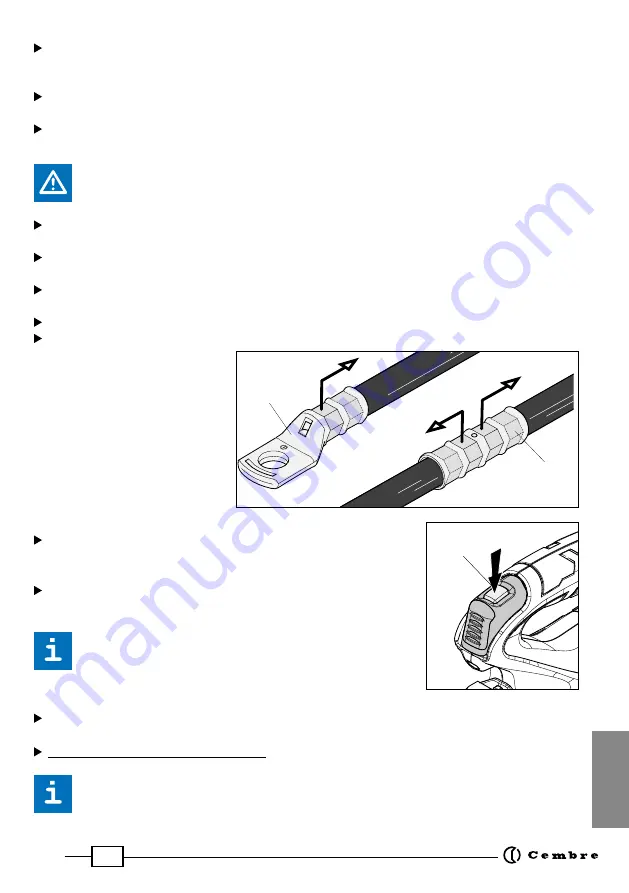
  Inserire a fondo il conduttore nel connettore (Rif. a Fig. 4).

  Posizionare quest’ultimo fra le due matrici allineando la zona da comprimere con l’impronta delle 

  matrici stesse (Rif. a Fig. 4).

NOTA

: per la compressione di 

capicorda o giunti, ove fosse ri-
chiesta più di una compressione, 
procedere secondo la sequenza e 
nella direzione indicata in figura, 
distanziando uniformemente le 
varie compressioni.

2.2) Accostamento delle matrici 

  Premere il pulsante di azionamento (1) per avviare il gruppo moto-

  re- pompa, inizierà l'avvicinamento delle matrici al connettore (Rif. 
  a Fig. 4).

  Per ottenere l'immediato arresto sia del motore che del movimento 

  delle matrici rilasciare il pulsante di azionamento. 


Assicurarsi che le matrici si trovino esattamente in corrispon-


    denza con la zona da comprimere; in caso contrario riaprirle 

        seguendo le istruzioni al § 2.4 e riposizionare il connettore.

2.3) Compressione

  Mantenendo premuto il pulsante di azionamento (1) il pistone avanzerà progressivamente fino 

  a portare le matrici in battuta tra loro.

  L'utensile si arresterà automaticamente al raggiungimento della pressione di taratura. 


Per effettuare una corretta compressione, mantenere premuto il pulsante di azionamento 

        (1) fino allo spegnimento automatico del motore. 

1 2

1 2

2 1

capocorda

giunto

condutt

ore

condutt

ore

1

Summary of Contents for B1320

Page 1: ...INAMICO DA COMPRESSIONE A BATTERIA ENGLISH FRANÇAIS DEUTSCH ESPAÑOL ITALIANO Certified Environmental Management System Certified Occupational Health Safety Management System Certified Quality Management System OPERATION AND MAINTENANCE MANUAL 5 NOTICE D UTILISATION ET ENTRETIEN 13 BEDIENUNGSANLEITUNG 21 MANUAL DE USO Y MANTENIMIENTO 29 MANUALE D USO E MANUTENZIONE 37 16 M 033 B1320 ...

Page 2: ...2 FIG BILD 1 FIG BILD 4 FIG BILD 3 1 2 10 Connector Connecteur Kabelschuh Terminal Connettore Battery Batterie Akku Batería Batteria Die set Matrices Presseinsätze Matrici 5 11 FIG BILD 2 16 13 12 14 15 ...

Page 3: ...TESTA 5 HANDLE POIGNEE GRIFF EMPUÑADURA IMPUGNATURA 6 TOUCH BUTTON FOR MENU SELECTION TOUCHE POUR SELECTIONNER LE MENU TOUCH TASTE FÜR AUSWAHLMENÜ TECLA PARA SELECCIONAR EL MENÚ TASTO A SFIORAMENTO PER SELEZIONE MENU 7 RING FOR SHOULDER STRAP ANNEAU POUR BANDOULIERE TRAGERIEMENRING ANILLO PARA CORREA ANELLO AGGANCIO TRACOLLA 8 DISPLAY ECRAN DISPLAYANZEIGE PANTALLA DISPLAY 9 BATTERY BATTERIE AKKU B...

Page 4: ... DI AVVERTENZA TG 0932 Never throw batteries into fire or water Ne Jamais jeter les batteries dans le feu ou dans l eau Werfen Sie Akkus nicht ins Feuer oder Wasser Nunca tire las baterías al fuego o al agua Mai gettare le batterie nel fuoco o in acqua Always recycle the batteries Toujours recycler les batteries Verbrauchte Akkus stets dem Recycling zuführen Reutilizar siempre las baterías Ricicla...

Page 5: ... 1 dB LpA 66 9 A LpCPeak 86 9 C LWA 74 9 A Vibrations 2 m s2 0 398 Rechargeable battery type CB1840L Li Ion V Ah Wh 18 4 0 72 Weight kg lbs 0 66 1 45 Battery Charger ASC30 36 type V Hz W EU 27044000 220 240 50 60 85 1 Directive 2006 42 EC annexe 1 point 1 7 4 2 letter u LpA weighted continuous acoustic pressure level equivalent LpCPeak maximum value of the weighted acoustic displacement pressure a...

Page 6: ...or a few minutes Protect the tool from rain and moisture Water will damage the tool and battery Electro hydraulic tools should not be operated in pouring rain 2 INSTRUCTIONS FOR USE IMPORTANT Never pressurise the tool without inserting the dies this could cause damage to the head and the ram The part reference includes the following Ref to Fig 6 page 45 Hydraulic crimping tool Li Ion rechargeable ...

Page 7: ... tool head until it is locked by retaining pin 13 then insert the battery Insert the conductor into the connector Ref to Fig 4 Position the connector between the dies and ensure the correct location of the crimp Ref to Fig 4 NOTE when more compression is required proceed according to the sequence and direction indicated inthefigure uniformlyspacingthe compressions 2 2 Die advancement Press operati...

Page 8: ... tool is in operation the compression area is illuminated by two high luminosity LED Worklights that switch off utomatically at the end of the cycle The LED Worklights can be disabled by following the procedure described in 4 2 2 6 Head rotation For ease of operation the tool head can rotate through 180 allowing the operator to work in the most comfortable position Do not attempt to rotate the hea...

Page 9: ...tivated when it is reintroduced into the tool and the operating button is pressed 2 9 Using the battery charger Carefully follow the instructions in the battery charger user manual 3 MAINTENANCE The tool is robust and requires very little daily maintenance Compliance with the following points should help to maintain its optimum performance 3 1 Thorough cleaning Dust sand and dirt are a danger for ...

Page 10: ...peareach time the tool is started and during the entire work cycle B1320 NR 16AA035 Fm 125 2 kN Fp 94 5 kN Fm 14 07 ton Fp 10 61 ton 1000 29000 BATTERY Fm 125 2 kN Fp 102 3 kN Pm 692 bar Pp 565 bar Fm 125 2 kN OK Pm 692 bar OK Pm 10037 psi Pp 7575 psi LED ON LED OFF 3 SEC max BATTERY BATTERY min Pm 692 bar Pp 522 3 bar Fm Minimum set force expressed in kN Fp Peak force reached expressed in kN scre...

Page 11: ...y operating the touch button for at least 3 seconds a beep will confirm the setting The RESET screen also shows the firmware version of the circuit board 4 3 WARNINGS these appear during operation and notify the operator of the status of the tool LOW BATTERY replace the battery NOTE when the battery Vage falls below a minimum safety threshold the tool will not start although it is still possible t...

Page 12: ...embre ERROR 001 002 003 004 Overcharging of the battery with protection tripping The tool stops Wait for the display to turn off 60 sec or remove and re insert the battery then re start the tool If the error occurs frequently contact Cembre Errors are displayed for about 30 seconds before being reset but will display repeatedly in the event of permanent anomalies 5 CONNECTION TO COMPUTER The memor...

Page 13: ... LWA 74 9 A Vibrations 2 m s2 0 398 Batterie rechargeable type CB1840L Li Ion V Ah Wh 18 4 0 72 Poids kg lbs 0 66 1 45 Chargeur de batterie ASC30 36 type V Hz W EU 27044000 220 240 50 60 85 1 CARACTERISTIQUESGENERALES FRANÇAIS 1 Directive 2006 42 CE annexe 1 point 1 7 4 2 lettre u LpA niveau de pression sonore continue équivalente pondérée A sur le poste de travail LpCPeak valeur de pression sonor...

Page 14: ...idissement de l outil Protégerl outildelapluieetdel humidité L eaupourraitendommagerl outiletlabatterie les outils hydro électriques ne devraient pas être utilisés sous la pluie 2 INSTRUCTIONS D UTILISATION IMPORTANT Nejamaismettrel outilsouspressionsanslesmatricesinsérées celapourrait endommager les sièges de la tête et du piston L ensemble comprend Voir Fig 6 page 45 Outil hydraulique le sertiss...

Page 15: ... l axe 13 puis insérez la batterie Insérer le conducteur dans le connecteur Voir Fig 4 Positionner ce dernier entre les deux matrices en alignant la zone à sertir avec l empreinte des matrices Voir Fig 4 REMARQUE s il est nécessaire de procéderàplusieurssertissagesde cosses ou de manchons suivre la séquence et la direction reportée sur l illustration en espaçant les empreintes de façon uniforme 2 ...

Page 16: ...puyant à fond sur la gâchette de déblocage pression 2 on provoque le retour du piston et par conséquent l ouverture des matrices Pour retirer les matrices poussez l axe de déblocage matrice 12 et 14 voir Fig 2 2 5 Led Lors de l actionnement de l outil la zone de sertissage est éclairée au moyen de deux LED haute luminosité qui s éteignent automati quement à la fin du cycle PourdésactiverlesLED sui...

Page 17: ...uyant sur le bouton d actionnement 2 9 Utilisation du chargeur de batterie Suivre attentivement les instructions indiquées sur le manuel 3 ENTRETIEN L outil est robuste et ne nécessite aucune préoccupation ou attention particulière Les recomman dations qui suivent sont néanmoins souhaitables pour assurer une longévité optimum 3 1 Nettoyage élémentaire Veiller à protéger l outil de la poussière du ...

Page 18: ...age de l outil et tout au long du cycle de travail B1320 NR 16AA035 Fm 125 2 kN Fp 94 5 kN Fm 14 07 ton Fp 10 61 ton 1000 29000 BATTERY Fm 125 2 kN Fp 102 3 kN Pm 692 bar Pp 565 bar Fm 125 2 kN OK Pm 692 bar OK Pm 10037 psi Pp 7575 psi LED ON LED OFF 3 SEC max BATTERY BATTERY min Pm 692 bar Pp 522 3 bar Fm Force minimale de réglage exprimée en kN Fp Force atteinte en temps réel exprimée en kN écra...

Page 19: ...irlatouchetactileappuyéependantunepériodeprolongée au moins 3 secondes Un signal sonore continu confirmera la configuration effective L écranRESETafficheégalementlaversiondufirmwaredelacarteélectronique 4 3 AVERTISSEMENTs affichentlorsdufonctionnementetfournissentdesinformationsàl opé rateur sur l état de l outil BATTERIE DÉCHARGÉE procéder à son remplacement REMARQUE lorsque la tension de la batt...

Page 20: ...ec ac tionnement de la protection L outil s arrête Patienter jusqu à l arrêt de l écran 60 secondes ou retirer puis réinsérer la batterie Redémarrer l outil Si ce signal d erreur apparaît souvent contacter Cembre Leserreursrestentaffichées àl écranpendantenviron30secondes puisl erreurestréinitiali sée Elles se présentent à nouveau en cas d anomalie permanente 5 CONNEXION À L ORDINATEUR Le fichier ...

Page 21: ... Sicherheit Überdruckventil Lärmschutzbestimmung 1 dB LpA 66 9 A LpCPeak 86 9 C LWA 74 9 A Vibrationen 2 m s2 0 398 Wiederaufladbarer Akku Typ CB1840L Li Ion V Ah Wh 18 4 0 72 Gewicht kg lbs 0 66 1 45 Akkuladegerät ASC30 36 Typ V Hz W EU 27044000 220 240 50 60 85 DEUTSCH 1 ALLGEMEINE EIGENSCHAFTEN 1 Richtlinie 2006 42 EG Anhang 1 Nummer 1 7 4 2 Buchstabe u LpA Stufe konstanter Emissionsschalldruck...

Page 22: ...kuwechsel dasWerkzeugeineangemesseneZeitabkühlenzulassen DasWerkzeugvorRegenundFeuchtigkeitschützen Wasserkönnte dasWerkzeugundden Akkubeschädigen ElektrohydraulischeWerkzeugesolltennichtimRegeneingesetztwerden 2 BEDIENUNGSHINWEISE WICHTIG BetätigenSiedasWerkzeugnieohnePresseinsätze dies kannzurBeschädigung des Kopfes und des Kolbens führen Zum Lieferumfang gehören folgende Teile Bild 6 Seite 45 H...

Page 23: ...en Den zu verpressenden Leiter in den Verbinder oder Kabelschuh einlegen siehe Bild 4 Positionieren Sie denVerbinder oder Kabelschuh an der vorgeschriebenen Position am Pressein satz siehe Bild 4 ANMERKUNG Beim Verpressen vonKabelschuhenoderVerbindern gehen Sie bei mehreren erforderli chen Pressvorgängen gemäß der in der Abbildung angegebenen Reihenfolge und Richtung vor LassenSieeinengleichmäßige...

Page 24: ...en um die Presseinsätze zu lösen siehe Bild 2 2 5 LED Während der Betätigung des Werkzeuges wird der Arbeitsbereich von zwei LED Leuchten mit hoher Helligkeit ausgeleuchtet die sich am Zyklusende automatisch abschalten Die LED Beleuchtung kann wie unter Pkt 4 2 beschrieben deaktiviert werden 2 6 Drehbewegung des Kopfes Das Werkzeug ist mit einem Kopf ausgerüstet der um 180 drehbar ist und somit ei...

Page 25: ...inführenindasWerkzeug und Betätigen des Startknopfes 2 9 Verwendung des Ladegerätes Die in der Bedienungsanleitung aufgeführten Hinweise sind zu beachten 3 WARTUNG Das Werkzeug ist robust und benötigt keine spezielle Pflege Zur Erhaltung der Garantieansprüche beachten Sie folgende Hinweise 3 1 Pflege Dieses hydraulische Werkzeug sollte vor starker Verschmutzung wie Staub Sand oder Schmutz geschütz...

Page 26: ...n bestimmter Parameter auf dem Display an gezeigt werden der anschließend bei jedem Starten des Werkzeuges und während des gesamten Arbeitszyklus erscheint B1320 NR 16AA035 Fm 125 2 kN Fp 94 5 kN Fm 14 07 ton Fp 10 61 ton 1000 29000 BATTERY Fm 125 2 kN Fp 102 3 kN Pm 692 bar Pp 565 bar Fm 125 2 kN OK Pm 692 bar OK Pm 10037 psi Pp 7575 psi LED ON LED OFF 3 SEC max BATTERY BATTERY min Pm 692 bar Pp ...

Page 27: ...rkzeug auf die ursprünglichen Werkseinstellungen zurückzusetzen Ein akustisches Signal signalisiert die erfolgte Einstellung Die RESET Einstellung zeigt außerdem die Firmware Version der Elektro nikkarte an 4 3 WARNHINWEISE SieerscheinenwährenddesBetriebesundinformierendenBedienerüber den Zustand des Werkzeuges AKKU LEER Akku austauschen ANMERKUNG WenndieBatteriespannungunterdasMindest Sicherheits...

Page 28: ...003 004 Akkuüberlastung und Auslösung der Schutzvorrichtung Das Werkzeug hält an Warten Sie bis das Display inaktiv wird 60 Sek oder entnehmen Sie den Akku und führen ihn wieder ein Starten Sie das Werkzeug erneut Wenden Sie sich an Cembre falls dieser Fehler wiederholt auftritt DieFehlermeldungenwerdenaufdemDisplayetwa30Sekundenlangangezeigt dannwird der Fehler zurückgesetzt Bei permanenter Störu...

Page 29: ...B LpA 66 9 A LpCPeak 86 9 C LWA 74 9 A Vibraciones 2 m s2 0 398 Batería recargable tipo CB1840L Li Ion V Ah Wh 18 4 0 72 Peso kg lbs 0 66 1 45 Cargador de batería ASC30 36 tipo V Hz W EU 27044000 220 240 50 60 85 ESPAÑOL 1 CARACTERíSTICASGENERALES 1 Directiva Europea 2006 42 CE anexo 1 punto 1 7 4 2 letra u LpA nivel de presión acústica contínua equivalente ponderado A en el puesto de trabajo LpCP...

Page 30: ... y la batería Las herramientas electrohidráulicas no deberían funcionar bajo la lluvia 2 INSTRUCCIONES DE USO IMPORTANTE Paraevitardañarlaherramienta serecomiendanooperarenvacíoapresión máxima sin matrices insertadas en el cabezal La referencia identifica el conjunto formado por Ref a Fig 6 pág 45 Herramienta hidráulica de compresión Batería recargable Li Ion 2 uds Cargador de batería Correa de tr...

Page 31: ...e la batería Introduzca el conductor en el conector Ref a Fig 4 Coloque este último entre las dos matrices alineando la zona a comprimir con la marca de las matrices Ref a Fig 4 NOTA Para la compresión de ter minales o manguitos cuando se solicite más de una compresión procedadeacuerdoconlasecuen cia y en la dirección indicada en la figura espaciaruniformementelas compresiones Antes de proceder co...

Page 32: ...desbloqueadores 12 y 14 Ref a Fig 2 2 5 Led Durante el accionamiento de la herramienta la zona de compresión está iluminada por dos led de alta luminosidad que se apagan auto máticamente al final del ciclo La iluminación de los led puede desactivarse mediante el procedimiento descrito en el 4 2 2 6 Rotación de la cabeza La cabeza de la herramienta puede rotar 180 respecto al cuerpo permitiendo al ...

Page 33: ...nto 2 9 Utilización del cargador de batería Seguir atentamente las instrucciones detalladas en el manual correspondiente 3 MANTENIMIENTO Esta herramienta es robusta y no requiere cuidados especiales Para obtener un funcionamiento correcto bastará tener algunas precauciones sencillas 3 1 Limpieza adecuada Tenga presente que el polvo la arena y la suciedad en general representan un peligro para toda...

Page 34: ...inicie la herramienta y durante todo el ciclo de trabajo B1320 NR 16AA035 Fm 125 2 kN Fp 94 5 kN Fm 14 07 ton Fp 10 61 ton 1000 29000 BATTERY Fm 125 2 kN Fp 102 3 kN Pm 692 bar Pp 565 bar Fm 125 2 kN OK Pm 692 bar OK Pm 10037 psi Pp 7575 psi LED ON LED OFF 3 SEC max BATTERY BATTERY min Pm 692 bar Pp 522 3 bar Fm fuerza mínima de ajuste expresada en kN Fp fuerza instantánea alcanzada expresada en k...

Page 35: ... de fábrica toque prolon gadamente al menos 3 segundos la tecla táctil una señal acústica confirmará el ajuste LapantallaRESETmuestratambiénlaversióndelfirmwaredelatarjetaelectrónica 4 3 ADVERTENCIAS aparecenduranteelfuncionamientoeinformanaloperariosobreelestado de la herramienta BATERÍA DESCARGADA proceda a la sustitución NOTA Cuando la tensión de la batería está por debajo del mínimo de segu ri...

Page 36: ...erramienta se detiene Espere a que la pantalla se apague 60 segundos o extraiga y reinserte la batería Después reinicie la he rramienta Si el error se presenta fre cuentemente contacte con Cembre Los errores se visualizan en la pantalla durante 30 segundos aproximadamente por lo tanto el error se restablece Se presentan en caso de anomalía permanente 5 CONEXIÓN AL ORDENADOR Latarjetadememoriadelah...

Page 37: ...eak 86 9 C LWA 74 9 A Vibrazioni 2 m s2 0 398 Batteria ricaricabile tipo CB1840L Li Ion V Ah Wh 18 4 0 72 Peso kg lbs 0 66 1 45 Caricabatteria ASC30 36 tipo V Hz W EU 27044000 220 240 50 60 85 ITALIANO 1 CARATTERISTICHE GENERALI 1 Direttiva Europea 2006 42 CE allegato 1 punto 1 7 4 2 lettera u LpA livello di pressione acustica continuo equivalente ponderato A nel posto di lavoro LpCPeak valore mas...

Page 38: ... umidità l acquapotrebbedanneggiarel utensile elabatteria Gliutensilielettro oleodinamicinondovrebberoessereusatisottolapioggia 2 ISTRUZIONI PER L USO IMPORTANTE Mai mettere in pressione l utensile senza le matrici inserite ciò potrebbe causare il danneggiamento delle sedi della testa e del pistone La fornitura comprende Rif a Fig 6 pag 45 Utensile oleodinamico da compressione Batteria ricaricabil...

Page 39: ...3 quindi inserire la batteria Inserire a fondo il conduttore nel connettore Rif a Fig 4 Posizionarequest ultimofraleduematriciallineandolazonadacomprimereconl improntadelle matrici stesse Rif a Fig 4 NOTA per la compressione di capicorda o giunti ove fosse ri chiesta più di una compressione procedere secondo la sequenza e nella direzione indicata in figura distanziando uniformemente le varie compr...

Page 40: ...ierelematricidallatesta sfilarlepremendoipistoncini 12 e 14 Rif a Fig 2 2 5 Led Durante l azionamento dell utensile la zona di compressione è illuminata da due led ad alta luminosità che si spengono automati camente a fine ciclo L accensione dei LED può essere disattivata seguendo la procedura descritta al 4 2 2 6 Rotazione della testa Latestadell utensilepuòruotaredi180 rispettoalcorpo permettend...

Page 41: ...ell utensile e alla pressione del pulsante di azionamento 2 9 Utilizzo del caricabatterie Seguire attentamente le istruzioni dettagliate sul relativo manuale d uso 3 MANUTENZIONE L utensile è robusto e non richiede attenzioni particolari per ottenere un corretto funzionamento basterà osservare alcune semplici precauzioni 3 1 Accurata pulizia Tenere presente che la polvere la sabbia e lo sporco rap...

Page 42: ...i carica della batteria n di cicli effettuati n di cicli mancanti alla manutenzione ordinaria logo Cembre modello utensile n di serie utensile 4 DISPLAY Il display a tecnologia OLED si attiva con l azionamento dell utensile e si disattiva automaticamente dopo circa 60 sec di inutilizzo dell utensile Il display permette di visualizzare I parametri operativi principali di funzionamento dell utensile...

Page 43: ...urante l utilizzo dell utensile agire con un tocco prolungato almeno 3 sec sul tasto a sfioramento unsegnaleacus tico continuo confermerà l avvenuta impostazione Ritorno alle impostazioni di fabbrica iniziali Versione Firmware Visualizzata la schermata RESET per riportare l utensile alle impostazioni di fabbrica iniziali agire con un tocco prolungato almeno 3 sec sul tasto a sfioramento un segnale...

Page 44: ...o della batteria con intervento della protezione L utensile si ferma Attendere lo spegnimento del display 60 sec oppure estrarre e reinserire la batteria quindi riavviare l utensile Sel erroresiripresentafrequentemente contattare la Cembre Imessaggidierrorerimangonovisualizzatisuldisplaypercirca30sec quindil erroreviene resettato si ripresentano in caso di anomalia permanente 5 COLLEGAMENTO AL COM...

Page 45: ...45 FIG BILD 6 FIG BILD 7 mm inch 404 15 9 102 5 4 239 9 4 ...

Page 46: ...stigtdieWiederverwertungunddasRecyclingderMateria lien des Gerätes Bei widerrechtlicher Entsorgung des Produktes durch den Benutzer werden die vom Gesetz vorgeseheneVerwaltungssanktionen angewandt INFORME PARA LOS USUARIOS en los términos de las Directivas 2002 95 CE y 2002 96 CE El símbolo del contenedor de basura cruzado por un aspa que aparece en el equipo o sobre su embalaje indica que al fina...

Page 47: ...47 ...

Page 48: ...lands B76 9EB Great Britain Tel 01675 470440 Fax 01675 470220 E mail sales cembre co uk www cembre co uk Cembre S a r l 22 Avenue Ferdinand de Lesseps 91420 Morangis France Tél 01 60 49 11 90 Fax 01 60 49 29 10 CS 92014 91423 Morangis Cédex E mail info cembre fr www cembre fr Cembre España S L Calle Verano 6 y 8 28850 Torrejón de Ardoz Madrid España Teléfono 91 4852580 Telefax 91 4852581 E mail co...

Reviews: