background image

17

System Installation

14.8. 

Additional System Settings can be adjusted at this time.

14.9. 

Select the Back icon to return to the Home Screen.

15. 

Calibrate the system balance using a 10 g weight.

15.1. 

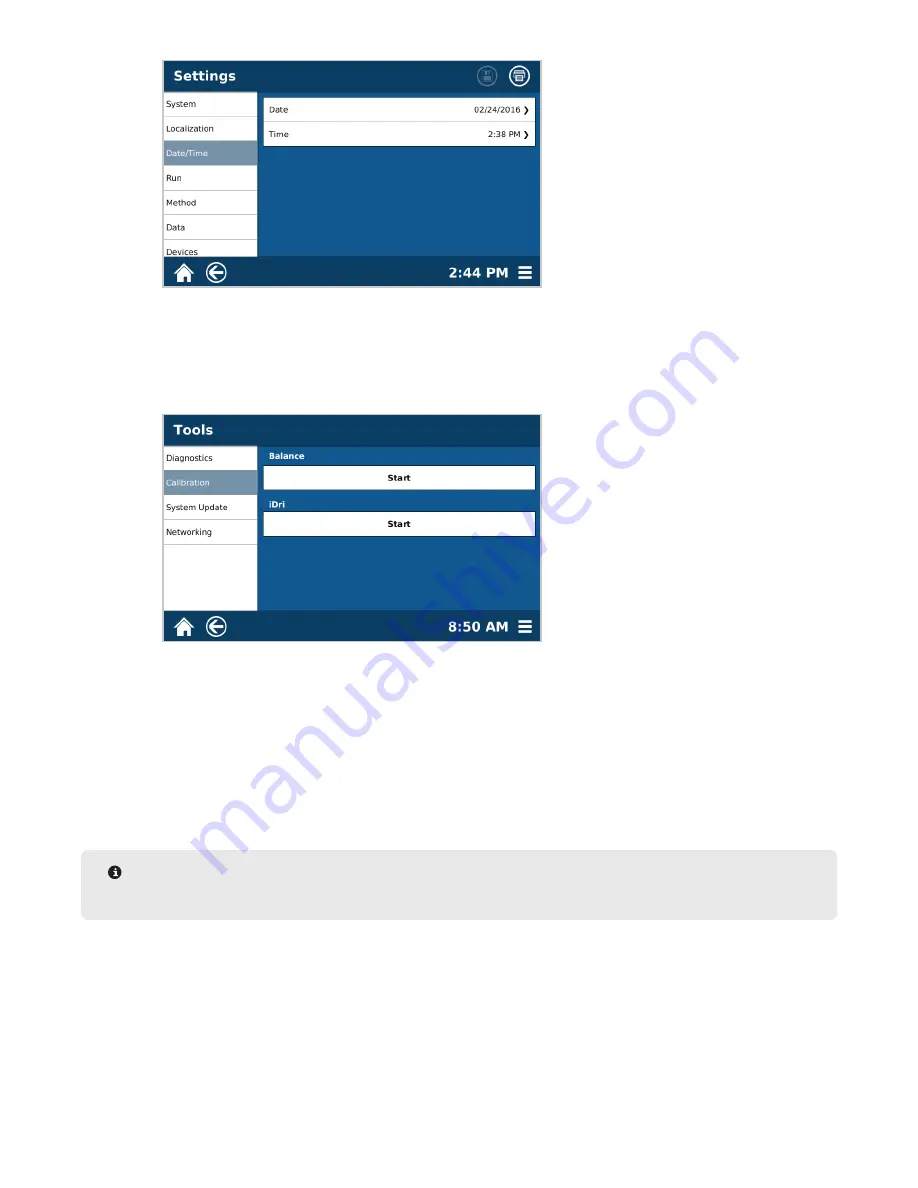
Select the System Menu icon in the bottom right corner of the screen to open the Menu screen.

15.2. 

Select Tools, followed by Calibration 

15.3. 

Using a calibrated traceable 10 g weight, press Start and follow the instructions on the screen to per-
form the balance calibration. Once the calibration is completed, press the Home icon to return to the 
main menu.

16. 

Select the System Menu icon in the bottom right corner of the screen to open the Menu screen.

17. 

Select Video. Watch the videos titled “Intro” and “Run Sample.”

18. 

After reviewing the process for performing a sample method, use the MONITOR One Touch method to test the 
monitor solution provided with the instrument. Follow the instructions on the screen to ensure the instrument 
is performing within proper specifications.


NOTE


See the ORACLE or Trac Fat Analyzer manual if connecting at this time.

19. 

Register the system by accessing www.cem.com and selecting “account” from the top right corner.
• For new logins, select “Signup” from the menu and follow the instructions. Name, contact information, and 

unit serial numbers are required for a new login.

• For existing logins, login and update your profile with your new serial number to gain access to owner 

content.

Summary of Contents for SMART 6

Page 1: ...SMART 6 Microwave Infrared Moisture Solids Analyzer Manual...

Page 2: ...THIS PAGE INTENTIONALLY LEFT BLANK...

Page 3: ...m an Ash Method 25 Perform an iDri Method 25 Method Create Edit and Delete Create a One Touch Method 26 Create a Classic Method 32 Create a ProFat Method 37 Edit Method 42 Delete Method 43 Users Creat...

Page 4: ...Warranty Limited Warranty Information 67 Contact Information CEM Corporation Headquarters 69 CEM International Subsidiaries 69 CEM Distributors 70...

Page 5: ...ed sensor for determining sample temperature USB ports for the transference of data or methods Ethernet ports for network integration and a printer option if a paper trail is required The system is co...

Page 6: ...o avoid any possibility of microwave leakage Flame detection with infrared feedback has been integrated to detect excessive temperature and immediately render the instrument inoperable If the system i...

Page 7: ...ument cover close properly and that there is no damage to the cover bent hinges and latch broken or loosened or sealing surfaces The instrument should be adjusted or repaired only by qualified service...

Page 8: ...Instrument Overview Instrument Overview Front View Cavity Handle Touch Screen Balance Stem Port Cavity Right Side View On Off Switch Left Side View USB Port Type A 1 Printer optional Exhaust Assembly...

Page 9: ...15A 100 120V 10A 200 240V Power Cord Receptacle Magnetron Cooling Fan Ethernet Connection USB Ports Type B 2 USB Ports Type A 3 Instrument Filters Infrared Air Intake Filter Electronics Air Intake Fil...

Page 10: ...e designated and the system will respond WARNING If the SMART 6 touchscreen is cracked or broken contact CEM Service immediately because the damaged screen can injure the user or lead to further syste...

Page 11: ...Touch Methods online Additional information is available in the installation portion of this manual Classic Methods parameters can be revised in the SMART 6 and are typically for users with unique or...

Page 12: ...ods or Classic Methods the method library will appear Quickly touching the desired method will access the run screen to begin the sample analysis Long holding press and hold for 2 3 seconds a method i...

Page 13: ...ion including serial number software version and contact information etc Settings System Instrument settings for the audio and visual selections of the individual user Localization Regional adjustment...

Page 14: ...are when a new version is released Networking IP connection and setup for using the SMART 6 in conjunction with a LIMS Network or Trac instrument Profat Appears only when active Users Settings Turning...

Page 15: ...ed to the instrument Video Each video can be played in full screen mode and volume can be adjusted Information System Reference for Serial Number Software and Firmware versions and Calibration dates C...

Page 16: ...during shipping If you notice damage DO NOT attempt instrument set up Contact your CEM representative for help WARNING If any damage to the instrument is noted do not attempt instrument operation 3 Re...

Page 17: ...ng the handholds in the foam to securely hold the instrument WARNING The SMART 6 weighs 60 pounds 27kg While it can be safely lifted by a single person if not lifted and supported properly a chance of...

Page 18: ...t cavity with the top of the stem flush with the cavity floor 4 Close the instrument cover WARNING The cover of the SMART 6 will close once it falls below a certain angle Keep hands and tools clear of...

Page 19: ...mitting data to a LIMS network or other external database Directions to properly transmit data are addressed in this manual 10 Position the instrument on the workbench facing forward 11 Locate the pow...

Page 20: ...the preferred language select Language to scroll through and select the applicable system language NOTE If the language is changed the SMART 6 will reboot once the SAVE icon is selected 14 5 Select Da...

Page 21: ...t corner of the screen to open the Menu screen 17 Select Video Watch the videos titled Intro and Run Sample 18 After reviewing the process for performing a sample method use the MONITOR One Touch meth...

Page 22: ...rted at this time Refer to the Importing and Exporting section of this manual For applications support or information on available methods contact our support team at process support cem com or visit...

Page 23: ...t Consistent sample weight helps ensure precision and accuracy While sample size can vary from 1 0 grams to 25 grams depending on the type of product being tested repeatability within the same sample...

Page 24: ...mple pad Cover the sample with the second sample pad to fully cover the product Gently use the sample press to spread the sample thinly and evenly between the two pads Mound cover and press For solid...

Page 25: ...ity For further information on sample preparation contact us at 800 726 3331 or email us at process support cem com 1 From the home screen select either Classic Method or One Touch Method based on the...

Page 26: ...essary select Sample ID to add a unique 24 character maximum ID for the sample being analyzed If no sample ID is entered the system will automatically increment each new sample by 1 5 Close the SMART...

Page 27: ...process support cem com 7 After the sample has been added and properly spread center the pads on the balance pan gently close the instrument cover and press START The system will automatically record...

Page 28: ...h the vacuum source operating pour the sample into the funnel 6 When all the sample has been filtered remove the pads from the funnel 7 Lift the instrument cover Place the wet pads on the balance pan...

Page 29: ...to less than two 2 minutes The SMART 6 is able to analyze the drying curve of a specific sample type and apply an algorithm to the testing in order to achieve an accurate final result in up to half th...

Page 30: ...st a method If the categories provided do not optimize sample results use the Classic Method development to obtain the parameters within the categories Prior to creating a new method contact the CEM C...

Page 31: ...l weight and final weight Waste Water Can be defined as Total Suspended Solids or Total Volatile Suspended Solids Typically utilizes a filtration step with the LOD analysis of the SMART 6 Ash The LOD...

Page 32: ...sture and Solids values can be accessed for any sample 3 6 Once the method settings have been selected press either the arrow in the bottom right corner of the screen or the tab on the left of the scr...

Page 33: ...the final stage can be a Constant Weight stage All previous stages must use Set Time 5 2 Set Time The method will run for a preset length of time regardless of sample size or final weight 5 2 1 Set th...

Page 34: ...5 3 3 Set the Maximum temperature for the sample Some category parameters contain a controlled ramp and do not reach the temperature immediately upon analyzing the sample 6 Select the Details tab 6 1...

Page 35: ...ues can create an unsafe testing environment due to fire or volatiles in the cavity 6 3 iDri can be set to OFF default ON or COMBO If iDri is turned ON an iDri bias must also be added for accurate iDr...

Page 36: ...the screen 3 Once in the method development screen enter the Settings tab 3 1 Enter a unique method name to easily link the method to the sample type being analyzed 3 2 Choose the desired calculation...

Page 37: ...ght difficult the syringe method can be used instead of directly weighing the amount of sample on the sample pad The sample is pulled into a syringe The syringe is weighed before and after adding the...

Page 38: ...The length of time between the fan turning off and the final reading is taken 3 6 Once the Method Settings have been determined select either the arrow on the bottom right of the screen or the tab on...

Page 39: ...he Mag Power and IR power The power should be set at 0 25 50 75 or 100 6 1 2 Set the run time for each analysis 6 1 3 Set the Maximum temperature for the sample type Some category parameters contain a...

Page 40: ...lysis During sample testing the weight graph will change from blue to green when the weight is within the set range 7 2 Set the minimum and maximum 20g maximum results which typically correspond to th...

Page 41: ...n 3 Once in the method development screen enter the Settings tab 3 1 Enter a unique method name to easily link the method to the sample type being analyzed 3 2 Select the category that best describes...

Page 42: ...ashing furnace then return it to the SMART 6 for a final weight measurement 3 5 Designate the desired unit of measurement Moisture or Solids by toggling Calculation Mode This will be the unit displaye...

Page 43: ...create additional stages 5 Select the Parameters tab 5 1 Once in the system parameters determine if the stage will be a Set Time or Constant Weight analysis NOTE If creating multiple stages only the f...

Page 44: ...t is 10 minutes 5 3 3 Set the Maximum temperature for the sample Some category parameters contain a controlled ramp and do not reach the temperature immediately upon analyzing the sample 6 Select the...

Page 45: ...d in the Bias section Similarly if after running 3 5 samples there is a consistent bias present between the ProFat results and the reference results a bias can be added for that purpose CAUTION Not fo...

Page 46: ...an edit methods 1 From the methods screen long hold the method to be edited until the additional menu icons appear 2 Select the edit icon 3 The method settings number of stages stage parameters and de...

Page 47: ...d Only Administrators can delete methods 1 From the methods screen long hold the method to be deleted until the additional menu icons appear At this time multiple methods can be selected 2 Select the...

Page 48: ...of the screen 2 Select Users 3 Select Add User 4 Select Name 5 Using the keypad enter the desired user name using a maximum of 16 characters Press the Hide Keypad icon on the bottom right of the keypa...

Page 49: ...stem must maintain at least one Administrator 7 Using the keypad enter the desired password Once the password is entered confirm the password Then select the Hide Keypad icon to return to the Add User...

Page 50: ...their password 1 From the Home screen select the System Menu icon in the bottom right corner of the screen 2 Select Users 3 Select the user to edit delete 4 Select Edit or Delete If Edit is selected...

Page 51: ...select a user and enter a password upon initial powering 1 From the Home screen select the System Menu icon in the bottom right corner of the screen 2 Select Users 3 Auto Login can be toggled on and o...

Page 52: ...set to ON the Home Screen will be displayed once the SMART 6 completes the initial powering Logs The User Logs is an account of user activity including Method Import Export methods run user login log...

Page 53: ...T 6 system following the steps below Import Only Administrators can import methods 1 Download the method to a USB stick from either the CEM website or from an email 2 Using a computer ensure that the...

Page 54: ...guration 7 Once the method has been imported a window will indicate that the importing process was successful Export 1 From the Home Screen select the One Touch or Classic Methods containing the metho...

Page 55: ...ccessful NOTE If the USB stick already contains the method to be exported or a different method that has the same name as the method a prompt window will request whether or not to overwrite the curren...

Page 56: ...tion trends SMART 6 Database The SMART 6 stores up to 50 results per method internally These results can be accessed from the method folder or the run screen once an analysis has been completed Data i...

Page 57: ...Home Screen 1 Select the method folder One Touch vs Classic that contains the method to be analyzed 2 Select the Statistics Icon 3 Select the Method to be analyzed Methods can be narrowed down by the...

Page 58: ...the Search icon to access the statistical analyses The SMART 6 will include the Average Minimum result Maximum Result Results Range and Standard Deviation It will also list all samples being used to c...

Page 59: ...nter follow the instructions below If using an external printer contact the printer manufacturer for instructions Internal Printer Paper Installation 1 Locate the internal printer on the left side of...

Page 60: ...equired NOTE The SMART 6 is capable of printing two levels of information Results will print the final result in Moisture and Solids the total test time the method name and the date and time that the...

Page 61: ...matically inserted on the screen type in the name of the printer for future identi fication 6 Do not attempt automatic installation Choose NO when prompted to perform the manual printer installation 7...

Page 62: ...river is not listed contact CEM Corporation 9 Once the correct driver has been specified select Install to complete the process The SMART 6 will prompt the user to print a test page to insure the inst...

Page 63: ...f the instrument connect one end of a USB TypeB to USB TypeA cable to the second USB Type B port in the back of the SMART 6 See below Connect the other end of the cable to a computer that is connected...

Page 64: ...60 External Database and Networks...

Page 65: ...taining the software update bundle cib into the USB port located on the side of the unit 4 Select the System Menu icon in the bottom right corner of the screen 5 Select Tools 6 Select System Update 7...

Page 66: ...Remove and clean the filter The electronics filter is located below the touchscreen The drawer securing the filter is held in place by magnets Slide the drawer out to remove and clean the filter Inspe...

Page 67: ...or distributor Microwave test meters are available from CEM Corporation CEM does not recommend use of inexpensive meters available in electronics stores because they lack the necessary sensitivity to...

Page 68: ...s that optimize the analysis of each sample Name Ramp Time Ramp Temp Delta Wt Delta Time Fan Off Fan Speed Ambient Speed Milk 0 60 2 20 60 50 0 Dairy 0 30 5 20 30 50 0 Cheese 0 0 5 20 30 50 0 Meat 0 3...

Page 69: ...counter space 29 99 cm W x 29 99 cm D x 24 61 cm H Provides 8 20 cm of open space on each side 6 15 cm open space in the rear for ventilation and 9 5 24 cm for overhead clearance when the cover is clo...

Page 70: ...tores up to 50 results Display Touchscreen interface with menu driven software Accessory Ports 4 x USB a 2 x USB b 1 x Ethernet Printer Options Optional internal thermal printer Request list of compli...

Page 71: ...ies of Purchaser To ensure warranty coverage the purchaser must Use the instrument according to directions Connect the instrument properly to a power supply of proper voltage Replace blown fuses Repla...

Page 72: ...of use of instrument or other incidental or consequential costs expenses or damages incurred by the purchaser or any other user This warranty is not transferable Purchaser s Rights under State Law Thi...

Page 73: ...ique de Saclay 4 rue Ren Razel 91892 ORSAY Cedex France Web Address http www cemfrance fr Email info fr cem com Germany CEM GmbH Phone 011 49 2842 9644 0 Fax 011 49 2842 9644 11 Address Carl Friedrich...

Page 74: ...nd Ltd Phone 353 0 1 885 1752 Address Sky Business Centre 9a Plato Business Park Damastown Dublin 15 Ireland Web Address http www cemmicrowave co uk Email info ireland cem com CEM Distributors For a c...

Page 75: ...THIS PAGE INTENTIONALLY LEFT BLANK...

Page 76: ...Reserved This guide contains proprietary information which shall not be reproduced or transferred to other documents or disclosed to others without prior written permission of CEM Corporation CEM and...

Reviews: