background image

2

 | ENGLISH

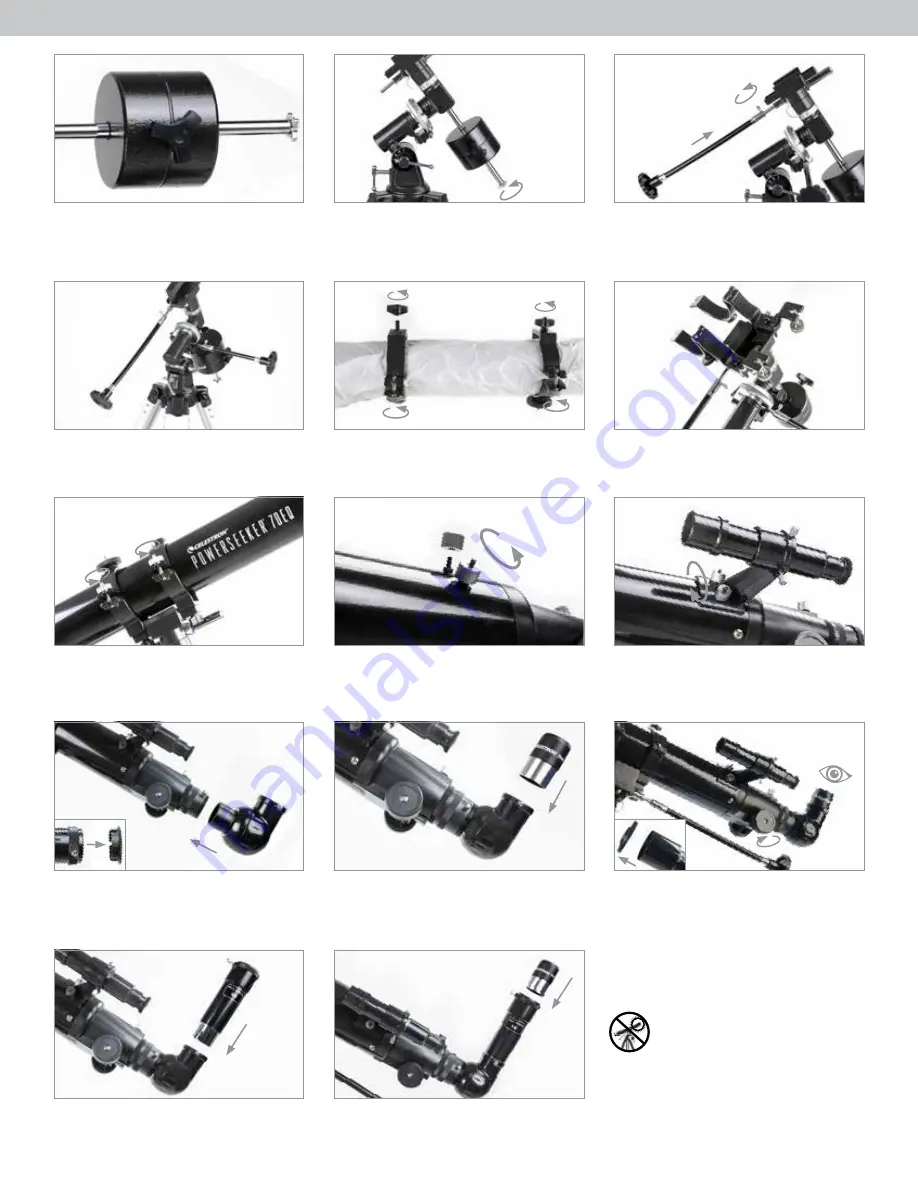
Locate the counterweight bar and counterweight. Slide the
counterweight half way down the counterweight bar.

HOLD

The cable should attach to the Right Ascension axis and the other 
cable attaches to the Declination axis. Tighten the screw to secure 
the cable in place.

Place the telescope tube back into the tube rings and secure the 
latch knobs to hold it in place. The front of the tube should be 
positioned over the counterweight assembly.

Loosen the screws on the focuser so they do not obstruct the 
inner diameter of the focuser. Remove the plastic cap covering 
the end of the focuser. Insert diagonal into the focuser and 
tighten the set screw.

For additional magnification, you can use the included 3x Barlow 
lens. Place the Barlow lens in the focuser in place of the eyepiece. 
Remove the cap from the Barlow lens.

Next, insert the eyepiece into the Barlow and tighten the set 
screws to secure it in place.

Holding the counterweight in one hand, line up the counterweight 
bar with the mount. With your other hand, turn the counterweight 
bar until it is fully seated. Tighten the counterweight locking screw 
to hold the counterweight in place.

Remove the tube rings from the telescope tube by loosening the 
latch knobs on the sides of each ring. Then remove the two knobs 
on the bottom of each tube ring.

Remove the knurled nuts on the threaded posts at the focuser end 
of the telescope tube.

Remove cap and insert the 20mm eyepiece into the diagonal and 
tighten the set screw.

Slide the chrome end of the slow motion control cables onto 
equatorial mount gear shaft. Be sure to line up the set screw over 
the flat spot on the shaft. Tighten screw to secure in place.

Insert the tube rings into the holes on the top of the mount and 
secure them using the knobs you removed from the bottom of 
each ring.  

Locate the finderscope and remove plastic caps on front and back of 
lens. Orient the finderscope so that the larger lens is facing towards 
the front of the tube as shown here. Place finderscope over the 
holes on the tube and tighten it down with the knurled nuts.

Remove the lens cap from the front of the telescope. To observe, 
look through the eyepiece as shown above. Focus the image by 
turning the knobs below the focuser.

10

10

13

13

16

16

11

11

14

14

17

17

12

12

15

15

18

18

19

19

22

22

23

23

20

20

21

21

For more information on this product or to download 

the instruction manual, please visit the respective 

product page on celestron.com

SOLAR WARNING:

  Never attempt to view the Sun 

through any telescope without a proper solar filter.

NEED ASSISTANCE?

Contact Celestron Technical Support
celestron.com/pages/technical-support
02-21

Summary of Contents for 21037

Page 1: ...e accessory tray on top of the tripod s center leg brace Thread the tray into the the threaded hole in the center of the leg brace until it is fully seated From underneath the tripod mounting platform...

Page 2: ...nobs on the sides of each ring Then remove the two knobs on the bottom of each tube ring Remove the knurled nuts on the threaded posts at the focuser end of the telescope tube Remove cap and insert th...

Page 3: ...u are observing in the telescope s 20mm eyepiece TIP Try adjusting one screw at a time Loosen one screw by half a turn and tighten another by the same amount to ensure the finderscope is securely held...

Page 4: ...to a few days before a Full Moon During this period you will be able to see the most detail in the craters and lunar mountain ranges YOUR FIRST NIGHT OUT THE MOON To get a closer view of the Moon loo...

Page 5: ...toise centrale du tr pied Vissez le plateau dans le trou filet au centre de l entretoise jusqu ce qu il soit compl tement niveau Par le dessous de la plateforme de montage du tr pied vissez le boulon...

Page 6: ...s de chaque anneau Retirez ensuite les deux molettes sur le dessous de chaque anneau du tube Retirez les crous stri s des tiges filet es de l extr mit du tube du t lescope comportant le syst me de mis...

Page 7: ...ne faire tourner qu une vis la fois Desserrez une vis d un demi tour et faites en tourner une autre d autant pour garantir que le chercheur ne risque pas de tomber VOTRE CHERCHEUR EST MAINTENANT ALIGN...

Page 8: ...cette p riode vous pourrez distinguer la plus grande quantit de d tails dans les crat res et les cha nes de montagnes lunaires VOTRE PREMI RE NUIT D OBSERVATION LA LUNE Pour obtenir une meilleure vue...

Page 9: ...Okularzubeh rfach oben auf der mittleren Beinst t ze des Stativs an Drehen Sie die Ablage in die Gewinde ffnung in der Mitte der Beinstrebe bis sie fest sitzt Schrauben Sie die mitgelieferte Befestig...

Page 10: ...n Sie anschlie end die zwei Kn pfe auf der Unterseite von jedem Tubusring Entfernen Sie die R ndelmuttern von den Gewindestangen am Fokussiererende des Teleskoptubus Entfernen Sie die Kappe und setzen...

Page 11: ...anderen einzustellen L sen Sie eine Schraube mit einer halben Umdrehung und ziehen Sie sie auch mit einer halben Umdrehung fest um sicherzustellen dass das Sucherfernrohr sicher festgehalten wird IHR...

Page 12: ...Tage nach Neumond bis ein paar Tage vor Vollmond Innerhalb dieses Zeitfensters zeigen sich Krater und Mondgebirge am detailreichsten IHRE ERSTE NACHT IM FREIEN DER MOND Um den Mond n her zu betrachte...

Page 13: ...mare il vassoio porta accessori dell oculare sul supporto cen trale delle gambe del treppiede Avvitare il vassoio nel foro filettato al centro del supporto delle gambe fino a quando non completa mente...

Page 14: ...i di ciascun anello Quindi rimuovere le due manopo le alla base di ciascun anello Rimuovere i dadi zigrinati dai perni filettati sull estremit del focheggiatore del tubo del telescopio Rimuovere il ta...

Page 15: ...a 20mm SUGGERIMENTO Provare a regolare una vite alla volta Allentare una vite di mezzo giro quindi serrare un altra dello stesso tanto per garantire che il cercatore sia fissato saldamente in posizion...

Page 16: ...di giorni prima della Luna piena Durante questo periodo crateri e catene montuose sono osservabili nel dettaglio LA PRIMA OSSERVAZIONE NOTTURNA LA LUNA Per avere una visione pi ravvicinata della Luna...

Page 17: ...del tr pode Enrosque la bandeja en el agujero estriado del centro del soporte de la pata hasta que est totalmente asentada Desde debajo de la plataforma de montaje del tr pode enrosque el perno de mon...

Page 18: ...parte inferior de cada arandela del tubo Saque las roscas estriadas de los postes estriados del extremo del enfoque del tubo telesc pico Saque la tapa e introduzca el ocular de 20mm en la diagonal y...

Page 19: ...observando en el ocular de 20mm del telescopio RECOMENDACI N Pruebe ajustando un tornillo cadavez Aflojeeltornillomedia vuelta y apriete otro el mismo recorrido para garantizar que el localizador se m...

Page 20: ...e dos d as despu s de Luna nueva hasta unos d as antes de Luna llena Durante este periodo podr ver el m ximo detalle de los cr teres y riscos lunares SU PRIMERA NOCHE EN EL EXTERIOR LA LUNA Para obten...

Reviews: