Hardware
Fig. 15.14
Fig. 15.13
2489
2337
2339
Flush
Centre in
opening
Step 15: Crowsnest Assembly
Part 5
P:
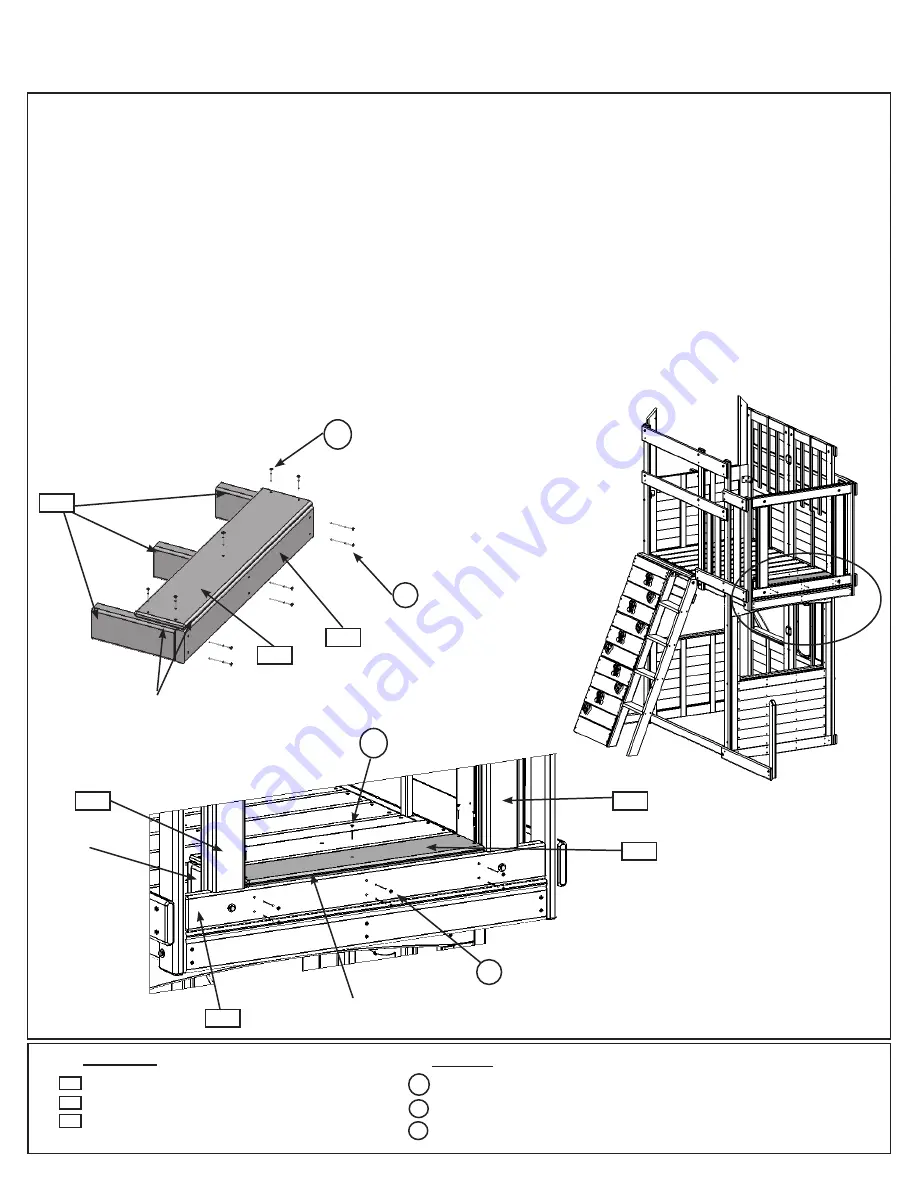
Centre 3 (2340) Crowsnest Joists over the pilot holes in (2337) Crowsnest Back so the 2 outside (2340)
Crowsnest Joists are flush to the outside edges of (2337) Crowsnest Back, then attach with 6 (S3) #8 x 2-1/2”
Wood Screws. (fig. 15.12)
Q:
Flush to the front and outside edges of (2337) Crowsnest Back attach 1 (2339) Crowsnest Floor with 5 (S20)
#8 x 1-3/8” Wood Screws. (fig. 15.12)
R:
Place the floor assembly just created in between both (2341) Crowsnest Uprights, flush to the top and tight
to (2489) Crowsnest Floor End. (2339) Crowsnest Floor is at the back of the assembly. Attach floor assembly to
(2489) Crowsnest Floor End with 6 (S4) #8 x 3” Wood Screws. (fig. 15.13 and 15.14)
S:
Attach a second (2339) Crowsnest Floor, tight to the first, with 5 (S20) #8 x 1-3/8” Wood Screws. (fig. 15.13
and 15.14)
Wood Parts
3 x
Crowsnest Joist 2 x 4 x 8-5/8”
1 x
Crowsnest Back 5/4 x 4 x 25-1/2”
2 x
Crowsnest Floor 1 x 6 x 25-3/8”
2340
2337
2339
10 x
#8 x 1-3/8” Wood Screw
6 x
#8 x 2-1/2” Wood Screw
6 x
#8 x 3” Wood Screw
S3
S20
S4
Fig. 15.12
S20
2340
S3
x 5
x 6
S4
x 6
2339
S20
x 5
2341
2341
Flush
48
Summary of Contents for Abbeydale Clubhouse F23920
Page 90: ...NOTES 90 support cedarsummit com ...
Page 91: ...NOTES ...


