Ceco DEAN PUMP R440 Installation, Operation & Maintenance Manual Download Page 6

may have forced the pump out of alignment. If so, correct the
piping  to  remove  the  distorting  load,  and  realign  the  pump
and driver.

9) The pump and driver alignment must again be checked at the

operating temperature and alignment corrected under the hot
condition.

10) After  about  two  weeks  of  normal  pump  operation  the  pump

and driver alignment should again be checked under the hot
condition.  If  alignment  is  still  correct,  the  driver  feet  may  be
doweled  to  the  baseplate.  If  the  alignment  has  changed,
realign the unit and recheck after two weeks.

SUCTION AND DISCHARGE PIPING

Suction and discharge nozzle sizes of Dean pumps are selected for
proper  performance  of  the  pumping  unit  and  are  not  intended  to
determine the suction and discharge pipe sizes. Pipe sizes must be
determined by the user based on the system requirements.

Suction piping should have a minimum friction loss and thus should
be as short and straight as possible with a pipe diameter as large as
economically  feasible  for  the  flow  rate  handled.  Suction  piping
should  never  be  smaller  in  diameter  than  the  suction  nozzle  size.
When  the  suction  piping  is  larger  than  the  suction  nozzle  size  an
eccentric  reducer  is  required  at  the  suction  flange  and  must  be
installed with the taper located on the underside to eliminate air or
vapor pockets. The section of piping attached to the suction flange
of the pump should be straight for a length of eight pipe diameters
or more.

Discharge piping may be the same size as, larger, or smaller than
the discharge nozzle as the system flow may demand.

In new installations or rebuilt systems, dirt, pipe scale, welding slag,
and general construction debris may get into the piping. It is impor-
tant to prevent this material from entering the pump and damaging
pump  parts,  mechanical  seal  faces,  or  seal  chamber  packing.
Mechanical  seal  parts  are  especially  subject  to  damage  even  by
very small particles. To prevent damage, a strainer or filter installed
in the suction line is recommended. Commercially available strainers
or filters as recommended by their manufacturers can do an excel-
lent  job.  In  addition,  special  filtering  and  mechanical  seal  flushing
may  be  required.  Consult  your  Dean  representative.  Suction  line
screens  or  strainers  may  usually  be  removed  when,  after  several
days of use, no dirt has been collected and the system is clean.

of the pump shaft when the unit is running. Although pumps and
drivers are check aligned at the factory, this is only to confirm that
the unit can be aligned in the field and handling during shipment
and installation will cause the alignment to change. 

The pump and

driver alignment must always be checked and corrected before the
baseplate is grouted to the foundation and again before the pump
is  first  started.

If  the  baseplate  mounting  instructions  have  been

carefully  fol lowed,  no  difficulties  in  making  the  alignment  should
be  experi enced. 

Failure  to  properly  align  the  unit  will  result  in

vibra tion, short bearing life,

and reduced mechanical seal or shaft

packing life.

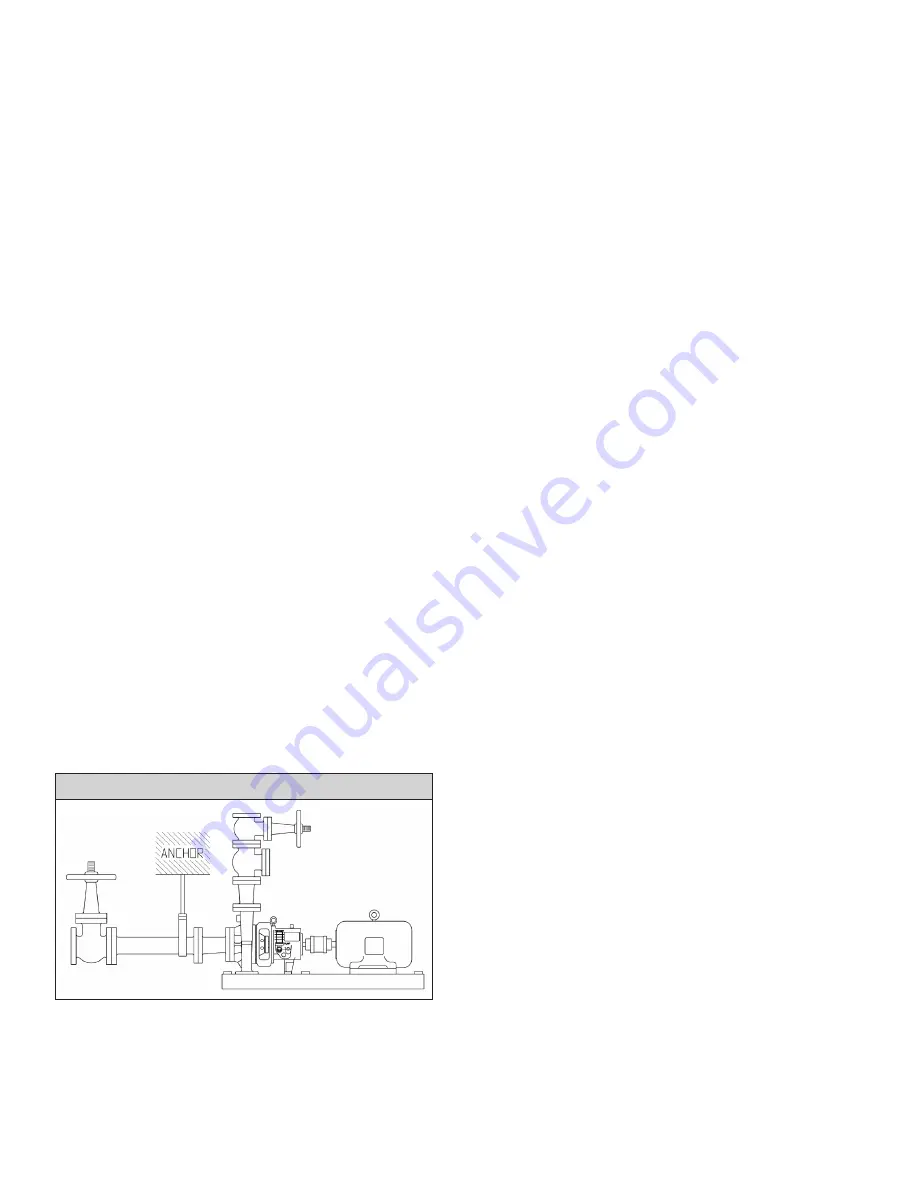
Pumps are not constructed to be used as pipe anchors. Both suc-
tion and discharge piping must be supported independently of the
pumping  unit  and  thermal  expansion  joints  provided  to  guard
against expansion loads on the pump. Pipes should be anchored
between the expansion joint and the pump and as closely to the
pump  as  possible.  Failure  to  provide  proper  piping  support  and
expansion  joints  may  impose  strains  on  the  pump ing  unit  which
will  result  in  serious  misalignment.  Maximum  allowable  piping
loads are shown on page 5 in this manual.

No  allowance  for  thermal  expansion  is  made  for  motor  driven
units  in  mounting  the  driver.  Allowance  for  turbine  mounting
should  be  in  accordance  with  the  turbine  manufacturer’s  recom-
mendations. 

Final alignment must always be checked and correct-

ed at the operating temperatures of the pump and driver.

Misalignment of the two shafts is of two kinds. The first of these is
angular misalignment where the axis of  one shaft is at an angle
from the other.  The other is offset alignment where the center of
one shaft is offset from the center of the other shaft. These effects
usually occur together so that both angular and offset misalignment
are present.

Coincident alignment of the driver and pump shaft is measured at
the faces of the coupling hubs. Because of the variety of coupling
types furnished at customer’s request, the procedure here given is
general in nature but may be applied by simple adaption to most
coupling types.

The first step is to remove the spacer from the coupling. To one of
the remaining coupling hubs, firmly seated on the shaft, attach a
dial indicator. Let the indicator button ride on the face of the other
coupling  hub  and  near  the  outside  diameter.  See  illustration  on
page 5. Rotate the shaft on which the dial indicator is mounted,
allowing  the  indicator  button  to  move  on  the  stationary  coupling
hub. The indicator dial movement will show the difference in dis-
tance between the two hubs. This indicates the amount of angular
misalignment  between  the  hubs  and  therefore  the  shaft  axes.
Good practice suggests alignment to within 0.002" T.l.R.

T

YPICAL

P

UMP

P

IPING

Remember  that  screens  and  filters  in  the  suction  line  are  restrictive
devices which reduce the net positive suction head (NPSH) available
to  the  pump  and  should  be  considered  at  the  time  the  system  is
designed.

PUMP AND DRIVER ALIGNMENT

Proper running life of a pump and driver unit depends on the accu-
racy with which the axis of the driver shaft coincides with the axis

4

Summary of Contents for DEAN PUMP R440

Page 1: ...Horizontal Process Pumps Instruction Manual MC 1 5 40 DO NOT INSTALL OPERATE OR SERVICE THIS PUMP BEFORE READING THE ENTIRE MANUAL DEAN PUMP SERIES R5000...

Page 2: ...rication 7 Starting the Pump 8 Filling 8 Operating 8 Pump Start Up Check List 8 9 Spare Parts 9 Ordering Spare Parts 9 Pump Section Views 10 Pump Parts List 10 Disassembly and Assembly Procedures 11 1...

Page 3: ...our factory or the replacement F O B our factory as the case may be or any Dean Products which shall have been deter mined by us after notice to us and inspection by us within the war ranty period to...

Page 4: ...er 2 AISI 1020 13 Fibre Sheet Non Asbestos Fibre 3 316SS ASTM A744 Grade CF8M 14 Buna N Rubber 4 AISI 4140 ASTM A193 B7 Steel 15 Steel Finned Stainless Steel Tube with Steel End Fittings 5 ASTM A194 G...

Page 5: ...base plate and pump mounting is 1 Place baseplate with pump and driver mounted thereon on the pump foundation 2 Use wedges under the baseplate edges at each foundation bolt to properly support and lev...

Page 6: ...ed before the baseplate is grouted to the foundation and again before the pump is first started If the baseplate mounting instructions have been carefully followed no difficulties in making the alignm...

Page 7: ...movement of the shaft measured at the shaft coupling when the pump is mounted on its baseplate and that baseplate is fully bolted to a properly designed foundation and is fully grouted in place For a...

Page 8: ...ll do no harm Mechanical seal gland cooling flow should be adjusted to about 1 2 GPM Bearing housing cooling flow rate when not in series with the stuff ing box cooling should be adjusted to 1 2 GPM T...

Page 9: ...factur ing plant Connection 7 is for the Automatic Oiler Bull s Eye Oil Level Indicator which is shipped in a box in the coupling guard assembly and must be installed into one of these two connections...

Page 10: ...ections on both sides so that you can place the oiler on the side that is most easily viewed The pump was shipped with a plastic shipping protector in one of the connections and the other is plugged F...

Page 11: ...direction of rotation to be observed A direction of rotation arrow is shown on the front of the pump casing If rotation is incorrect change the wiring connections and recheck rotation Operating the pu...

Page 12: ...PARTS These points must be checked after pump installation and before starting up the pump 1 Read instruction manual thoroughly and understand it 2 Review pump order head sheet for the service rating...

Page 13: ...sing Capscrew 9 Bearing Housing Foot 10 Shaft Sleeve 10K Shaft Sleeve Key 12 Impeller Bolt 12A Impeller Washer 12B Impeller Lock Washer 12C Impeller Washer Pin 13 Seal Chamber Gland Packing Gland 14 G...

Page 14: ...the pump Hook a lifting hoist to the lifting eye s of the motor and take the slack out of the cable or chain Make sure that all of the components of the lifting apparatus are capable of lifting the w...

Page 15: ...saw or otherwise cut parts to remove them Explosion and or fuming could occur causing personal injury death and or equipment damage Do not hammer on any parts Personal injury and or damage to equipmen...

Page 16: ...ring 75B over the shaft before pressing on the last bearing s I Place a new bearing lock washer 31A onto the pump shaft 29 Tighten the bearing lock nut 31 against the lock washer to 75 ft lb while hol...

Page 17: ...proximately 90 from the blind hole w Replace the coupling key into the keyway at the coupling end of the pump shaft 29 x If the pump and driver are independently mounted to a com mon baseplate place t...

Page 18: ...ull contact with the base lightly tighten the casing stud nuts 5C and the bolts that retain the motor sup port 83 to the bearing housing 26 al Tighten the casing stud nuts 5C evenly to 105 ft lb am Ti...

Page 19: ...Shaft Sleeve 10K Shaft Sleeve Key 12 Impeller Bolt Nut on R440 12A Impeller Washer 12B Impeller Lock Washer 12C Impeller Washer Pin 13 Seal Chamber Gland Packing Gland 14 Gland Stud 15 Gland Nut 17 La...

Page 20: ...essure in the system when the pump was stopped the quality type and condition of the isolation valves the thermal expan sion values of the fluid and the pump material and the change in the vapor press...

Page 21: ...onary 95A and gland 13 Remove the mechanical seal stationary 95A from the gland 13 f Remove the four capscrews securing the cradle spacer 7 to the bearing housing 26 and remove the cradle spacer g Rem...

Page 22: ...t lb j Replace the bearing housing cooling coil after the shaft has been reinstalled Use a new gasket and tighten the cooling coil cap screws snugly and evenly to avoid oil leakage Torque cap screws t...

Page 23: ...e stuffing box may be packed either with or without a lantern ring also known as a seal cage or lantern gland as the service of the pump dictates When the pump suction pressure is above 100 psig a lan...

Page 24: ...ints at 90 intervals until the stuffing box is nearly full 5 Put the packing gland in place and pull up the gland stud nuts firmly Back the gland stud nuts off to finger tightness 6 Rotate the pump sh...

Page 25: ...ump casing back cover 22 carefully into place secure it with the two capscrews and then guide the seal gland insert and gaskets together with the gland carefully into position Reassemble the pump Now...

Page 26: ...ng away from the insert 315 Lubricate the outside diameter of the seat rings 328 the inside of the casing back cover 22 and the inside of the mechanical seal gland 300 if the seat rings 328 are Grafoi...

Page 27: ...ly top quality tools Stop the pump Turn off the power supply electricity steam etc to the pump driver motor turbine engine etc and lock the switching device so that it cannot be restarted Tag the swit...

Reviews: