


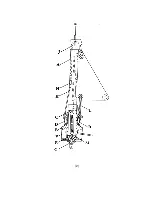


7. Pass the forestay, starting with the swage-end, down
through the halyard top fitting /luff assembly. If the mast is
up, pass a light line through the luff and make it fast to the
cotter pin hole in the swage-end of the turnbuckle using a
piece of wire to make the link. Pull the line while pushing
the luff up the forestay. When the swage-end and wire
appear, screw on the turnbuckle body to prevent the luff
from falling down.
connecting swage stud pushing extrusion up screwing turnbuckle
to messenger line forestay on stud
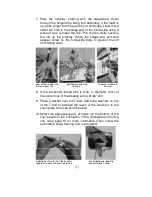
8. If the turnbuckle thread size is 5/16” in diameter, drill out
the center hole of the bearing with a 21/64” drill.
9. Place a washer over the T-bolt. Add extra washers on top
of the T-bolt to increase the reach of the clevis pin to the
chain plate hole (see photos below).
10. Select the appropriate pair of holes (on the bottom of the
cup) based on the orientation of the chainplate and furling
line. (See page 10 for more information.)Then screw the
antirotation strap, bearing and cup together.
Adding washers to the T-bolt so the Assembling cup, bearing
toggle will reach the chain plate hole and antirotation strap
(7)
Summary of Contents for FLEXIBLE FURLER 2
Page 4: ... 2 ...


