


Note: Occasionally you may need a pre-feeder to get the
halyard to feed easily into the halyard top fitting. If so, use
a cigarette lighter and melt a piece of 1/8” line to the
”OTHER” end of the halyard (see instruction #2 on
previous page).
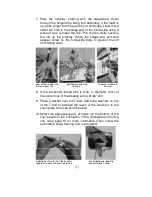
Feed halyard into HTF & out Pull halyard thru HTF. Ferrule gets inserted
the side. (bottom view) into the top of the luff extrusion.
3. Pass the decored line through the groove in the top of the
luff extrusion that is opposite the sail feed slot (see photo
below) and slide the ferrule down inside the groove.
Ferrule
sail feed slot
Starting the ferrule down the luff extrusion
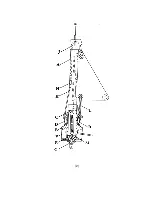
4. Push the halyard top fitting over the top of the luff and
secure with the locking screw. Make sure the “OTHER”
end of the halyard (the end without the ferrule) exits the
halyard top fitting on the same side as the sail feed slot,
and slides freely. (See diagram on page 2.)
5. Tie a light line, the length of the luff, to the decored end.
This messenger line will be used to raise the sail.
6. Completely unscrew both ends of the turnbuckle.
(6)
Summary of Contents for FLEXIBLE FURLER 2
Page 4: ... 2 ...


