CDI FLEXIBLE FURLER 2 Installation & Operating Instructions Manual Download Page 2

WARNINGS – 

READ BEFORE INSTALLING OR USING YOUR 

FURLER 


Improper installation of the Flexible Furler or improper reinstallation of the 

forestay can cause failure of the forestay, and could result in the loss of the 

mast and injury to crew members. 


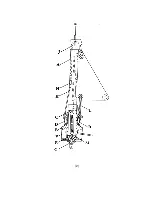
PRE-INSTALLATION WARNING:


You  must  use

 toggles


at  both ends


of the forestay

. Improper toggling 

may cause the forestay to fatigue due to bending stresses. 


POST INSTALLATION WARNINGS & SAFETY CHECKLIST:


1.  All 

clevis  pins

  and 

cotter  pins

  (especially 

turnbuckle  cotter  pins

removed during installation must be replaced.  

2. 

Turnbuckle threads

 must have full engagement.  

3.  Make sure your furler 

rotates freely

.  

4.  The  luff  and  the  inside  of  the  drum 

must  not  touch  the  turnbuckle 

body

. If they touch, furling may unscrew the turnbuckle.  

5.  The 

luff support pin

 must be installed, or the turnbuckle will  unscrew 

and cause dismasting. 

6.  Insure  that  the 

bearing  is  not  jammed

,  as  winching  with  a  jammed 

bearing will transmit torsional loads to the turnbuckle which could lead 

to failure.  

7.  There  must  be  at  least 

3”  clearance

  on  the  sides  and  above  the 

halyard top fitting. 


OPERATION WARNINGS & SAFETY CHECKLIST:


1. 

Never  winch

  the  unit  without  checking  for  jams  or  snarls.  Winching 

against  an  obstruction  can  sever  or  cause  hidden  damage  to  your 

forestay.  

2. 

Keep your unused halyards 

flipped to the after side

 of your spreaders 

and 

lightly tensioned.  

3.  If the  unit  becomes  hard  to  furl, 

investigate  and  correct  the  cause

Failure to do so can lead to the failure of the forestay. 


USAGE WARNINGS: 

The Flexible Furler is  NOT designed to be used while your boat is in the 

water and passing under low clearance obstructions (bridges, power lines, 

etc.) with mast tipped forward and headstay attached to the bow. Lowering 

the  mast  in  this  manner  is  dangerous  even  without  a  furler,  and  can  be 

further complicated by the weight of the furler and the sail. 


“This  product  is  intended  for  use  only  on  sailboats  having  masts 

fixed  vertically  in  place  at  all  times  while  the  boat  is  in  the  water, 

wherein the mast may only be lowered in accordance  with the boat 

manufacturer’s  instructions  when  the  boat  is  on  land. 

Any  other 

use  of  the  product  constitutes  misuse,  and  may  result  in 

damage to the product, and/or serious injury to the user.” 


Summary of Contents for FLEXIBLE FURLER 2

Page 1: ...FLEXIBLE FURLER 2 INSTALLATION OPERATING INSTRUCTIONS 44 James Street Homer NY 13077 Tel 607 749 4599 Fax 607 749 4604 Website www sailcdi com Updated April 2004 ...

Page 2: ...e must be at least 3 clearance on the sides and above the halyard top fitting OPERATION WARNINGS SAFETY CHECKLIST 1 Never winch the unit without checking for jams or snarls Winching against an obstruction can sever or cause hidden damage to your forestay 2 Keep your unused halyards flipped to the after side of your spreaders and lightly tensioned 3 If the unit becomes hard to furl investigate and ...

Page 3: ...urnbuckle must be a or 5 16 swage on turnbuckle with a T bolt and toggle on the bottom see page 5 It MUST be locked by cotter pins You may NOT use 3 piece Navtec turnbuckles The stud must NOT have non marine protuberances such as aircraft hex nuts If your turnbuckle doesn t meet all of the above requirements replace it with one that does Mounting The system can NOT be mounted above the turnbuckle ...

Page 4: ... 2 ...

Page 5: ... 2007 E Main Bearing HDPE plastic standard 1033 or Ball Bearing torlon balls optional BB2 F Cup stainless steel 1807 G Antirotation Strap 1081 H Ferrule the little metal tube swaged on halyard J Halyard Top Fitting 2011 K Halyard Assembly x 33 1932 L Tack Tension Line 1 8 x 4 2048 M Thrust Washer 1253 Instruction Manual not shown 1049 3 ...

Page 6: ...de Then take it out to uncoil see below Bring it back inside to accelerate straightening Start removing the tape by cutting the band retaining the outside end of the coil while restraining the outer wrap Gently uncoil to the next band of tape Repeat this process until all tape has been removed When cutting the last piece the coil will have a tendency to spring outwards so be cautious Never cut the...

Page 7: ...k and void the warranty ASSEMBLY Assembly is easiest with the mast down although assembly can be done with the mast up 1 Measure the pin to pin length L below of the forestay with the turnbuckle in its normal state of adjustment If the mast is up you will have to raise a tape on the jib halyard and add an amount approximately equal to the distance from the top end of the tape to the pin at the top...

Page 8: ...of the luff extrusion that is opposite the sail feed slot see photo below and slide the ferrule down inside the groove Ferrule sail feed slot Starting the ferrule down the luff extrusion 4 Push the halyard top fitting over the top of the luff and secure with the locking screw Make sure the OTHER end of the halyard the end without the ferrule exits the halyard top fitting on the same side as the sa...

Page 9: ...up screwing turnbuckle to messenger line forestay on stud 8 If the turnbuckle thread size is 5 16 in diameter drill out the center hole of the bearing with a 21 64 drill 9 Place a washer over the T bolt Add extra washers on top of the T bolt to increase the reach of the clevis pin to the chain plate hole see photos below 10 Select the appropriate pair of holes on the bottom of the cup based on the...

Page 10: ... the bearing 12 Screw the T Bolt into the turnbuckle body and adjust until the overall length is correct BE SURE TO REPLACE THE COTTER PINS IN YOUR TURNBUCKLE Also remember to INSTALL THE LUFF SUPPORT PIN when you lower the furling drum 13 Pass the furling line through the hole in the side of the cup then up through the hole in the top of the furling drum flange Tie an overhand knot to prevent it ...

Page 11: ... ferrule hard up against the halyard top fitting and cut the halyard so that when it is tied to the sail the head of the sail is just below the sail feed slot Melt end of rope to prevent fraying If your sail is not a full hoist sail estimate the distance from the head of the sail to the mast when the sail is raised Call this estimated distance dimension A With the halyard ferrule hard up against t...

Page 12: ...d can result in chafing and cutting of the furling line In most cases the first fairlead must be mounted on the deck Properly bed the screws If using a sunscreen on your sail the furling line should be wrapped so the sunscreen is on the outside of the sail when the sail is furled The furler can work rotating in either direction Locating the first Fairlead Possible deck layout if UV is on starboard...

Page 13: ...IB 1 Attach the halyard to head of the jib Pull decored end of Tie decored end of halyard Tension at the bottom of the halyard down to hoist to halyard shackle sail using tack tension sail line Lace it 3 or 4 times 2 Pull up the sail by pulling down on the messenger line attached to the decored end of the halyard while feeding the luff tape into the sail feed slot If raising and lowering the sail ...

Page 14: ...r each use Foam Tape Shape Tape Because modern sails are quite stiff the draft can be controlled with small changes in luff tension If you are sailing to windward frequently in heavy weather and reef a lot it may be appropriate to have a foam shape tape installed on the luff which will help remove the belly in a reefed sail We suggest you consult your sailmaker Furling Reefing When sailing reefed ...

Page 15: ...yards flipped aft of the spreaders and lightly tensioned Do not clip them to the bow TRAILERING WITH YOUR FLEXIBLE FURLER Your Flexible Furler is designed to take a lot of abuse However if you plan to trail your boat there are some precautions that will help avoid problems not normally experienced while sailing If you leave the furler lashed along the mast while trailering do not let the furler sa...

Page 16: ...over the spreaders or any other fitting as the plastic will creep and the luff will kink Luffs must be stored flat and straight or warranty is void Do not expose the furler to temperatures above 140 degrees F Such temperatures may frequently occur in warm climates under a boat cover The higher the temperature the faster a bend becomes permanent To clean the luff use a rag soaked in paint thinner F...

Page 17: ... furl more evenly The Flexible Furler can not be mounted above the turnbuckle as it might put excessive torsional stress on the turnbuckle that could lead to the unscrewing of the turnbuckle and dismasting To raise the system shorten the headstay the desired amount and install link plates under the turnbuckle The FF2 can be used with and 5 16 turnbuckles The turnbuckle must have a threaded swage e...

Page 18: ...s of God The warranty is void if the mast is not fixed in place vertically at all times while the boat is in the water Tipping the mast forward to pass under bridges power lines or other low clearance obstructions voids the warranty On Trailers Collision being dragged on the ground improper stowage resulting in kinks bends and twists and damage due to the luff not being supported over its entire l...

Reviews: