Cattini YAK 40/Q Operating And Maintenance Manual Download Page 10

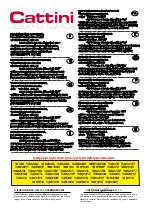
User’s Guide for Hydraulic Garage Jacks, model 

YAK 40/Q


Warnings – Safe Usage Instructions

1. 

This is a lifting device only.

2. 

Do not move or transport the load while on the jack. 

3. 

The load must be supported immediately by axle stands. 

4. 

Do not overload. Overloading may cause damage to or failure of the jack.

5. 

Lift only on areas as specified by the manufacturer. Make sure that the saddle cushion cannot slip 

during lifting (Note: the saddle will describe a curve)

6. 

This jack is designed for use only on hard level surfaces capable of sustaining the load. Use on 
other than hard level surfaces may result in jack instability and possible loss of load.

7.  

Point the wheels forward and apply the brake.

8. 

No person should remain in, on, or get bodily under a load that is being jacked or is only supported 
by a jack.

9. 

The safety valve being adjusted and sealed by the manufacturer shall not be additionally adjusted.

10. 

Do only apply options recommended. See “Options”.

11. 

Failure to heed these warnings may result in loss of load, damage to jack, and/or failure resulting in 
personal injury or property damage.
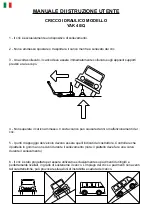
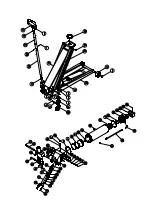
Assembly

Place the plastic handle with the inner groove in the slot of the lever tube and press it far into the tube to 
mount screw (1) and nut (2) through transverse hole. 
Push lever completely into the tipping gear with slot turning backward and fasten it by mounting screw (9) 
completely into the slot.

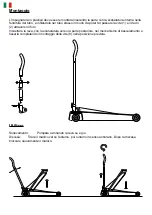
Use of the jacktc “Use of the jack”

Lifting:  Activate lever up and down. 
Lowering:  

Pull handle outward, then turn carefully counter clockwise. Turn handle back to locked 

position after lowering. 

Maintenancetc “Maintenance”

Daily: Inspect jack for damage.
Monthly: Oil all mechanical parts. 
Yearly: Inspect for abnormal wear and tear and lubricate all mechanical part.

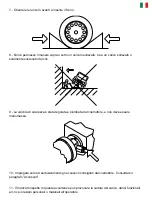
Refilling of oil: Pump and cylinder form a closed system and refilling of oil is only necessary in exceptional 

cases. To check the oil level it is necessary to take out the pump, complete: 
pump the jack half-way up.
keep the handle vertically and block the piston rod (35) in the inmost position by a screw or the like through 
the hole in the release bracket. (44). Mind the inner spring.
Remove handle and tipping gear as well as two screws (8) on the top of the lifting frame.
Unfasten screw (26) and disconnect the piston rod and the base frame by lifting the lifting frame.
Lift the loose complete pump up and out of the lifting frame.

Correct oil level is up to lower edge of filling hole (28) keeping the complete pump vertically and the piston 

rod pushed in. Too much oil might cause imperfect pump function. 
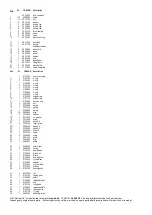
Oil quantity:   YAK 40/Q: 0,8l 


Any good hydraulic oil of viscosity of 10°-32°cSt/40° can be used. 

NEVER USE BRAKE NLUID.

Destruction

When the jack after several years is worn and must be dismantled, the oil must be drained off and legally 
disposed of.

Summary of Contents for YAK 40/Q

Page 1: ...manuel pour l utilisation et l entretien manual uso y manutencion sollevatore jack heber cric gato I GB D F E VIA EDISON 18 31 35 VILLAGGIO BELLAROSA 42049 CALERNO DI S ILARIO D ENZA Reggio Emilia ITALY PH 39 0522 909750 FAX 39 0522 909875 www cattini eu E mail info cattini eu YAK 40 Q ...

Page 2: ...REVISIONATO 06 09 ...

Page 3: ...r omfattet af denne erklæring er i overens stemmelse med bestemmelserne i Direktiv 93 44 EEC EN 1494 98 37 EEC DICHIARAZIONE DI CONFORMITÀ Noi Cattini Oleopneumatica S r l Indirizzo Via Edison 18 31 35 42049 Calerno di S Iario d Enza R E ITALIA dichiariamo sotto la nostra esclusiva responsabilità che i prodotti ai quali questa dichiarazione si riferisce sono conformi a quanto previsto dalle Dirett...

Page 4: ... sovraccarico può causare danni o malfunzionamenti del cric 5 I punti di appoggio del veicolo devono essere quelli indicati dal costruttore Controllare che il piattello in gomma non scivoli durante il sollevamento nota il piattello deve fare una curva durante il sollevamento 6 Il cric è stato progettato per essere utilizzato esclusivamente su pavimenti duri rigidi e perfettamente livellati in grad...

Page 5: ...ric 9 La valvola di sicurezza è stata regolata e piombata dal costruttore e non deve essere manomessa 10 Impiegare solo ed esclusivamente gli accessori consigliati dal costruttore Consultare il paragrafo Accessori 11 Il mancato rispetto di queste avvertenze può provocare la caduta del carico danni funzionali al cric e o lesioni personali o materiali all operatore ...

Page 6: ... la vite 1 e il dado 2 attraverso il foro Incastrare la leva con la scanalatura verso la parte posteriore nel meccanismo di basculamento e fissarla completando il montaggio della vite 8 nella posizione prevista Utilizzo Sollevamento Pompare azionando la leva su e giù Discesa Tirare il manico verso l esterno poi ruotarlo in senso antiorario Dopo la discesa bloccare nuovamente il manico ...

Page 7: ... interna Togliere il manico e il meccanismo di basculamento nonché le due viti 8 che si trovano sulla parte alta del braccio di sollevamento Svitare la vite 26 e separare lo stelo del pistone dal telaio di base sollevandolo Sollevare in avanti la pompa completa estraendola dai bracci di sollevamento Per verificare che il livello d olio sia corretto controllare che arrivi fino al bordo inferiore de...

Page 8: ......

Page 9: ...2 054 00 spring 15 1 02 078 00 spring 16 1 3 02 088 00 plug 17 2 02 108 00 washer 18 1 02 132 00 cu washer 19 1 02 155 00 screw 20 1 02 183 00 ball ø2 5 21 2 02 224 00 locking ring 22 1 02 291 00 ball ø3 5 23 1 02 292 00 ball ø6 5 24 1 02 294 00 ball ø10 25 1 02 313 00 screw 26 2 02 346 00 screw 27 1 02 417 00 gland 28 1 02 448 00 plug 29 1 02 498 00 gland 30 1 02 683 00 stop screw 31 1 02 685 00 ...

Page 10: ...e tipping gear with slot turning backward and fasten it by mounting screw 9 completely into the slot Use of the jacktc Use of the jack Lifting Activate lever up and down Lowering Pull handle outward then turn carefully counter clockwise Turn handle back to locked position after lowering Maintenancetc Maintenance Daily Inspect jack for damage Monthly Oil all mechanical parts Yearly Inspect for abno...

Page 11: ... hinten tief in die Kippvorrichtung eindrücken Die Schraube 9 völlig im Schliz hineinschrauben Betrieb Heben Den Handhebel auf und abwärts pumpen Senken Den Handhebel zuerst ausziehen und danach vorsichtig links drehen Nach dem Senken den Handhebel zur geschlossenen Position zurückziehen Wartung Vedligeholdelse Täglich Den Heber nach Schäden überprüfen Monatlich Alle mechanischen Teile mit einem g...

Page 12: ...rs l arrière dans le mécanisme basculant et fixer le levier en montant complètement la vis 8 dans l entaille Utilisation Levage Activer le levier du haut en bas Descente Tirer sur la poignée et tourner ensuite la poignée lentement contre la montre Faire retourner la poignée en position bloquée après descente Entretien Quotidiennement Inspecter le cric de dommage Mensuellement Huiler toutes les par...

Page 13: ...a y se asegura con tornillo 9 atornillando hasta la hendidura Instrucciones de uso Elevación Bombear hacia arriba y hacia abajo Bajar Tirar de la empuñadura hacia fuera y girar con cuidado contra el reloj Girar la empuñadura hacia atras y cerrar la posición después de bajar Mantenimiento Díario Kontrolar el gato por daños Mensual Engrasar todas las piezas móviles Annual Controlar minuciosamente po...

Page 14: ......

Reviews: