background image

21

CARE AND CLEANING

CARE AND CLEANING

Before cleaning the appliance, always 
disconnect the plug of the power cord from 
the mains socket and let it to cool down 
properly.

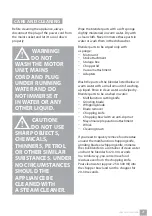
WARNING!

DO NOT 

WASH THE MOTOR 
UNIT, MAINS 
CORD AND PLUG 
UNDER RUNNING 
WATER AND DO 
NOT IMMERSE IT 
IN WATER OR ANY 
OTHER LIQUID.

CAUTION!

DO NOT USE 

SHARP OBJECTS, 
CHEMICALS, 
THINNERS, PETROL 
OR OTHER SIMILAR 
SUBSTANCES. UNDER 
NO CIRCUMSTANCES 
SHOULD THE 
APPLIANCE BE 
CLEANED WITH 
A STEAM CLEANER.

Wipe the blender parts with a soft sponge 
slightly moistened in warm water. Dry with 
a clean cloth. Never immerse these parts in 
water or wash them in the dishwasher.

Blender parts to be wiped only with 
a sponge:
– Motor 

unit

– Stick 

attachment

– Storage 

box

– Chopper 

lid

– Vacuum 

attachment

– Adapters

Wash the parts of the blender listed below in 
warm water with a small amount of washing-
up liquid. Rinse in clean water and wipe dry. 
Blender parts to be washed in water:
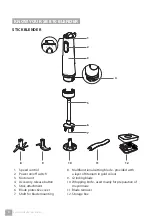
–  Multifunction cutting knife
– Grinding 

blade

– Whipping 

blade

– Blade 

remover

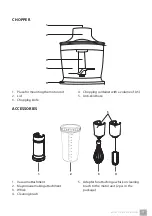
– Chopping 

knife

–   Chopping bowl with an anti-slip mat
–  Mayonnaise preparation attachment
– Whisk
– Cleaning 

brush

If you need to quickly remove food residue 
around the multifunction chopping knife, 
grinding blade or whipping knife, immerse 
the stick blender in a container of clean water 
and run the blender for 20–30 seconds.
In a similar way, you can remove food 
residues even from the chopping knife. 
Pour clean water (approx. 250–300 ml) into 
the chopper bowl and run the chopper for 
20–30 seconds.

Summary of Contents for SB 810

Page 1: ...STICK BLENDER WITH VACUUM ATTACHMENT SB 810 Instructions for use STICK BLENDER WITH VACUUM ATTACHMENT...

Page 2: ...STICK BLENDER WITH VACUUM ATTACHMENT...

Page 3: ...CONTENTS TABLE OF CONTENTS 4 Catler recommends safety first 8 Know your SB 810 blender 10 Assembly and disassembly of your SB 810 blender 18 Operating your SB 810 blender 21 Care and cleaning 23 Troub...

Page 4: ...ts or by inexperienced persons only if they are properly supervised or have been informed about how to use of the product in a safe manner and understand the potential dangers Children must not play w...

Page 5: ...ing label corresponds to the voltage in your power socket Do not disconnect the appliance from the power socket by pulling the power cord This could damage the power cord or the power socket Disconnec...

Page 6: ...ss hot or boiling liquids Allow them to cool before processing Do not expose any parts or accessories to extreme temperatures Use the air extraction attachment for a maximum of 1 minute In the case of...

Page 7: ...vehicles or on boats outdoors or for any purpose other than intended Otherwise there is a risk of personal injury Any maintenance other than standard cleaning must be performed at authorised Catler se...

Page 8: ...on off switch 3 Motor unit 4 Accessory release button 5 Stick attachment 6 Blade protective cover 7 Shaft for blade mounting 8 Multifunctional cutting blade provided with a layer of titanium in gold...

Page 9: ...unit 2 Lid 3 Chopping knife 4 Chopping container with a volume of 0 5l 5 Anti skid base ACCESSORIES 1 2 3 4 5 1 Vacuum attachment 2 Mayonnaise making attachment 3 Whisk 4 Cleaning brush 5 Adapter for...

Page 10: ...iance as 1 Stick blender attach the stick attachment 2 Chopper attach the motor unit to the chopper lid 3 Whisk attach the whisk 4 Vacuum sealer attach the vacuum attachment 5 Cleaning tool attach the...

Page 11: ...Attach the stick attachment to the motor unit until you hear a click Make sure that the stick attachment is properly attached and does not move If you need to remove the stick attachment first press...

Page 12: ...ent types of food quickly and efficiently MULTIFUNCTION CUTTING BLADE Suitable for mixing chopping vegetables carrots tomatoes etc ice etc GRINDING BLADE Mincing meat fish etc WHIPPING KNIFE Whipping...

Page 13: ...stick attachment upside down Slightly turn the blade counterclockwise until the shaft tip is approximately in the middle of the knife cutout Insert the blade remover under the knife blades and use it...

Page 14: ...lid on the container and attach the motor unit When disassembling or inspecting processed food first press the accessory release button and then pull up to remove the motor unit Remove the lid and th...

Page 15: ...k Attach the whisk to the motor unit until you hear a click Make sure that the whisk is properly attached and does not move If you need to remove the whisk first press the accessory release button and...

Page 16: ...ttach the vacuum attachment to the motor unit until you hear a click Make sure that the vacuum attachment is properly attached and does not move If you need to remove the vacuum attachment first press...

Page 17: ...ng brush to the motor unit until you hear a click Make sure that the cleaning brush is properly attached and does not move If you need to remove the cleaning brush first press the accessory release bu...

Page 18: ...with an anti slip mat Mayonnaise preparation attachment Whisk Cleaning brush WARNING ALWAYS BE CAREFUL WHEN HANDLING THE BLADES THE BLADES ARE VERY SHARP MISHANDLING MAY LEAD TO SERIOUS INJURIES NOTE...

Page 19: ...ddition food may not be processed evenly 11 If you process a larger amount of food divide it into smaller parts Use the blender continuously for a maximum of 1 minute Then let it rest for 3 minutes Yo...

Page 20: ...Insert the cap into the vacuum attachment depending on whether you are vacuuming air from a special vacuum container or a special vacuum bag If you are going to extract air from the container the wid...

Page 21: ...to be wiped only with a sponge Motor unit Stick attachment Storage box Chopper lid Vacuum attachment Adapters Wash the parts of the blender listed below in warm water with a small amount of washing up...

Page 22: ...dry and completely cooled down Store it in a well ventilated dry place out of reach of children and animals Insert two chopping knives in the storage box Place the third one on the stick attachment a...

Page 23: ...run the blender for 20 30 seconds It is not possible to set the air extraction speed When extracting air the mixer uses a stable speed the lowest Turn the dial to 1 and do not change it under any circ...

Page 24: ...more details In accordance with national regulations penalties may be imposed for the incorrect disposal of this type of waste For business entities in European Union states If you want to dispose of...

Page 25: ...WWW CATLER EU STICK BLENDER WITH VACUUM ATTACHMENT CUSTOMER SERVICE Z KAZNICK SERVIS Z KAZNICK SERVIS GYF LSZOLG LAT SERWIS KLIENTA INFO CATLER EU...

Reviews: