


- Fire hazard: do not store elements on
cooking surfaces.
- Only counter top protectors designed
for use with the cooking appliance and
listed in the manufacturer’s instructions
should be used as suitable protection for
the counter top incorporated in the ap-
pli-ance. Use of unsuitable protectors may
cause accidents.
- WARNING: Accessible parts will become
hot when in use. To avoid burns and scalds
children should be kept away.
Insert in the fixed wiring a mean for dis- con-
nection from the supply mains having a con-
tact separation in all poles that pro-vide full
disconnection under overvoltage category
III conditions, in accordance with the wiring
rules. The plug or omnipolar switch must be
easily reached on the in-stalled equipment.
This appliance is not intended to be used
via an external timer or a remote control
system.
The manufacturers decline any responsi-
bility in the event of non-compliance with
what is described above and the accident
prevention norms not being respected and
followed.
To avoid all risk, if the power cable be-
comes damaged, it must only be replaced
by the manufacturer, by an authorised ser-
vice centre, or by a qualified electri-cian.
User’s Instructions
Installation
All operations can be performed using touch sensi-
tive keys (ca- pacitive sensors) located on the front of
the control board; each key has a corresponding display.
All actions are confirmed by an audible signal.
Use
TOUCH CONTROL HEATING ELEMENTS
Touch sensitive keys
All operations can be performed using touch sensi-
tive keys (capacitive sensors) located on the front of the
control board; each key has a corresponding display.
All actions are confirmed by an audible signal.
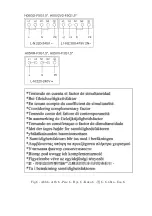
TOUCH CONTROL (Fig. 2)
1 ON / OFF
2 Minus -
3 Plus +
4 Double / Triple Circuit
5 Cooking zone
6 Setting level display
7 Timer indicator
8 Key lock
9 Timer
Switching the Touch Control on/off
After mains voltage is applied, the touch control initialises for ap-
proximately one second before it is ready for use.
All displays and LEDs flash for approximately one second after re-
setting. Once this period is complete, all displays and LEDs switch
off and the touch control is in standby mode.
Press the ON/OFF (1) button to switch the touch control on.
The cooking zone displays indicate “--“. If a cooking zone is in “hot
“(high temperature) mode, the display will alter-nately indicate “H“.
After switching the touch control on, it will remain active for 60
seconds. If no cooking zone is selected, the touch control auto-
matically switches back to standby mode.
The touch control can only be switched on by pressing the ON/
OFF (1) button.
Pressing the ON/OFF (1) button at the same time as other buttons
will have no effect and the touch control will remain on standby.
The touch control can be switched off at any time using the ON/
OFF (1) button. This is even the case when the control has been
locked by the child safety feature.
The ON/OFF (1) button always takes priority in the switch-ing off
function.
Automatic off
Once switched on, the touch control automatically switches off
after 60 seconds of inactivity.
Switching a cooking zone on/off
If the touch control is switched on, the cooking zone can be se-
lected by pressing the button (5) of the correspond-ing zone.
The display (6) of the zone selected lights up, while the remain-
Summary of Contents for TDG 3002 BK
Page 2: ...TDG 3002 BK TNG 6004 BK TDG 6003 BK Fig 2 Abb 2 Afb 2 2 Rys 2 Kuva 2 2 2 bra 2 2...
Page 4: ...Fig 6 Abb 6 Afb 6 6 Rys 6 Kuva 6 6 6 bra 6...
Page 49: ...2014 35 EU 2014 30 EU 6 8 8 EL...
Page 52: ...1 99 9 0 99 1 MINUS 2 PLUS 3 9 9 10 2 3 0 5 0 ouch LED 9 0 99 1 2 3 9 5 7 6 H 10 4 5 1 2 50 C...
Page 53: ...2014 35 EU EMC 2014 30 EU 8 8 RU...
Page 55: ...0 1 9 1 9 7 6 7 0 9 60 3 2 10 E R 0 3 20 8 1 L L 10 8 3 10 20 0 0 2 2B 6 4 4 2C 2D 3 4 8...
Page 56: ...1 99 1 99 9 0 99 1 2 3 9 9 10 2 3 0 5 0 9 0 99 1 2 3 9 5 7 6 10 10 4 5 1 2 50 C...
Page 65: ...2014 35 EU 2014 30 EU 1 2 8 8 III ZH...
Page 68: ...50 C...
Page 69: ...5 1 2 50...
Page 70: ...EU 2014 35 30 2014...
Page 71: ...3 2 1 2 3 4 5...
Page 72: ...5 6 H 2 3 5 2 3 9 0 3 2 5 3 6 0 2 2 0 H H 6 7 8 9 LED LED 1 H 60 1 60...
Page 73: ...LOCKED 8 3 2 2 6 4 2 2 LED 4 9 LED 9 1 6 H 9 0 H 60 2 3 8 L...
Page 74: ...AR 9 LED 0 99 3 2 9 5 7 6 H LED 10 4 99 1 99 1 9 0 99 2 9 3 9 10 3 2 0 0 5...


