background image

Configuring Settings with the Keyboard

E-25

English

bt

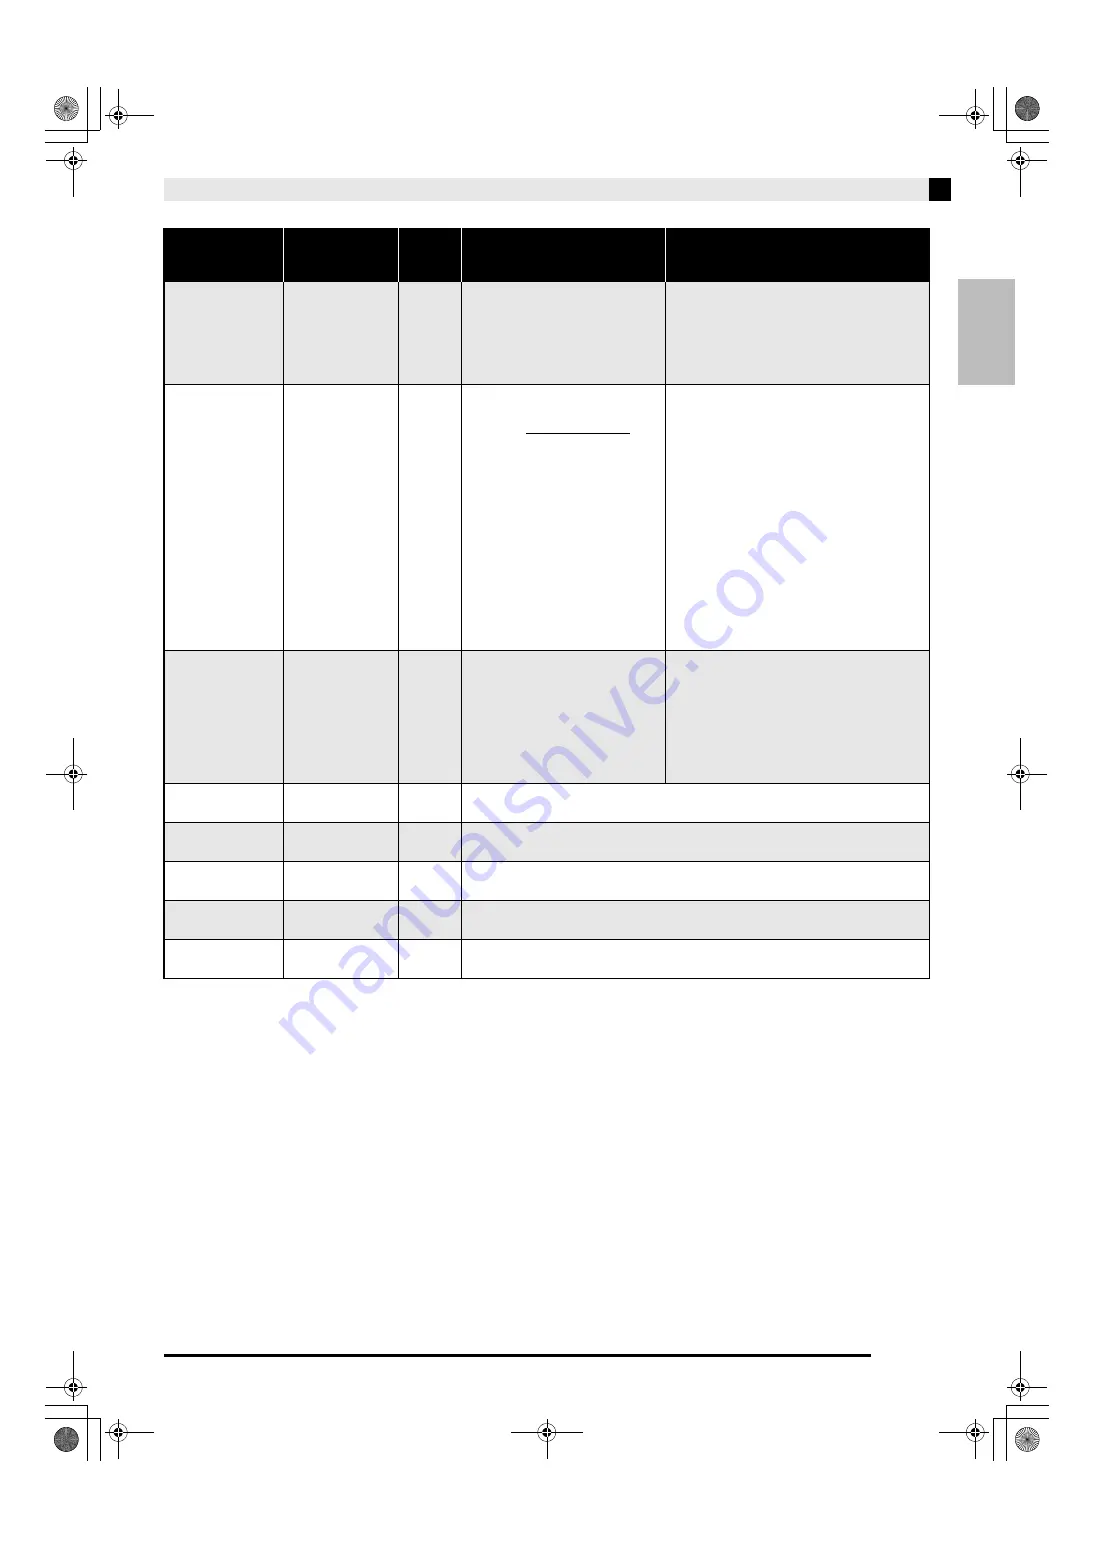
Operation tone

Off, On
Default: On

D

Selecting “Off” disables sounding 
of the operation tone whenever a 
keyboard key is pressed while the 

FUNCTION

 or 

METRONOME

 is 

depressed.

• This setting is retained even when the 

Digital Piano is turned off.

• The operation tone setting cannot be 

changed while Music Library playback is in 
progress, while the metronome is 
sounding, and during recording.

ck

Back up

Off, On
Default: Off

D

When “On” is selected for this 
setting, the Digital Piano will 
remember its current settings

*1

and restore them when it is turned 
on again.
When “Off” is selected, settings

*2


are reset to their initial defaults 
whenever the Digital Piano is 
turned on.

*1

The following settings are not 
remembered.
• Duet  Mode
• Tune  LR  (part)
• Local  control

*2

Except for the operation tone 
on/off setting.

• The back up setting cannot be changed 

while Music Library playback is in 
progress, while the metronome is 
sounding, in the Duet Mode, and during 
recording.

cl

Operation lock

Off, On
Default: Off

D

Selecting “On” for this setting locks 
the Digital Piano’s buttons (except 
for the 

P

 (POWER) button and the 

buttons required for unlock), so no 
operation can be performed.
Turn on operation lock when you 
want to protect against 
unintentional button operations.

• The operation lock setting cannot be 

changed while Music Library playback is in 
progress, while the metronome is 
sounding, and during recording.

cm

USB flash drive 
mode

Off, On
Default: Off

USB flash drive mode.

cn

Format

Off, On
Default: Off

Formats a USB flash drive.

co

Save

Off, On
Default: Off

Stores data to a USB flash drive.

cp

Load

Off, On
Default: Off

Loads data from a USB flash drive to Digital Piano song memory.

cq

Delete

Off, On
Default: Off

Deletes USB flash drive data.

Parameter

Settings

Operation 

Type 

(page E-21)

Description

Remarks

PXA800_e.book  25 ページ  2013年6月18日 火曜日 午後6時18分

Summary of Contents for Privia PX-A800

Page 1: ...te Safety Precautions Precauciones de seguridad Antes de intentar usar el piano aseg rese de leer las Precauciones de seguridad separadas English Espa ol PX A800 This recycle mark indicates that the p...

Page 2: ...ng walked on or pinched particularly at plugs convenience receptacles and the point where they exit from the apparatus 11 Only use attachments accessories specified by the manufacturer 12 Use only wit...

Page 3: ...ct E 24 Temperament Base note E 24 Temperament Base note select E 24 Touch response TOUCH RESPONSE E 24 USB device mode E 24 Send channel E 24 Local control E 24 Operation tone E 25 Back up E 25 Opera...

Page 4: ...E 2 General Guide 2 1 3 4 5 6 8 9 7 bk bq bp bl bm bn bo Front Bottom Rear PXA800_e book 2...

Page 5: ...e To select a tone on page E 5 NOTE For details about operations and settings see Configuring Settings with the Keyboard on page E 21 Your Digital Piano lets you save its current settings and lock its...

Page 6: ...rrent continue to flow within the Digital Piano in the standby state If you do not plan to use the Digital Piano for a long time or if there is a lightning storm in your area be sure to unplug the AC...

Page 7: ...oller to adjust the volume Selecting and Playing a Tone SONG a FUNCTION METRONOME GRAND PIANO VOLUME z To select GRAND PIANO CONCERT ROCK or JAZZ Press one of the GRAND PIANO buttons CONCERT ROCK or J...

Page 8: ...o Track 2 Tone Name Characteristics CONCERT A full concert grand piano tone that uses Linear Morphing for dynamic and natural tone changes This tone is designed to reproduce damper resonance and other...

Page 9: ...the main tone while the second tone will be the layered tone 1 While holding down the FUNCTION button press down the keyboard key for the first tone you want to layer and then the key for the second...

Page 10: ...ed Volume of the layered tone Second tone you selected Using Effects Hall simulator Makes your notes resonate Chorus Adds more breadth to your notes Hall simulator Name Description OFF Off N Y CLUB Ma...

Page 11: ...d to be sustained continue to play longer When GRAND PIANO is selected as the tone using this pedal generates harmonic and other resonance just like the damper pedal on an acoustic grand piano z Soft...

Page 12: ...t Be sure to input all three digits Example To enter 96 press keys 0 9 6 4 Press the METRONOME button or SONG a button to turn off the metronome NOTE To return the tempo setting to the default tempo o...

Page 13: ...xample if the initial default range is not enough when one person is playing the left hand part and another person is playing the right hand part 1 While holding down the FUNCTION and METRONOME button...

Page 14: ...playing 2 To change demo playback to a different song hold down the FUNCTION button as you use the SONG SELECT keys to specify a song number Each press of the or key raises or lowers the song number b...

Page 15: ...ust the playback tempo Hall simulator etc Refer to the pages below for information about how to configure settings Performance tempo Page E 10 step 3 under Using the Metronome Hall simulator Page E 8...

Page 16: ...ive port 1 Press the AUDIO RECORDER button Note that you should press the button and immediately release it Do not hold it down This causes the two SONG a button indicator lamps to light 2 Press the S...

Page 17: ...ecording stops automatically if the number of notes in memory exceeds the maximum Recorded Data Keyboard play Tone used Pedal operations Hall simulator and chorus settings Track 1 only Tempo setting T...

Page 18: ...g Track 1 L lamp Track 2 R lamp Example Track 1 selected 3 Select the tone and effects Track 1 only you want to use in your recording Tone page E 5 Effects page E 8 NOTE If you want the metronome to s...

Page 19: ...ten to playback of Track 1 as you record to Track 2 5 Select the tone and effects Track 1 only you want to use for your recording 6 Press the SONG a button or play something on the keyboard This will...

Page 20: ...ay back data stored in song memory the memory playback and your keyboard play are both recorded to USB flash drive Linear PCM 16bit 44 1 kHz Stereo Recording Capacity 99 files No 01 to No 99 Approxima...

Page 21: ...RDER button Recording Digital Piano Play as Data Recorded in Song Memory Plays Back Audio Recorder 1 Press the AUDIO RECORDER button Note that you should press the button and immediately release it Do...

Page 22: ...r lamps to light 2 Press the SONG RECORDER button twice so its lamp is flashing 3 If you want to delete the last file you recorded jump directly to step 4 To select a file and delete it Hold down the...

Page 23: ...ion Types There are four types of operations that you can perform while configuring settings with the keyboard keys Type A Type B Type C and Type D Example Pressing the STRINGS keyboard key to select...

Page 24: ...Right keyboard 6Song select Temperament select Base note select bmSong volume boBrilliance bnMetronome volume 2Base note 3Keyboard key Transpose 4Keyboard tuning Tuning 7Hall simulator 8Tone selection...

Page 25: ...Layer balance 24 to 0 to 24 Default 0 B Specifies the volume balance between the main tone and the layered tone page E 8 Parameter Settings Operation Type page E 21 Description Remarks 6 Song select...

Page 26: ...ahargah 13 Segah 14 Gurjari Todi 15 Chandrakauns 16 Charukeshi 2 6 Temperament Base note Temperament Base note select Base note 0 to 9 C to B Default C A Specifies the base note of the currently selec...

Page 27: ...n tone on off setting The back up setting cannot be changed while Music Library playback is in progress while the metronome is sounding in the Duet Mode and during recording cl Operation lock Off On D...

Page 28: ...tored in the AUDIO folder automatically assigning them names from TAKE01 WAV to TAKE99 WAV You also can connect a USB flash drive to a computer and change the names of audio data WAV files to the form...

Page 29: ...ive mounting sequence is being performed The Digital Piano s L R lamps flash while the mounting process is in progress It may take up to 10 or 20 seconds or even longer for a USB flash drive to be mou...

Page 30: ...format 1 Insert the USB flash drive you want to format into the Digital Piano s USB flash drive port 2 While holding down the FUNCTION button press the keyboard key that corresponds to the USB flash d...

Page 31: ...lamps to flash 3 While holding down the FUNCTION button press the save keyboard key This will cause the GRAND PIANO CONCERT button lamp to light To exit the data save operation hold down the FUNCTION...

Page 32: ...USB flash drive to the Digital Piano s Music Library song numbers 61 to 70 After that you can play back the user song or use it for lesson play 1 On your computer copy the file you want to load to on...

Page 33: ...cate that the USB flash drive mode has been exited You can use the procedure below to delete song data stored in the MUSICLIB folder on a USB flash drive 1 Insert the USB flash drive into the Digital...

Page 34: ...select any of the first 99 songs sorted in file name sequence for playback 2 Insert the USB flash drive into the Digital Piano s USB flash drive port 3 While holding down the FUNCTION button press th...

Page 35: ...to save Record something before performing a save operation Read Only A read only file with the same name you are trying to use is already stored on USB flash drive Change the name and then save the n...

Page 36: ...he song data Example Delete any tracks that are not required Format 1 The USB flash drive format is not compatible with this Digital Piano 1 Format the USB flash drive on the Digital Piano 2 The USB f...

Page 37: ...urn on the Digital Piano If this is the first time you are connecting the Digital Piano to your computer the driver software required to send and receive data will be installed on your computer automa...

Page 38: ...If data is deleted it will take longer than normal for the Digital Piano to power up the next time you turn it on page E 4 1 Perform steps 1 through 3 of the procedure under Connecting the Digital Pi...

Page 39: ...tensions To show file name extensions under Windows XP To show file name extensions under Windows Vista or Windows 7 To show file name extensions under Windows 8 To load a song into user song memory M...

Page 40: ...contents of MUSICLIB into user song memory and the contents of RECORDER into Recorder memory IMPORTANT A data conversion error is indicated when both of the SONG a button lamps and the GRAND PIANO CON...

Page 41: ...e tape securing the keyboard cover in place until assembly is complete Removing the tape can cause the keyboard cover to open and close during assembly creating the risk of personal injury to your han...

Page 42: ...ide panels A and B Remove the two screws one on the outside of each side panel that hold the brackets and then slide the brackets as shown in the illustration After extending the anti tip brackets rei...

Page 43: ...angle brackets H which you installed in step 5 above 7 Mount brackets L onto both ends of the pedal unit E 8 Use the screws F to securely fix the brackets L to the pedal unit E 9 After adjusting the...

Page 44: ...es not fall off the stand IMPORTANT After mounting the piano onto the stand check to make sure the sides of the piano and the side panels of the stand are position relative to each other as shown in t...

Page 45: ...comes with the Digital Piano into its power terminal DC 24V 3 Plug the power cord of the AC adaptor that comes with the Digital Piano into a household power outlet as shown in the illustration below...

Page 46: ...when opening or closing the lid To open the lid 1 Lift up the lid as shown in the illustration The lid has a support bracket indicated by the star in the illustration attached to its inside surface Ch...

Page 47: ...e Digital Piano is turned off before plugging in or unplugging the AC adaptor The AC adaptor will become warm to the touch after very long use This is normal and does not indicate malfunction Use the...

Page 48: ...ecifies the terminal such as AUX IN to which the piano is connected Use the Digital Piano s VOLUME controller to adjust the volume level Connecting to a Musical Instrument Amplifier 2 Use commercially...

Page 49: ...our computer s music software E 35 2 Turn off the Digital Piano and then exit the music software on your computer Next turn the Digital Piano back on and then restart the music software on your comput...

Page 50: ...ng 1 Number of Tracks 2 Capacity Approximately 5 000 notes total Recorded Data Protection Built in flash memory Audio Recorder Real time recording and playback to USB flash drive Linear PCM 16bit 44 1...

Page 51: ...whenever using this product Be especially careful when playing late at night to keep the volume at levels that do not disturb others Other steps you can take when playing late at night are closing th...

Page 52: ...allow the electrical load output to exceed the label rating 12 Make sure the surrounding area is dry before plugging into a power source 13 Make sure the product is oriented correctly 14 Unplug the pr...

Page 53: ...erszenen 16 Tr umerei Kinderszenen 17 Tambourin 18 Menuet BWV Anh 114 Clavierb chlein der Anna Magdalena Bach 19 Inventio 1 BWV 772 20 Inventio 8 BWV 779 21 Inventio 13 BWV 784 22 Praeludium 1 BWV 846...

Page 54: ...6 77 78 80 81 82 83 84 88 Bank select Modulation Portamento Time Data entry LSB MSB 2 Volume Pan Expression DSP Parameter0 2 DSP Parameter1 2 DSP Parameter2 2 DSP Parameter3 2 Damper Portamento Switch...

Page 55: ...ng walked on or pinched particularly at plugs convenience receptacles and the point where they exit from the apparatus 11 Only use attachments accessories specified by the manufacturer 12 Use only wit...

Page 56: ...te Safety Precautions Precauciones de seguridad Antes de intentar usar el piano aseg rese de leer las Precauciones de seguridad separadas English Espa ol PX A800 This recycle mark indicates that the p...

Reviews: