LK-125
– 7 –
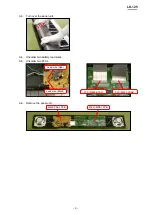
DISASSEMBLY
CAUTION
The photos show a prototype. The appearance of the instrument, such as color, may
z
differ from the actual model.
To avoid damages to the instrument and the floor, lay the instrument on a mattress
z
or blanket before starting disassembling.
There are several kinds of screws. Be sure to use the correct type of screws when
z
reassembling. It is advisable to sort the screws as shown below after removing
them.
If a screw cap is attached to a screw, be sure to reattach the screw cap when
z
reassembling.
BEFORE STARTING REPAIR OR SERVICING
Remove the AC adaptor or the AC cord.
z
Remove accessories such as the music stand.
z
Summary of Contents for LK-125
Page 1: ...LK 125 SEP 2010 LK 125 Ver 2 Jan 2012 ELECTRONIC KEYBOARD...
Page 7: ...LK 125 5 PRINTED CIRCUIT BOARDS Main PCB M821 MDA1 Power Amp PCB M820 PSA1...
Page 30: ...LK 125 28 Keyboard LED PCB M821 LDA1 to LDA2 CN503 to LD3M JG...
Page 31: ...LK 125 29 Keyboard LED PCB M821 LDA2 to MDA1 CN2 to LD5M JE to LD4M JF to LDA1 CN501...
Page 32: ...LK 125 30 Keyboard LED PCB CSM446 LD3M LD4M LD5M to LDA1 CN502 to LDA2 CN504 to LDA2 CN505...


