background image

E-9

FUNCTION

SHIFT

CODE

CAPS

M-FEED

6mm

STAMP
MIRROR

CAS

A A A

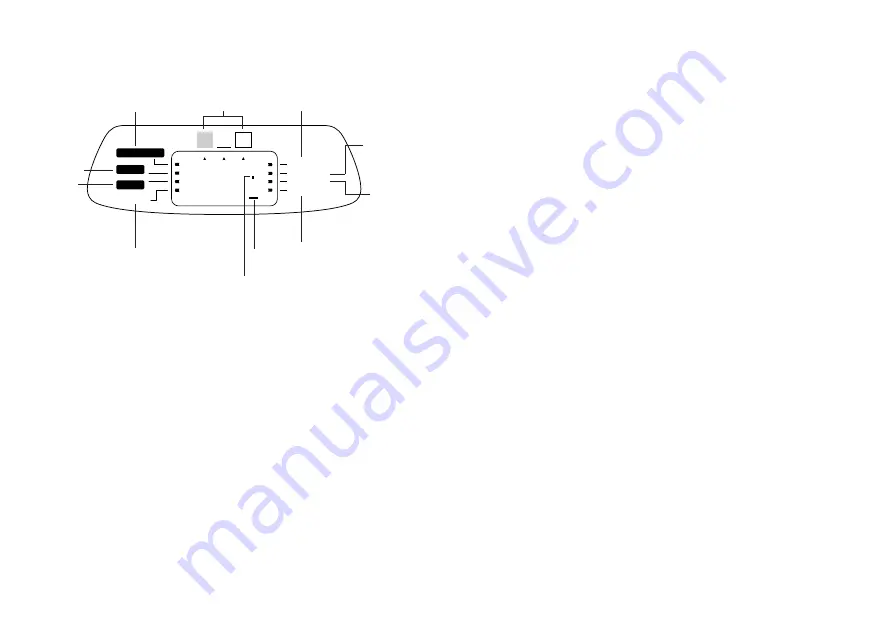
Display Symbols and Indicators

Before getting into actual input, you should first become acquainted with the
symbols and indicators used on the Label Printer display.

Function indicator

This indicator appears when you press the 

FUNCTION

 key. Pressing a key

while this indicator is on the display causes the function marked above that key
to be executed.

Shift indicator

This indicator appears when you press the 

SHIFT

 key. While this indicator is on

the display, the keyboard is shifted, so the letter keys input upper-case alpha
characters. The number keys input the punctuation symbols marked in the up-
per right corners of the keys.
If both the caps mode indicator and the shift indicator are shown on the display,
the keyboard is shifted to lower-case input.
The keyboard automatically unshifts (and the shift indicator disappears) as soon
as you input a character.

Code indicator

This indicator appears when you press the 

CODE

 key. While this indicator is on

the display, number keys 

1

 through 

0

 input the accents marked above them and

the 

U

O

P

A

S

J

K

L

Z

C

 and 

N

 keys input the special characters marked

in their lower right corners.
The keyboard automatically returns to normal (and the code indicator disap-
pears) as soon as you input an accent.

Caps indicator

This indicator appears when the Label Printer is in the caps (upper-case) mode.
All letters you input in the caps mode are upper-case. When the caps mode
indicator is not shown on the display, all letters are input as lower-case.
Note that the Label Printer stays in the caps mode until you press the 

CAPS

key again.
If both the caps mode indicator and the shift indicator are shown on the display,
the keyboard is shifted to lower-case input.

Effect indicators

These indicators point to the character effect that is currently in use. You can
select between shading, underline, and box.

Stamp printing indicator

This indicator appears when the Label Printer is set up for stamp printing. La-
bels you create with stamp printing can be attached to an optionally available
stamp holder and then used as a pre-inked stamp.

Mirror image printing indicator

This indicator appears when the Label Printer is set up for mirror image printing.
Normal (non mirror image) printing is performed when this indicator is not shown.

Manual feed indicator

This indicator appears when you are using manual feed instead of auto feed.
Auto feed is in effect when this indicator is not on the display.

Important!

After you finish printing when using manual feed, be sure to always press

FUNCTION

 and then 

PRINT

 (FEED) to feed the tape before cutting it. If you

don’t you will cut off part of the printed text.

Shift
indicator

Mirror image
printing
indicator

Manual feed
indicator

Cursor

6mm tape indicator

Caps indicator

Stamp printing indicator

Effect indicators

Function indicator

Character position marks

Code
indicator

Summary of Contents for KL-70E

Page 1: ...KL 70E User s Guide...

Page 2: ...to become shorted Never expose batteries to direct heat or dispose of them by incineration Tape Cutter Never touch the tape cutter while a tape cut operation is being per formed Doing so can result i...

Page 3: ...her sources of intense heat Doing so can melt power cord insulation and create the danger of fire and electrical shock When unplugging the power cord from the wall socket grasp the plug Never pull on...

Page 4: ...malfunctions repairs or interruption of power supply It is up to the user to keep backup records of important data Keep this manual on hand for future reference Contents Important Safety Precautions...

Page 5: ...smudged When this hap pens clean off the printer head by wiping it with a cotton swab moistened with alcohol page 18 Use of the Label Printer next to a television or radio may interfere with recep ti...

Page 6: ...the BATT message ap pears Important All data stored in memory is deleted whenever batteries go dead and when you replace batteries Be sure to keep written backup copies of all important data text and...

Page 7: ...negative ends of the batteries are facing correctly when you load them 4 Replace the back cover As shown in the illustration hook the cover on the battery side of the compartment first and then close...

Page 8: ...the Label Printer following the reset operation Auto Power Off Function If you do not perform any key operation for about six minutes the Label Printer automatically turns power off To restore power...

Page 9: ...in from step 1 above a Tape Width Specification Important When using 6mm tape using certain character sizes can cause characters to run off the top or bottom of the tape Be sure to use the following p...

Page 10: ...e Label Printer is in the caps upper case mode All letters you input in the caps mode are upper case When the caps mode indicator is not shown on the display all letters are input as lower case Note t...

Page 11: ...press CAPS again Press SPACE to input spaces If you input a wrong character press BS to delete it and input again See page 11 for other details on editing text 3 When you reach the end of a line of te...

Page 12: ...ither the BS key or the DEL key which is the K cursor key The only difference between the operation of these two keys is the location of the cursor To delete characters using the BS key Example To cha...

Page 13: ...rs XYZ Inputting the new characters causes them to be inserted at the cursor posi tion The existing characters are opened up to make room for the new char acters To change existing characters to diffe...

Page 14: ...a malfunction and normal printing should resume shortly indicated by the message P R N T on the display Important Never touch the tape cutter while a tape cut operation is being performed Doing so can...

Page 15: ...e of the text you have input and laid out To stop a print operation that is in progress press ESC 2 After the print operation is complete press down on the tape cutter button to cut the tape 3 Use sci...

Page 16: ...ss FUNCTION and then 1 MEMO 3 Press L a number of times to change to the text store prompt 2 Press H J K or L to change the setting shown on the display between ON mirror printing and OFF normal 3 Whe...

Page 17: ...ring anything If there is nothing in memory yet your text is automatically stored in Area 1 If Area 1 already contains data your new input is automatically stored in Area 2 If there is not enough room...

Page 18: ...te Converting Euros to a National Currency Selecting PRINT B A performs the conversion according to the following formula Value Rate Example Round to two decimal places To set the conversion rate 1 Pr...

Page 19: ...Label for 30 discount To perform the calculation and print the label CURRENCY A NOW CURRENCY B Blank RATE 0 7 30 ROUND 2 Round to two decimal places FORMAT 1 PRINT PRINT B A 1 Press FUNCTION Z RATE i...

Page 20: ...2 EFFECT CANCEL MIRROR OFF M FEED NO 6mm OFF INT To initialize the Label Printer 1 Turn power off 2 While holding down the PRINT and ESC keys press ON to turn power on 3 Keeping PRINT and ESC held do...

Page 21: ...the ink ribbon cassette and check to make sure the ink ribbon is not broken Next take up any slack in the ink ribbon and then reload the tape cartridge Important Before loading an ink ribbon cassette...

Page 22: ...digits or more than seven digits with a leading decimal point More than one decimal point character Action Use only one B mark Only two lines of text can be input so text can contain only one B mark...

Page 23: ...T ERR Possible Causes Both text memory areas AREA 1 and AREA 2 already contain text Battery power is too low Memory data has become corrupted for some reason Action Delete text from one of the text me...

Page 24: ...ter font Sans serif Character effects Shade underline box Character sizes 1 1 1 2 1 3 2 1 2 2 2 3 Number of lines 1 6mm tape 1 or 2 other tapes Memory Text Up to approximately 126 characters total sto...

Page 25: ...CASIO COMPUTER CO LTD 6 2 Hon machi 1 chome Shibuya ku Tokyo 151 8543 Japan...

Reviews: