background image

EN-56

Reference

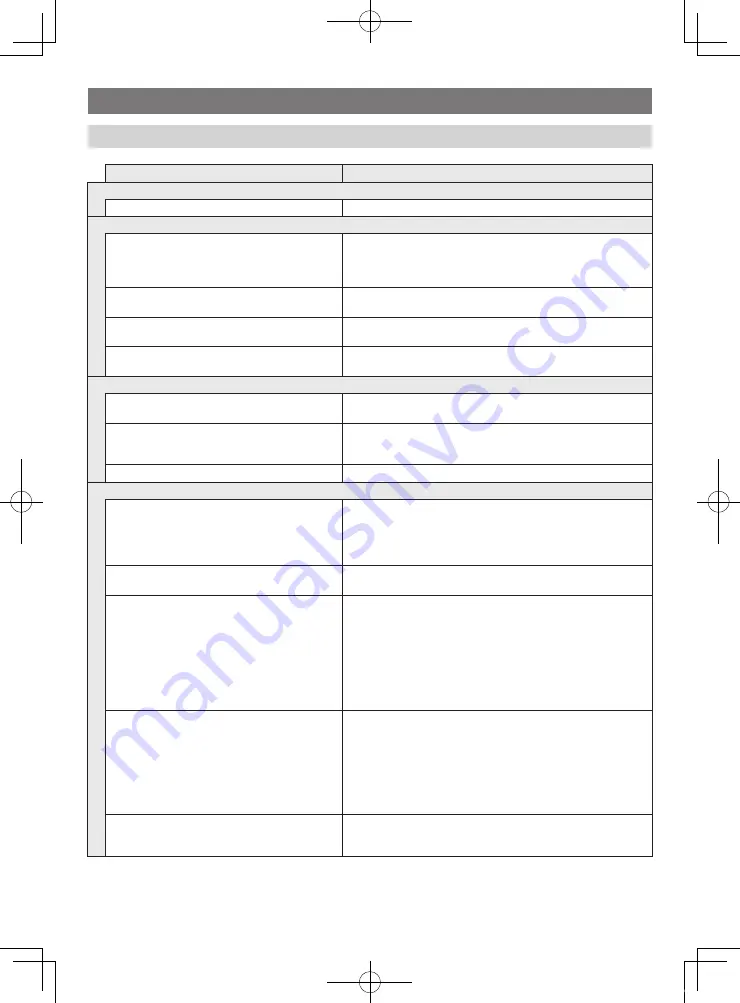
Troubleshooting

Symptom

Action

Included Accessories

I can’t find something that should be here.

Carefully check inside all of the packing materials.

Power Requirements

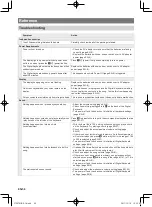
Power will not turned on.

• Check the AC adaptor or make sure that the batteries are facing 

correctly (page EN-8).

• Replace the batteries with new ones or switch over to AC adaptor 

power (page EN-8).

The display lights up momentarily but power does 

not turn on when I press the 

1

P

 (power) button.

Press 

1

P

 (power) firmly and completely to turn on power.

The Digital Keyboard outputs a loud sound and then 

suddenly powers down.

Replace the batteries with new ones or switch over to AC adaptor 

power (page EN-8).

The Digital Keyboard suddenly powers down after 

about 30 minutes.

This happens when Auto Power Off (page EN-9) is triggered.

Display

The display keeps going out or are flashing.

Replace the batteries with new ones or switch over to AC adaptor 

power (page EN-8).

On-screen keyboard keys or notes remain on the 

display.

A Step Up Lesson is in progress and the Digital Keyboard is waiting 

for you to play the next note in the song. To stop this from happening, 

cancel the lesson (page EN-23).

Screen contents are visible only from straight ahead. This is dues to production limitations. It does not indicate malfunction.

Sound

Nothing happens when I press any keyboard key.

• Adjust the volume setting (page EN-9).

• Check if something is plugged into 

en

 on the back of the Digital 

Keyboard.

• Turn power off and then back on to initialize all keyboard settings 

(page EN-9).

Nothing happens or notes do not play normally when 

I play notes on the left side of the keyboard.

Press 

9

 to disable chord input in the accompaniment keyboard area 

(page EN-27).

Nothing happens when I start an Auto 

Accompaniment.

• With rhythms 186 to 195, nothing will sound until you play a chord 

on the keyboard. Try playing a chord (page EN-27).

• Check and adjust the accompaniment volume setting (page 

EN-32).

• If there is no user rhythm stored in memory, Auto Accompaniment 

will not start when you press 

8

 while a rhythm in the range of 196 

to 205 is selected (page EN-27).

• Turn power off and then back on to initialize all Digital Keyboard 

settings (page EN-9).

Nothing happens when I start playback of a built-in 

song.

• It takes a little time after you press the button until the song starts to 

play. Wait for a moment for the song to start.

• Check and adjust the song volume (page EN-21).

• If there is no user song stored in memory, song playback will not 

start when you press 

8

 while a song in the range of 161 to 176 is 

selected (page EN-21).

• Turn power off and then back on to initialize all Digital Keyboard 

settings (page EN-9).

The metronome does not sound.

• Check and adjust the metronome volume setting (page EN-32).

• Turn power off and then back on to initialize all Digital Keyboard 

settings (page EN-9).

CTX870IN-E-1A.indd   58

2017/12/18   15:25:00

Summary of Contents for CT-X870IN

Page 1: ...eparate Safety Precautions Please keep all information for future reference CT X870IN About Music Score data You can use a computer to download music score data from the CASIO Website For more information visit the URL below http world casio com MA1712 A Printed in China C CTX870IN E 1A indd 1 2017 12 18 15 24 54 ...

Page 2: ... product Manufacturer CASIO COMPUTER CO LTD 6 2 Hon machi 1 chome Shibuya ku Tokyo 151 8543 Japan Responsible within the European Union Casio Europe GmbH Casio Platz 1 22848 Norderstedt Germany www casio europe com Declaration of Conformity According to EU Directive Any reproduction of the contents of this manual either in part or its entirety is prohibited Except for your own personal use any oth...

Page 3: ...EN 24 Lesson Settings EN 25 Using Auto Accompaniment EN 27 Playing the Rhythm Part Only EN 27 Playing All Parts EN 27 Using Auto Accompaniment Effectively EN 30 Using One Touch Preset EN 32 Increasing the Number of Rhythms User Rhythms EN 32 Using Music Preset EN 33 Using Auto Harmonize EN 33 Using the Arpeggiator EN 34 Looking Up the Notes of Chords Chord Book EN 35 Saving Keyboard Setups to Regi...

Page 4: ... Drum Assignment List A 2 Fingering Guide A 7 Chord Example List A 8 MIDI Implementation Chart Included Accessories Music Stand Leaflets Safety Precautions Appendix Other Warranty etc Items included as accessories are subject to change without notice Separately Available Accessories You can get information about accessories that are separately for this product from the CASIO catalog available from...

Page 5: ...s bt ck cl cm cn co cp cr cs 4 5 6 7 9 8 ct dk dr The following explains the meaning of the symbol that appears on the product console and with the key names below Indicates a function that is enabled by holding down the button for some time CTX870IN E 1A indd 6 2017 12 18 15 24 54 ...

Page 6: ... LISTEN button EN 23 37 ck Area2 WATCH button EN 23 37 cl Area3 REMEMBER button EN 24 37 cm Area4 PHRASE button EN 24 37 cn STORE button EN 37 co SPLIT POINT button EN 14 cp LAYER OCTAVE button EN 13 17 cq METRONOME BEAT button EN 10 cr TEMPO TAP button EN 11 cs FUNCTION button EN 43 ct Number keys EN 6 dk and keys EN 6 dl Speakers dm Song Bank list dn Rhythm list do Tone list dp Display dq Tray T...

Page 7: ...r is not shown on the display press the 0 number key to display it and then input the value you want Tone rhythm song bank Music Preset indicators Indicators Number setting name status display I N F V E Auto Accompaniment Types indicators ACCOMP Auto Accompaniment indicator Chord name Tempo measure Beat display Part fingering display Keyboard display Registration bank indicator Track Indicator I I...

Page 8: ...ill be shown on the display You can change the category if you want Tones Rhythms Songs Music Presets 1 Press bo CATEGORY Each press of bo CATEGORY selects the first number of the next sequential category After pressing bo CATEGORY you can also scroll forward and back between category names using the dk and keys If you do not perform any operation for a while after displaying a category the displa...

Page 9: ...Doing so creates the risk of accident Be sure to turn off power before loading batteries It is up to you to prepare six commercially available batteries Do not use oxyride batteries or any other nickel based batteries 1 Open the battery cover on the bottom of the Digital Keyboard 2 Load six AA size batteries into the battery compartment Make sure the positive and negative ends of the batteries are...

Page 10: ...al Keyboard for a long time or if there is a lightning storm in your area be sure to unplug the AC adaptor from the power outlet If you do not perform any operation on the Digital Keyboard for about 30 minutes power will turn off automatically Disabling Auto Power Off You can disable Auto Power Off to ensure that power is not turned off automatically during a concert etc See Function No 70 under F...

Page 11: ... display Contrast 4 Use the ct number keys and the dk and keys to adjust display contrast page EN 6 The contrast setting range is 01 to 17 The metronome lets you play and practice along with a steady beat to help keep you on tempo 1 Press cq METRONOME This starts the metronome 2 Press cq METRONOME again to stop the metronome Changing Keyboard Response to Touch Pressure Touch Response Changing Touc...

Page 12: ...EMPO TAP to make Tempo appear on the display 2 Use the ct number keys and the dk and keys to change the tempo value Holding down either button changes the value at high speed You can specify a tempo value in the range of 20 to 255 You can set the currently selected song or rhythm and music preset to the recommended tempo by long pressing cr TEMPO TAP 3 To return to the previous screen press cs FUN...

Page 13: ... press of bk PIANO ORGAN toggles the tone setting between a piano tone Tone Number 001 and an organ tone Tone Number 079 In addition to the tone number you also can configure the settings Example Rhythm Number 176 When a piano tone is selected 098 When an organ tone is selected You can configure the keyboard to play two different tones at the same time Layer or to play different tones in the left ...

Page 14: ...ressing of the bl TONE button until the pointer is next to the part you want When you have multiple DSP tones selected the DSP tone effects assigned to the UPPER 2 and LOWER parts may become disabled Check to make sure that the U2 Layer and L split indicators are not shown on the display before starting this procedure If either indicator is displayed press cp LAYER and or co SPLIT so they are not ...

Page 15: ...n will turn split off If you turn on both layer and split layering will be applied to the right side range of the keyboard only 1 Keep co SPLIT depressed until you finish step 2 of this procedure This will cause the key name at the currently set split point to appear on the display 2 Press the keyboard key where you want the split point to be The key you press will become the lowest note of the ri...

Page 16: ...ype you want You can select from among chorus types 1 through 11 If you select Setting Number 1 Tone appropriate chorus settings are assigned to each tone The actual effect produced by chorus depends on the tone you are using Using Reverb Setting Number Parameter 1 Off 2 6 Room1 5 7 8 Large Room1 2 9 13 Hall1 5 14 15 Stadium1 2 16 17 Plate1 2 18 19 Delay1 2 20 Church 21 Cathedral R e v e r b Using...

Page 17: ...3 Treble Enhances the high range 4 Loudness Enhances everything 5 Mellow Creates a soft feeling 6 Bright Creates a bright feeling 7 Rock Creates a sound optimized for rock music 8 Dance Creates a sound optimized for dance music 9 Jazz Creates a sound optimized for jazz music 10 Classic Creates a sound optimized for classical music Using a Pedal Connecting a Pedal Unit em PEDAL Selecting the Pedal ...

Page 18: ...he ct number keys and the dk and keys to adjust tuning page EN 6 You can use the number keys to input the integer part left of the decimal point of the value only Use the and keys to change the value to the right of the decimal point Octave Shift lets you raise or lower the pitch of the keyboard notes of each tone part page EN 12 in octave units The octave shift setting range is 3 to 3 octaves 1 K...

Page 19: ...ION Button cs Functions page EN 43 With this Digital Keyboard tune data is referred to as songs You can listen to the built in songs for your own enjoyment or you can play along with them for practice In addition to simple listening enjoyment the songs can be used with the lesson system page EN 22 for practice You can increase the number of songs using your computer page EN 52 1 Press bl TONE and ...

Page 20: ...epeat by pressing 3 REPEAT Use the operations in this section to perform pause skip forward and skip back operations Pause 1 Press 7kPAUSE This pauses song playback 2 Press 7kPAUSE again to resume playback from the point where you paused it Skip Forward 1 Press 6dFF This skips song playback forward to the next measure Each press of 6dFF skips ahead one measure Holding down 6dFF skips forward at hi...

Page 21: ...the start measure press 4A B This specifies the measure as the start measure 3 When playback reaches the measure you want to select as the end measure press 4A B again This specifies the measure as the end measure and starts repeat playback of the measures in the specified range During repeat play you can use 7kPAUSE to pause playback 6dFF to skip forward or 5sREW to skip back 4 Pressing 4A B agai...

Page 22: ...m a USB flash drive Whenever you copy a file to the USB flash drive that you plan to play on the Digital Keyboard be sure to store the file in the MUSICDAT folder on the USB flash drive 1 Insert the USB flash drive into the Digital Keyboard s USB flash drive port Never plug any other device besides a USB flash drive into the USB flash drive port When you perform a USB flash drive operation or turn...

Page 23: ...same tone used for song playback will be assigned to the keyboard page EN 21 You can repeat specific sections of a song for practice See Repeating Playback of Specific Measures page EN 20 In this mode you concentrate on timing as you press any key to play the notes of the song melody This is a good way for beginners to master key press timing while enjoying playing on the keyboard 1 Select the son...

Page 24: ...rovided on the display and by voice fingering guide During this lesson the display shows the key you need to press next Voice fingering guide uses a simulate voice to announce which finger you should use 3 To stop Lesson 2 press ck WATCH or 8 PLAY STOP If you complete Lesson 2 play to the end a score that rates your play appears on the screen Fingering Guide may not be available in the case of a s...

Page 25: ...songs are pre divided into phrases to help you master keyboard play The Digital Keyboard may not be able to divide a song imported from an external device page EN 21 into phrases that can be used for practice If you want to divide such a song into phrases see Changing the Phrase Length page EN 26 1 Press cm PHRASE This turns on the lesson phrase function 2 You can use 5sREW and 6dFF to select phra...

Page 26: ...wing procedure to turn off note guide which sounds the note to be played next in Lesson 2 and Lesson 3 1 Press cs FUNCTION and then use the ct 2 o and 3 p keys to display Lesson 2 Press ct 6 ENTER key 3 Use the ct 2 o and 3 p keys to display NoteGuid 4 Press the dk key to select the off setting Messages that Appear during Lessons Message Description Phrase Appears when you select a phrase when a l...

Page 27: ...gth setting Simplifying accompaniment helps to make the lesson sound easier to hear See Function No 42 under FUNCTION Button cs Functions page EN 43 The part channel provides part information that is used by the functions below If a song does not have any part channel information the current settings of these functions will be used Tone Sync page EN 21 Lesson Function page EN 23 See Functions No 6...

Page 28: ...Use the number keys to enter the rhythm number Specify three digits for the rhythm number Example To select 001 enter 0 3 0 3 1 To jump to the top rhythm of a category first make sure a rhythm name is shown on the display Next hold down bo CATEGORY as you use the dk and keys to select the category you want 3 Press 8 START STOP This starts the rhythm 4 Play along with the rhythm 5 To stop the rhyth...

Page 29: ... as you play the melody with your right hand 5 Pressing 9 ACCOMP again returns to rhythm only accompaniment You can select from among the following six chord input modes CASIO CHORD FINGERED 1 FINGERED 2 FINGERED ON BASS FINGERED ASSIST FULL RANGE CHORD 1 Press bq CHORD MODE 2 Use the dk and keys to select the chord input mode you want CASIO CHORD With CASIO CHORD you can use simplified fingerings...

Page 30: ...or chord whose name is marked above the key All of the accompaniment area keys that are marked with the same chord name play exactly the same chord Example C C Major Minor Chords To play a minor chord press the accompaniment area key that corresponds to the major chord while also pressing one other accompaniment area key to the right Example Cm C Minor Seventh Chords To play a seventh chord press ...

Page 31: ...ion pattern 1 Press 5VAR FILL IN This starts the variation pattern 2 Pressing 4NORMAL FILL IN returns to normal pattern Chord Type Minor Chords To play a minor chord press the accompaniment keyboard key that specifies the major chord while also adding the closest black key to the left of the major chord key Example Cm C Minor Seventh Chords To play a seventh chord press the accompaniment keyboard ...

Page 32: ...odies or an accent Normal and variation patterns have their own unique fill in patterns Normal Pattern Fill in 1 While a normal pattern is playing press 4NORMAL FILL IN This plays the fill in for the normal pattern Normal pattern play will resume after the fill in pattern is complete Variation Pattern Fill in 1 While a variation pattern is playing press 5VAR FILL IN This plays the fill in for the ...

Page 33: ...me of the Auto Accompaniment See Function No 8 under FUNCTION Button cs Functions page EN 43 With One Touch Preset the Digital Keyboard automatically configures optimal tone tempo and other settings in accordance with the rhythm pattern you select 1 Hold down bm RHYTHM until the current tone screen appears on the display This will automatically apply the One Touch Preset settings in accordance wit...

Page 34: ... along on the keyboard with the accompaniment To stop Auto Accompaniment press 8 START STOP or 6 ENDING SYNCHRO START To exit Music Preset press 9 ACCOMP However the tone and rhythm settings configured by the selected music preset remain in effect See Function No 66 under FUNCTION Button cs Functions page EN 43 Auto Harmonize automatically adds harmony to notes you play with your right hand which ...

Page 35: ...ype 4 Use the dk and keys to select the Arpeggiator type you want For details about arpeggio types refer to the separate Appendix Type number Type Name Description 01 Duet 1 Adds close separated by 2 to 4 degrees 1 note harmony below the melody note 02 Duet 2 Adds open separated by more than 4 to 6 degrees 1 note harmony below the melody note 03 Country Adds country style harmony 04 Octave Adds th...

Page 36: ...rds that you do not know how to play Specifying root chord type and inversion settings causes the chord form to appear on the display and sounds the chord You can also sound Auto Accompaniment based on the looked up chord or play Auto Accompaniment and have the chords that are played displayed by the chord book 1 Hold down bq CHORD MODE until the message Root appears on the display 2 Specify the r...

Page 37: ...note and chord type When playing a chord form make sure that it fits within the accompaniment keyboard range Use an inverted chord form if necessary This causes the N indicator to flash on the display to indicate synchro start standby 3 On the accompaniment keyboard press the keys of the notes that make up the displayed chord form This will start Auto Accompaniment sounding the chord you selected ...

Page 38: ...f type Chorus on off type Accomp on off Arpeggiator hold on off Layer on off Split on off Pedal effect Preset Scales Pitch Bend range tone part on off 1 Press bm RHYTHM 2 Configure the tone rhythm and other settings you can to include in the setup 3 Press bs BANK to select the bank you want Each press of bs BANK cycles through the bank numbers You also can select a bank using the ct number keys an...

Page 39: ...s 1 to 4 normally causes the applicable Digital Keyboard settings to be overwritten by the recalled settings With the Freeze you can disable overwriting of specific setting items whenever setup data is recalled 1 Long press bs BANK to toggle Freeze between on and off Freezable Setting Items Tones Rhythms Auto Harmonize Arpeggiator Tempo Controllers Pedals and Pitch Bender Transpose Scales Split Po...

Page 40: ...o stop recording press bp RECORD STOP 6 To play back what you have recorded press 8 PLAY STOP Each press of 8 PLAY STOP starts and stops playback Turning off the Digital Keyboard while recording is in progress will cause any data in recorder memory to be deleted A new recording replaces deletes previously recorded contents Due to the way the Digital Keyboard s system is designed certain tone Auto ...

Page 41: ...TOP and then start playing 6 To stop recording press bp RECORD STOP To play back what you have recorded press 8 PLAY STOP Each press of 8 PLAY STOP starts and stops playback 7 Repeat steps 3 through 6 to record the other tracks 8 After you finish recording all of the tracks press 8 PLAY STOP This will start playback of the recorded tracks Press 8 PLAY STOP to stop or restart playback You can use t...

Page 42: ...ecorded track and record new keyboard play along with it press 8 PLAY STOP and then play along with the playback This section explains how to play along and record along with one of the Digital Keyboard s songs Recorded content is saved in Song Bank location 171 The following operations and settings also are recorded along with your keyboard play Tone number tempo reverb setting octave shift setti...

Page 43: ... 4 Use the ct 2 o and 3 p keys to select Song Clr 5 Press the ct 6 ENTER key This causes Sure to appear on the display 6 Press the dk YES key This deletes the song To cancel press the dk NO key 1 Press bn SONG BANK 2 Use the ct number keys and the dk and keys to select the song that contains the track you want to delete 3 Hold down bp RECORD STOP 4 Use the ct 2 o and 3 p keys to select Trk Clr 5 U...

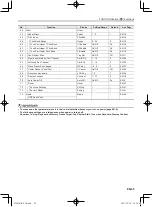
Page 44: ... causes the FUNCTION indicator to disappear from the display FUNCTION Button cs Functions To select a function No Function Display Setting Range Default See Page 1 Transpose Trans 12 12 0 EN 17 2 Octave Shift Octave EN 17 3 Tone Part Upper 1 Octave Shift U1 Oct 3 3 0 EN 17 4 Tone Part Upper 2 Octave Shift U2 Oct 3 3 0 EN 17 5 Tone Part Lower Octave Shift L Oct 3 3 0 EN 17 6 Split Point Split Pt 36...

Page 45: ...sson EN 25 38 Voice Fingering Guide Speak On Off On EN 25 39 Next Note Guide NoteGuid On Off On EN 25 40 Performance Evaluation Scoring On Off On EN 26 41 Phrase Length PhraseLn 1 8 4 EN 26 42 Simplifying Accompaniment PlainAcc On Off Off EN 26 43 Chord Book Chord Bk EN 35 44 Chord Root Root 1 12 1 EN 35 45 Chord Type Type 1 25 1 EN 35 46 Chord Inversion Invert 0 to Depends on chord type 0 EN 35 4...

Page 46: ...rt Upper 2 Pitch Bend U2Enable On Off On EN 18 62 Tone Part Lower Pitch Bend L Enable On Off On EN 18 63 Tap Rhythm Start Tap Rhy On Off Off EN 11 64 Right hand Melody Part Channel PartR Ch 1 16 4 EN 26 65 Left hand Part Channel PartL Ch 1 16 3 EN 26 66 Music Preset Key Change MP Key 5 6 0 EN 33 67 Center Cancel Vocal Cut C Cancel On Off Off EN 55 68 On screen Keyboard LCD Key 1 2 1 EN 46 69 Displ...

Page 47: ...l 4 Use the dk key to select on You can control the type of on screen keyboard that appears on the display See Function No 68 under FUNCTION Button cs Functions page EN 43 Changing the Scale of the Keyboard No Scale name Display 01 Equal Temperament Equal 02 Pure Major PureMajr 03 Pure Minor PureMinr 04 Pythagorean Pythagor 05 Kirnberger 3 Kirnbrg3 06 Werckmeister Wercmeis 07 Mean Tone MeanTone 08...

Page 48: ...and 3 p keys to display Reset 4 Press the ct 6 ENTER key 5 Use the ct 2 o or 3 p key to display Factory 6 Press the ct 6 ENTER key This displays a delete confirmation message 7 Press the dk YES key After performing the above step Wait will appear on the display The Digital Keyboard will restart automatically after data deletion is complete To cancel the delete operation press dk NO or ct 5 EXIT Yo...

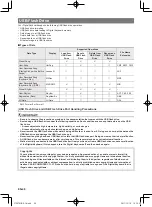
Page 49: ...a USB flash drive can cause malfunction of the Digital Keyboard If this happens turn the Digital Keyboard off and then back on again USB Flash Drive Data Type Display Supported Operations File Name Extension Load from USB Flash Drive Save to USB Flash Drive Delete from USB Flash Drive Rename on USB Flash Drive Preset Song User Song UsrSng O O O CMF MID CM2 User Recorded Song Playing Along with a B...

Page 50: ...ght out Be sure to format a USB flash drive on the Digital Keyboard before using it for the first time Before formatting a USB flash drive make sure it does not have any valuable data stored on it The format operation performed by this Digital Keyboard is a quick format If you want to completely delete all of the data in USB flash drive format it on your computer or some other device Supported USB...

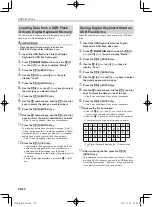
Page 51: ...e appears on the display after data import is complete To cancel the import operation press the dk NO key Digital Keyboard memory data can be saved to a USB flash drive 1 Insert the USB flash drive into the Digital Keyboard s USB flash drive port 2 Press cs FUNCTION and then use the ct 2 o and 3 p keys to display Media 3 Press the ct 6 ENTER key 4 Use the ct 2 o and 3 p keys to display Save 5 Pres...

Page 52: ...s on the display after data delete is complete To cancel the delete operation press the dk NO key 1 Insert the USB flash drive into the Digital Keyboard s USB flash drive port 2 Press cs FUNCTION and then use the ct 2 o and 3 p keys to display Media 3 Press the ct 6 ENTER key 4 Use the ct 2 o and 3 p keys to display Rename 5 Press the ct 6 ENTER key 6 Use the ct 2 o and 3 p keys to select the data...

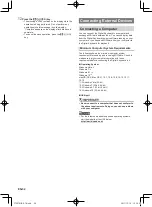
Page 53: ...omputer system requirements for sending and receiving MIDI data Check to make sure that your computer complies with these requirements before connecting the Digital Keyboard to it Operating System Windows Vista 1 Windows 7 2 Windows 8 1 3 Windows 10 4 macOS OS X Mac OS X 10 7 10 8 10 9 10 10 10 11 10 12 USB port Never connect to a computer that does not conform to the above requirements Doing so c...

Page 54: ... keyboard performance information is sent from this Digital Keyboard to a computer For details about how to configure this setting see FUNCTION Button cs Functions page EN 43 This parameter can be used to display only the notes of particular channels parts as on screen guide information from among the performance information sent from a computer These channels are called navigate channels For deta...

Page 55: ...this product If you cannot find such a link use the search form of the area site where you are located to enter the model name of this product and search for it Note that site contents are subject to change without notice 4 Check if your computer system complies with the minimum requirements for Data Manager 5 Download Data Manager and its user s guide to your computer 6 Follow the procedure in th...

Page 56: ...evice on the other end Turn off the Digital Keyboard when making connections After connecting turn down the Digital Keyboard and external device volume levels whenever turning power on or off After connecting turn on the external device and then the Digital Keyboard If notes are distorted when they are sounded on the external device lower the volume setting of the external device Enabling Vocal Cu...

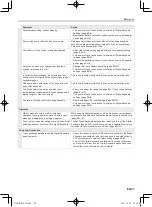
Page 57: ...eyboard key Adjust the volume setting page EN 9 Check if something is plugged into en on the back of the Digital Keyboard Turn power off and then back on to initialize all keyboard settings page EN 9 Nothing happens or notes do not play normally when I play notes on the left side of the keyboard Press 9 to disable chord input in the accompaniment keyboard area page EN 27 Nothing happens when I sta...

Page 58: ...ng instruments or sounds strange when played long with other instruments Check and adjust the transpose page EN 17 and tuning settings page EN 17 Turn power off and then back on to initialize all Digital Keyboard settings page EN 9 The reverb of notes seems to change suddenly Check and adjust the reverb setting page EN 15 Turn power off and then back on to initialize all Digital Keyboard settings ...

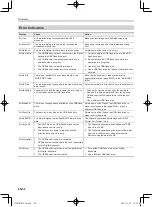
Page 59: ...ame name you are trying to use is already stored on USB flash drive Change the name and then save the new data Remove the read only attribute from the existing USB flash drive file and overwrite it with the new data Use a different USB flash drive Err MediaFul There is not enough space available on the USB flash drive Delete some of the files on the USB flash drive to make room for new data page E...

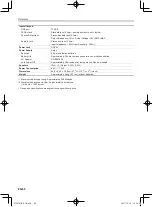
Page 60: ... Registration 32 4 setups 8 banks Recorder Real time recording playback Keyboard Play 5 songs 6 tracks Playing Along with a Built in Songs 1 song L R LR Memory Capacity Approximately 40 000 notes 1 song Other Functions Transpose 1 octaves 12 to 12 semitones Octave Shift Upper 1 Upper 2 Lower 3 octaves Tuning A4 415 5 to 465 9 Hz Initial Default 440 0 Hz Preset Scales 17 Music Preset 310 One Touch ...

Page 61: ...upply 2 way Batteries 6 AA size alkaline batteries Battery Life Approximately 3 hours continuous operation on alkaline batteries AC Adaptor AD E95100L Auto Power Off Approximately 30 minutes after last operation Can be disabled Speakers 12cm 2 Output 2 5W 2 5W Power Consumption 9 5V 7 5W Dimensions 94 8 35 0 10 9 cm 37 5 16 13 3 4 4 5 16 inch Weight Approximately 4 4kg 9 7 lbs without batteries 1 ...

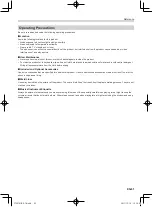
Page 62: ... water and a mild neutral detergent Wring all excess moisture from the cloth before wiping Included and Optional Accessories Use only accessories that are specified for use with this product Use of unauthorized accessories creates the risk of fire electric shock and personal injury Weld Lines Lines may be visible on the exterior of the product These are weld lines that result from the plastic mold...

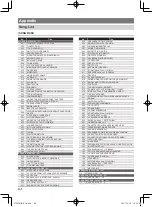
Page 63: ...R FROM SUITE no 3 057 SPRING FROM THE FOUR SEASONS 058 HABANERA FROM CARMEN 059 BRINDISI FROM LA TRAVIATA 060 HUNGARIAN DANCES no 5 061 MINUET IN G MAJOR 062 MUSETTE IN D MAJOR 063 ECOSSAISE IN G MAJOR 064 GAVOTTE GOSSEC 065 ARABESQUE BURGMÜLLER 066 CHOPSTICKS 067 DECK THE HALL 068 ODE TO JOY 069 AVE MARIA GOUNOD 070 SONATINA op 36 no 1 1st Mov 071 PRELUDE op 28 no 7 CHOPIN 072 RÊVERIE 073 GYMNOPÉ...

Page 64: ...ard4 Snare 2 Standard3 Low Tom 2 Standard4 Closed Hi Hat Standard3 Low Tom 1 Standard4 Pedal Hi Hat Standard3 Mid Tom 2 Standard4 Open Hi Hat Standard3 Mid Tom 1 Standard3 High Tom 2 Standard3 Crash Cymbal 1 Standard3 High Tom 1 Standard3 Ride Cymbal 1 Standard3 China Cymbal Standard3 Ride Bell Standard3 Splash Cymbal Standard3 Crash Cymbal 2 Standard3 Ride Cymbal 2 High Whistle 2 Low Whistle 2 St...

Page 65: ...SFX Sound 2 Dance5 SFX Sound 3 Dance5 SFX Sound 4 Dance5 SFX Sound 5 Dance5 SFX Sound 6 Dance5 SFX Sound 7 Dance5 SFX Sound 8 Dance5 SFX Sound 9 Dance5 SFX Sound 10 Dance5 SFX Sound 11 Dance5 SFX Sound 12 Dance5 SFX Sound 13 Dance5 SFX Sound 14 Dance5 SFX Sound 15 Dance5 SFX Sound 16 Dance5 SFX Sound 17 Dance5 SFX Sound 18 Dance5 SFX Sound 19 Dance5 SFX Sound 20 Dance5 SFX Sound 21 Dance5 SFX Soun...

Page 66: ...l Standard3 Splash Cymbal Standard3 Crash Cymbal 2 DM3 Kick 4 DM3 Kick 3 DM3 Hand Clap 2 DM3 Snare 3 DM3 Snare 4 DM3 Snare 5 DM3 Low Tom 4 DM3 Closed Hi Hat 3 DM3 Low Tom 3 DM3 Closed Hi Hat 4 DM3 Mid Tom 4 DM3 Open Hi Hat 2 DM3 Mid Tom 3 DM3 High Tom 4 DM3 Crash Cymbal 2 DM3 High Tom 3 DM3 Ride Cymbal 2 Standard3 Chinese Cymbal Standard3 Ride Bell DM3 Tambourine Standard3 Splash Cymbal DM3 Cowbel...

Page 67: ...ra Aha Bhangra Ashke Bhangra Chakde Bhangra Hoye Bhangra Oho Bhangra Oh Balle Bhangra Oh Shava Nagada Rim 1 Nagada Rim 2 Duff Close Duff Open Duffli Close 1 Duffli Close 2 Duffli Close 3 Duffli Open 1 Duffli Open 2 Duffli Jingle 1 Duffli Jingle 2 Dhol L Dhol H Dumru Ghungroo 1 Ghungroo 2 Tasha 1 Tasha 2 Standard2 Sticks Standard3 Kick 2 Standard3 Kick 1 Standard2 Side Stick Standard3 Snare 1 Stand...

Page 68: ...i Hat Standard1 Open Hi Hat Standard1 Crash Cymbal 1 Standard1 Ride Cymbal 1 Standard1 Chinese Cymbal Standard1 Ride Bell Standard1 Splash Cymbal Standard1 Crash Cymbal 2 Standard1 Ride Cymbal 2 Standard2 Closed Hi Hat Standard2 Pedal Hi Hat Standard2 Open Hi Hat Standard2 Crash Cymbal 1 Standard2 Ride Cymbal 1 Standard2 Chinese Cymbal Standard2 Ride Bell Standard2 Splash Cymbal Standard2 Crash Cy...

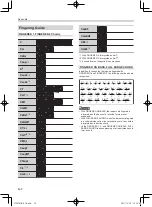
Page 69: ...requires pressing of at least three keys to form a chord Fingering Guide FINGERED 1 FINGERED 2 Chords C Cm Cdim Caug 3 C 5 Csus4 3 Csus2 3 C7 CmM7 Cdim7 3 C6 1 3 Cm6 2 3 CaugM7 CdimM7 Caug7 Cm7 3 CM7 Cm7 5 3 CM7 5 C7sus4 C7 5 3 1 With FINGERED 2 interpreted as Am7 2 With FINGERED 2 interpreted as Am7b5 3 Inverted form not supported in some cases FINGERED ON BASS FULL RANGE CHORD Cmadd9 C69 3 Cm69 ...

Page 70: ... m7 M7 m7 b 5 7 b 5 7sus4 add9 madd9 mM7 dim7 69 6 m6 A B b B F G b G G A b A F C C D b D D E b E 2 1 You can use the split point to change the size of the accompaniment keyboard range page EN 14 1 Root 2 Chord Type CTX870IN E 1A indd 71 2017 12 18 15 25 04 ...

Page 71: ...q bq br br bo bo 2 2 4 4 5 5 6 6 7 7 8 8 9 9 bs bs bt bt ck ck cl cl cm cm cn cn co co cp cp cr cr cs cs dk dk 3 3 Cut this page along the dashed line so you can have it on hand as you read the contents of the manual CTX870IN E 1A indd 73 2017 12 18 15 25 04 ...

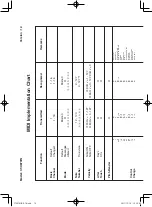
Page 72: ...H v 0 127 Note ON Note OFF Mode Mode 3 X Mode 3 X Default Messages Altered 0 1 5 6 38 7 10 11 64 65 66 67 71 72 73 Bank select Modulation Portamento Time Data entry LSB MSB Volume Pan Expression Hold 1 Portamento Switch Sostenuto Soft pedal Filter resonance Release time Attack time Model CT X870IN Version 1 0 O X X X O O X O X O O X X X 2 4 4 4 4 3 3 3 4 4 4 O O O O O O O O O O O O O O 2 MIDI Impl...

Page 73: ...5 76 77 78 84 91 93 94 100 101 Bank select Modulation Portamento Time Data entry LSB MSB Volume Pan Expression Hold 1 Portamento Switch Sostenuto Soft pedal Filter resonance Release time Attack time Filter cutoff Decay time Vibrato rate Vibrato depth Vibrato delay Portamento Control Reverb send level Chorus send level Delay send level RPN LSB MSB Model CT X870IN Version 1 0 Mode 1 OMNI ON POLY Mod...

Page 74: ...eparate Safety Precautions Please keep all information for future reference CT X870IN About Music Score data You can use a computer to download music score data from the CASIO Website For more information visit the URL below http world casio com MA1712 A Printed in China C CTX870IN E 1A indd 1 2017 12 18 15 24 54 ...

Reviews: