10
PIN Number Display
The wireless modem PIN number may be displayed by
pressing the SET button and then pressing and holding the
soft key below the Hours value for 10 seconds until the
display goes blank. The PIN number will then be displayed
across the room air, cool set point and clock locations. The
thermostat will return to normal operation after 15 seconds.
NOTE: The PIN number will not be displayed if in software
configuration, installer test or programming modes.
Other Messages
HEAT ON, COOL ON — The HEAT ON and COOL ON
icons, which are located under the two set point displays,
indicate when cooling or heating equipment is actually
operating. When the icons flash, equipment is waiting to
come on but is being held off by compressor timeguard or
cycle timer.
The triangle icon appears before the fan mode ON icon.
During an unoccupied mode (DAY, SLEEP) the fan
selection will be allowed to change from AUTO to ON, but
when ON is selected and the equipment is not running, the
triangle icon will appear before the ON icon. This is a
feedback to the user that the fan is not running because the
current period is unoccupied and the equipment is not
running.
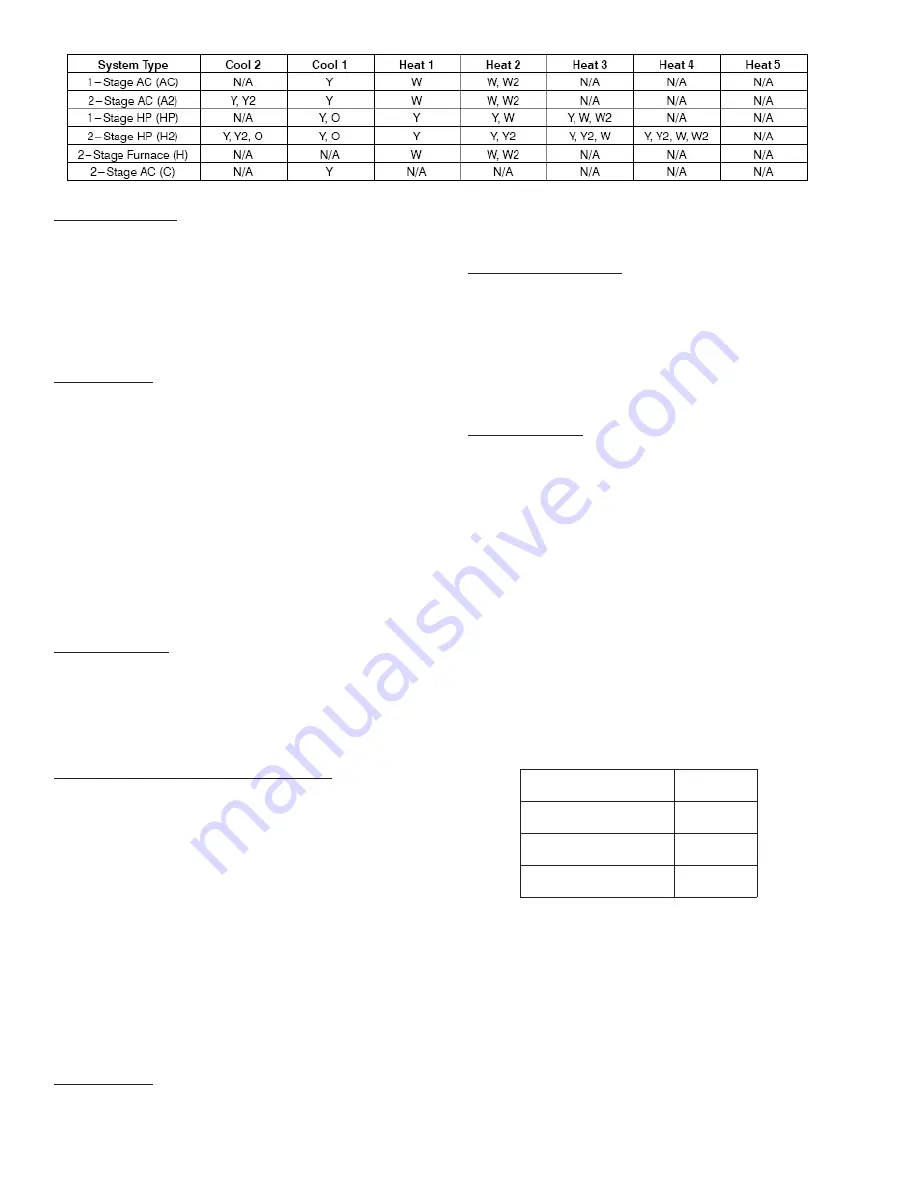
Outputs vs. Stages
Table 2 above lists the active outputs for each stage of
each possible system configuration. G is not shown. For 1-
stage furnaces and auxiliary heat, connect to W and leave
W2 open. For single speed compressors, connect to Y and
leave Y2 open.
Step 8 - Thermostat Programming - Overview
QUICK START
This quick start procedure provides an overview of
programming in order for you to begin to use your system.
For the best comfort and energy-saving results and detailed
thermostat operating instructions, we recommend that you
read through the ComfortChoice Edge Owner’s Manual,
which is included in the box along with your thermostat,
and set up the system to match the end-user’s specific
schedule and comfort requirements.
Setting the Clock, Calendar, Daily Schedule,
and Vacation Settings
The thermostat communicates wirelessly with a communica-
tion network and it automatically obtains the current time
and date from the communication network. In the event of
loss of network communication, you can manually set the
time and date by following the instructions below.
To set the clock:
Press and release the SET button until ...clock is displayed
in the left center of the display along with the time at the
bottom center of the screen. Use the softkeys to move the
box around the digits to be set and use the UP or DOWN
button to change the setting.
To set the daily schedule:
Pressing the SET button will cycle through ...clock, ...daily
schedule and ...vacation settings. When changing daily
schedule settings, the softkeys are used to set the days,
period times, heating set points, and cooling set points.
The UP and DOWN buttons are used to change the setting
with the box around it. All program periods (WAKE, DAY,
EVE, and SLEEP) must occur within the same 24-hour
period.
Vacation schedule: When changing Vacation settings, the
softkeys are used to choose the selection to be adjusted
and the UP or DOWN button is used to change the setting.
A Vacation selection is available specifically for times when
the space will not be occupied for an extended period.
Vacation mode has an automatic hold, meaning that set
points are not affected by the programmed schedule.
Vacation mode is active for a specified period of time. While
in Vacation mode, the system provides temperature
protection for the space in the selected mode, but not
comfort. When Vacation mode is active, the triangle icon
will be displayed before the VACATION in the upper left
corner of the display.
Vacation Set Points — A default set of temperature and
humidity set points are active in Vacation mode. They are
adjustable by the user and are used exclusively for Vaca-
tion mode. They are remembered from one Vacation
selection to the next. See Table
3 below for default Vacation
values.
Programming Comfort Schedules
The following is a brief overview of how to access and
program schedules in your new system. For additional
information, we also recommend that you read and follow
the programming information provided in the
ComfortChoice Edge Owner’s Manual that is included in
the box with the thermostat.
Table 3 - Vacation Set Points Default Values
E
D
O
M
O
T
U
A
n
a
F
o
t
u
A
t
n
i
o
P
t
e
S
t
a
e
H
F
°
5
5
t
n
i
o
P
t
e
S
l
o
o
C
F
°
5
8
Table
2 – Outputs vs. Stages


