


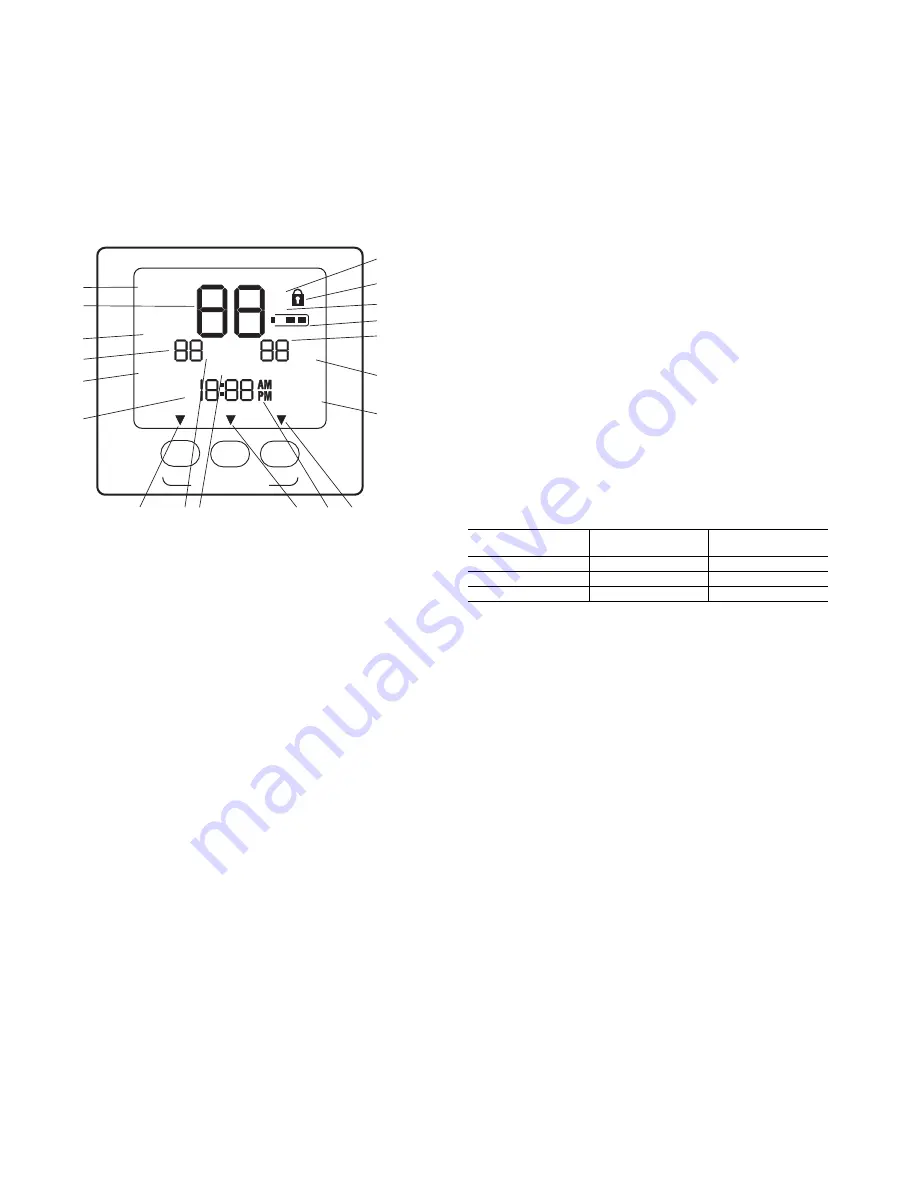
2
• Celsius units (9)
• Battery strength indicator (10)
• Selected cooling set point; "on" indicates system is in
cooling mode (first stage of cooling) (11)
• Second stage of cooling (12)
• Day of the week for programming mode (13)
• System is using Limit settings (14)
• AM or PM indicator for current time (15)
• System is using unoccupied settings (16)
• System is in hold (17)
• System is in temporary hold override (18)
• System is using occupied settings (19)
Setting Time and Day of Week —
The user must set
the time and date before the thermostat’s programming features
can be used. Perform the following procedure:
1. Open the thermostat front panel door.
2. Press the
d/h/m
button located on the lower right under
the display screen. The hours will be displayed and will
flash.
3. Press the
up
or
down
button located to the right of the
display to change the hours. Rotate through the hours to
change AM and PM.
4. Press the
d/h/m
button again and the minutes will flash
on the display.
5. Press the
up
or
down
button to change the minutes. Stop
on the correct number.
6. Press the
d/h/m
button again and the day of the week will
flash on the display.
7. Press the
up
or
down
button to change the day of the
week. Stop on the correct day.
8. Press the
done
button or close the thermostat front panel
door.
Setting Cooling and Heating Temperatures —
The thermostat is installed with preset cooling and heating
temperature settings. The user can use these settings or change
them. Perform the following procedure to change temperature
settings:
1. Open the thermostat front panel door.
2. Press the
up
or
down
button located on the right side of
the display. The preset temperature settings for cooling
and heating are displayed. The word “cool” will flash.
3. Press the
up
or
down
button to change the cool setting.
Stop on the correct setting.
NOTE: The temporary hold icon will be displayed for 15
minutes. See page 3 for more information on Temporary
Hold Override.
4. To change the heating set point, press the
mode
button
until the heat icon begins to flash.
5. Press the
up
or
down
button to change the heat setting.
Stop on the correct setting.
6. For automatic switching from the cooling cycle to the
heating cycle or from heating to cooling, both the cooling
and heating settings must be displayed. If cooling only is
desired, only the cooling set point should be shown. If
heating only is required, only the heating set point should
be shown in the display. To change which modes are dis-
played, continue to press the
mode
button until the de-
sired modes of operation are displayed.
7. Press the
hold/run
button to save these settings.
Using OCC, UNOCC and LIMIT Buttons —
When the user presses the
OCC
,
UNOCC
, or
LIMIT
button,
the preset temperature settings will be viewed and a triangle
icon will appear above the
OCC
,
UNOCC
, or
LIMIT
button
indicating which presets are being used.
The
LIMIT
button is used for an occupied period with set-
tings that are less conditioned than the Occupied settings but
more conditioned than the unoccupied settings. This is used as
an occupied energy savings function.
The default set points for the Comfort settings -
OCC
,
UN-
OCC
and
LIMIT
are listed in Table 1.
Table 1 — OCC, UNOCC, and LIMIT Settings
The set points for the
OCC
,
UNOCC
, and
LIMIT
One-
Touch functions can be modified from their factory defaults us-
ing the following procedure:
1. Open the thermostat front panel door. The heat or cool
icon flashes indicating to the user that pressing the
up
or
down
buttons will change the set point value next to the
flashing icon.
2. Change the setpoint of the flashing mode by pressing the
up
and
down
buttons. The heat or cool icon and the trian-
gle icon above the
OCC
,
UNOCC
, and
LIMIT
button
will flash.
3. If desired, change the set point of the opposite mode by
pressing the
mode
button until the opposite mode icon is
flashing. The opposite mode icon and the triangle icon
above the
OCC
,
UNOCC
, and
LIMIT
button flashes.
4. Press the
up
and
down
buttons to change the opposite
mode set point.
5. Then press and hold either
OCC
,
UNOCC
, or
LIMIT
button for 3 seconds. The triangle icon above the
OCC
,
UNOCC
, or
LIMIT
button will stop flashing and remain
on. The heat and/or cool set point will flash once when
complete.
NOTE: The thermostats are shipped with fully accessible
keypads. The installer has the option to change the access
to the keypad. This function will not be allowed if keypad
lock 2 or 3 is enabled. This will be allowed if the keypad
lock is disabled or set to 1.
6. Close thermostat door.
7. Repeat at Step 1 to program set points for another period,
if desired.
OCC
LIMIT
UNOCC
push and hold to set
off
Em
heat
fan
auto
fan
on
aux
heat
on
cool
on:
°
F
°
C
temporary
hold
all days
weekdays
weekend
start
at
actual temp
6
5
4
3
2
1
7
8
9
10
11
12
1
3
14
15
16
17
1
8
19
Fig. 2 — Thermostat On-Screen Indicators
a33-9218
ONE-TOUCH
SETTING
HEAT
SET POINT
COOL
SET POINT
OCC
68
78
UNOCC
60
85
LIMIT
66
80


