background image

On a new installation, air entrapped in oil line leading from
tank to nozzle must be thoroughly purged in order to prevent
excessive after drip. The oil pump is provided with a special
fitting which allows purging of any air between tank and oil
pump. The proper procedure for performing this operation is
as follows:
a. Place a piece of clear plastic 1/4-in. diameter tubing over

purge fitting on oil pump.

b. Start oil burner, then open purge fitting and allow burner to

run until purge tube is completely free of air bubbles.

c. Tighten purge fitting. Allow oil to run to nozzle and fire

burner.

d. If purging takes longer than 30 sec and no flame has been

established, burner stops. Push reset button on top of
primary control to restart burner.

e. For detailed information on operation of primary control,

refer to instructions included with furnace.

Step 3—Fan Adjustment Check

This furnace is equipped with a 3-speed direct-drive motor to
deliver a temperature rise (between return and supply plenums)
within range specified on rating plate at external duct static
pressure noted on rating plate.

When operating furnace in heating mode, static pressure and
temperature rise (supply-air temperature minus return-air
temperature) must be within those limits specified on rating
label. Failure to follow this warning could lead to severe
furnace damage.

Adjust fan speed so that temperature rise is within rise range
specified on rating plate. Consult wiring diagram for speed
changes on direct-drive motor.

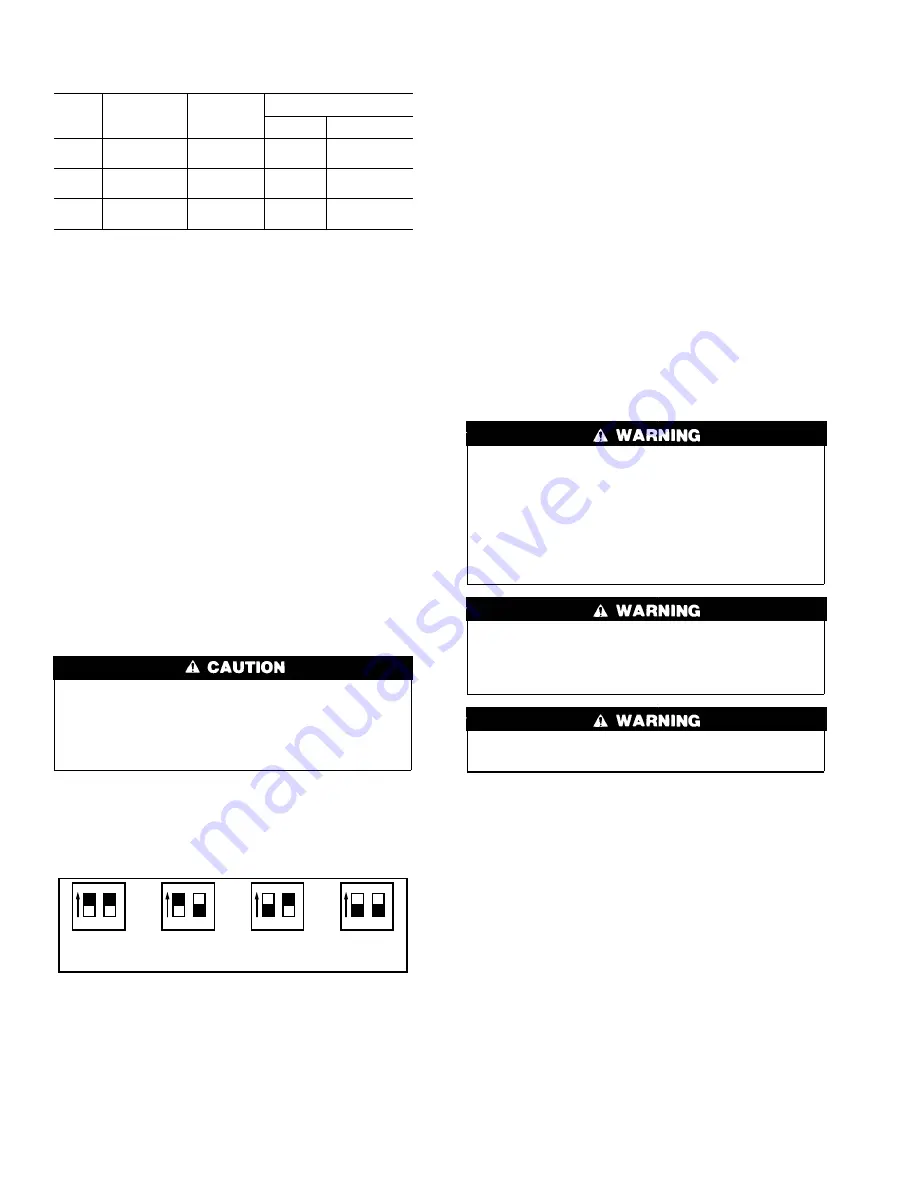
To adjust fan off time, set DIP switches on control board to obtain
desired timing. (See Fig. 1.)

Step 4—Limit Control Check

After furnace has been in operation for at least 15 minutes, restrict
return-air supply by blocking filters or closing return registers and
allow furnace to shut down on high limit. The burner should shut
off, and main blower should continue to run.

Remove restriction, and burner should come back on in a few
minutes.

Step 5—For Year-Round Air Conditioning

This furnace is designed for use in conjunction with cooling
equipment to provide year-round air conditioning. The blower has
been sized for both heating and cooling, however, fan motor speed
may need to be changed to obtain necessary cooling airflow.

Step 6—Heating

The blower speed is factory set to deliver required airflow at
normal duct static pressure.

Step 7—Cooling

The blower speed may be field adjusted to deliver required airflow
for cooling application. (See Table 5.)

Step 8—Constant Blower Switch

This furnace is equipped with a constant low-speed blower option.
Whenever room thermostat is not calling for heating or cooling,
blower runs on low speed in order to provide air circulation. If
constant blower option is not desired, the rocker switch on side of
control box may be used to turn off constant speed.

MAINTENANCE

The ability to properly perform maintenance on this equip-
ment requires certain expertise, mechanical skills, tools, and
equipment. If you do not possess these, do not attempt to
perform any maintenance on this equipment other than those
procedures recommended in the User’s Manual. FAILURE
TO FOLLOW THIS WARNING COULD RESULT IN
POSSIBLE DAMAGE TO THIS EQUIPMENT, SERIOUS
PERSONAL INJURY, OR DEATH.

Before performing any service functions, unless operations
specifically require power to be on, make sure all utilities are
turned off upstream of appliance. Failure to comply with this
warning will cause a fire hazard and/or bodily harm.

To avoid personal injury, make sure electrical supply power
is off before servicing.

Step 1—General

In order to keep this furnace in good operating condition and to
maintain its warranty, the furnace MUST be serviced on an annual
basis. This servicing includes a nozzle change, a burner inspection,
a visual check of tube passages through flue outlet and cleanout
ports, and a visual inspection of combustion chamber when burner
is removed.

Depending on above inspection, service could also include a
cleaning and vacuuming of heat exchanger tubes and possibly the
heat exchanger drum section.

Removal of any heat exchanger components which are sealed by
gaskets requires replacement of gasket.

Table 4—Burner, Nozzle, and Pump

Pressure Chart

UNIT

SIZE

FIRING

RATE

GAL/HR (US)

PUMP

PRESSURE

(PSIG)

BECKETT OIL BURNER

Model

Nozzle

105-12

0.76

103

AFG

0.75 gph

70° Hollow

125-16

0.90

100

AFG

0.90 gph

70° Hollow

155-20

1.12

104

AFG

1.10 gph

70° Hollow

Fig. 1—Fan Off Time DIP Switch Settings

(Black Box Represents Switch Position)

A95115

1

2

60 Sec

1

2

90 Sec

DELAY  OFF  DIP  SWITCH  SETTINGS

1

2

1

2

1

2

120 Sec

1

2

150 Sec

6

Summary of Contents for 58BLA

Page 1: ... BURNER WHEN EXCESS OIL HAS ACCUMULATED WHEN THE FURNACE IS FULL OF VAPOR OR WHEN THE COMBUSTION CHAMBER IS VERY HOT For use with grade 2 Fuel Oil maximum Do not use Gasoline Crankcase Oil or any Oil containing Gasoline Failure to follow this warning could lead to sooting fire explosion and or severe bodily harm Never burn garbage or paper in the heating system and never leave rags paper or any fl...

Page 2: ...i nation would include the following ammonia chlorine hydrogen sulfide halogenated hydrocarbons carbon tetra chloride cleaning solvents hydrochloric acid water soften ing chemicals and similar chemicals Failure to follow this warning will lead to premature rusting of heat exchanger and possible premature furnace failure and or vent failure which could result in fire hazard and or bodily harm This ...

Page 3: ...urnace operational problems Some of these problems are 1 Excessive oil burner after drip and oil fumes 2 Sooting 3 Melted oil burner couplings and or ignitor relay control 4 A condition where air band or air shutter settings must be more open than normal to achieve proper combustion 5 Lockouts on start up Step 2 Duct Work Recommendations The proper sizing of warm air ducts is necessary to ensure s...

Page 4: ...Never reduce pipe size below minimum certified furnace pipe size as shown in Table 2 4 All pipe should be supported using proper clamps and or straps These supports should be at least every 4 ft 5 All horizontal runs of pipe should have at least 1 4 in per ft of upward slope 6 All runs of pipe should be as short as possible with as few turns as possible 7 Seams should be tightly joined and checked...

Page 5: ...en valve on oil supply line 3 Reset primary control 4 Set thermostat above room temperature 5 Set main electrical switch to ON position Burner should start DO NOT TAMPER WITH UNIT OR CONTROLS CALL YOUR SERVICE TECHNICIAN Step 2 Recommended Installation Practices and Combustion Check In order to obtain optimum performance from oil burner the following setup procedures must be followed 1 A test kit ...

Page 6: ... to be changed to obtain necessary cooling airflow Step 6 Heating The blower speed is factory set to deliver required airflow at normal duct static pressure Step 7 Cooling The blower speed may be field adjusted to deliver required airflow for cooling application See Table 5 Step 8 Constant Blower Switch This furnace is equipped with a constant low speed blower option Whenever room thermostat is no...

Page 7: ...cal supplies upstream of furnace If furnace has been in operation some surfaces may be hot Allow time for unit to cool down 2 Disconnect flue pipe 3 For access to cleanout ports remove blower door and filter The 2 cleanout ports are located in blower compartment They protrude through the partition and are located on the left and right of flue pipe See Fig 2 4 Unscrew wing clamp nuts and remove cle...

Page 8: ...r observa tion door limit wiring and oil burner 21 Replace collector box on secondary tube flange ensuring proper placement of gasket Tighten screws to 35 45 lb in of torque 22 Replace top partition inside collar on flue pipe top rear panel outside flue collar and blower door 23 Reconnect flue pipe and oil line s 24 Readjust burner for proper operation Check limit operation as outlined in Limit Co...

Page 9: ...STATIC PRESSURE IN WC 0 1 0 2 0 3 0 4 0 5 0 6 0 7 0 8 0 9 1 0 105 12 High 1795 1735 1675 1605 1550 1485 1425 1350 1275 1220 Medium 1365 1335 1305 1275 1255 1215 1155 1105 1050 985 Low 995 965 945 925 900 870 825 775 725 670 125 16 High 1905 1845 1770 1695 1630 1565 1490 1425 1325 1220 Medium 1750 1675 1620 1560 1500 1440 1370 1305 1235 1130 Low 1390 1350 1305 1260 1220 1180 1120 1060 985 880 155 2...

Page 10: ...Fig 6 Barometric Damper Locations A95117 FIG A FIG G FIG D FIG L FIG B FIG C FIG J FIG H FIG K POOR WRONG WRONG WRONG WRONG WRONG BAROMETRIC DAMPER LOCATIONS GOOD LOCATIONS BAD LOCATIONS 10 ...

Page 11: ... CONFORM TO N E C AND LOCAL CODES IN CANADA WIRING MUST CONFORM TO CURRENT CSA 22 1 CANADIAN ELECTRICAL CODE PART 1 AND OR LOCAL CODES 3 IF ANY OF THE ORIGINAL WIRE AS SUPPLIED WITH THE FURNACE MUST BE REPLACED IT MUST BE REPLACED WITH WIRING MATERIAL HAVING A TEMPERATURE RATING OF AT LEAST 105 C AND BE A MINIMUM OF 16 GA AWG COPPER STRAND WIRE USE COPPER WIRE ONLY FOR FIELD WIRING 4 CONNECT REQUI...

Page 12: ...ructions exactly a fire or explosion may result causing property damage personal injury or loss of life 1 Open all warm air registers and make sure all return air grilles are unobstructed 2 If a humidifier is installed with your system open water supply valve 3 Set thermostat to lowest setting 4 Turn on electric power to furnace 5 Open oil supply valve 6 Check all connections to ensure there are n...

Reviews: