Carestream DRYVIEW 5950 User Manual Download Page 49

Maintenance and Troubleshooting

AA2204_en | 2012-07-27

3–21

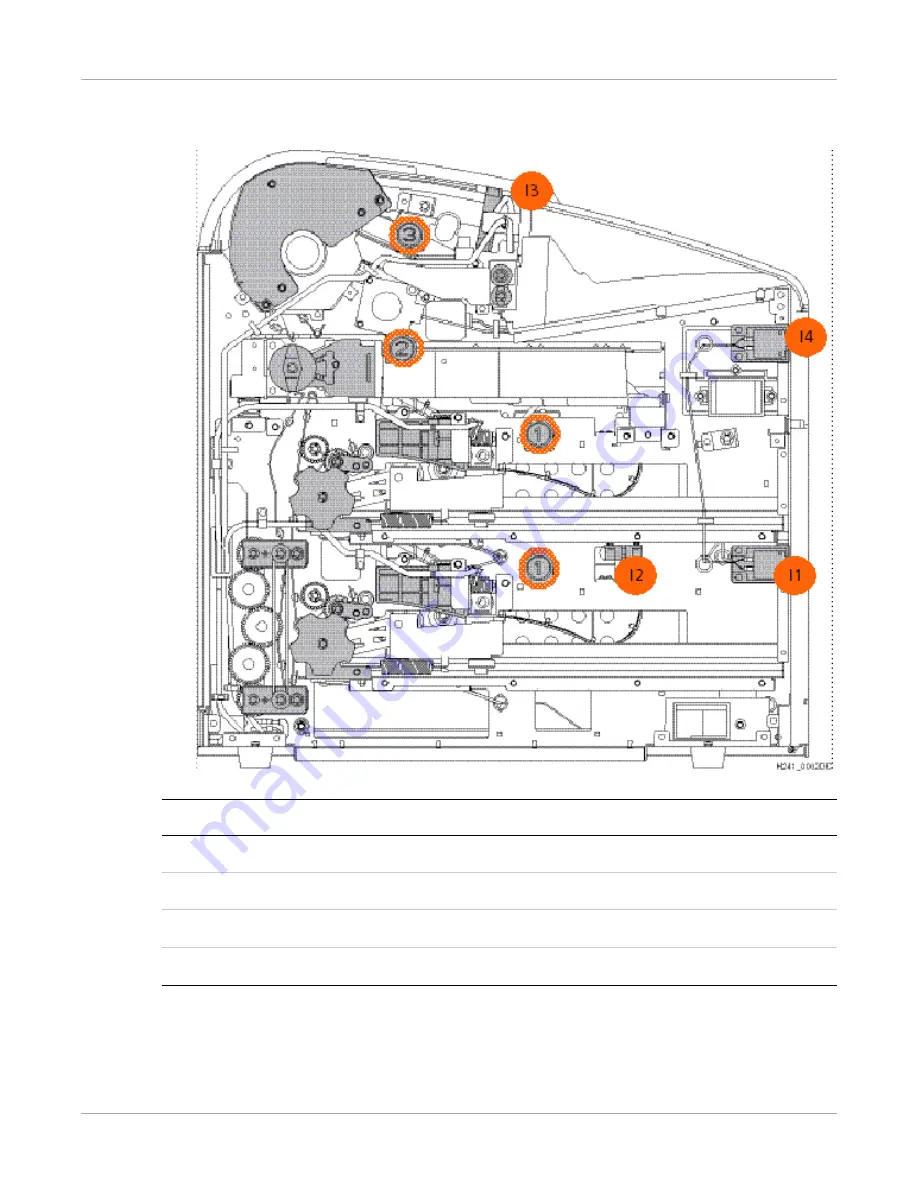
Figure 5:

Film Jam Areas

Jam Areas

Description

Interlocks

Description

1

Upper and Lower film supply

I1

Lower film supply

2

Film path

I2

Left cover

3

Processor / densitometer

I3

Top cover

I4

Upper film supply

SHORT TERM CONFIDENTIAL

Summary of Contents for DRYVIEW 5950

Page 1: ...Publication No AA2204_en 2012 07 27 Preliminary User Manual SHORT TERM CONFIDENTIAL...

Page 2: ...o part of this manual may be reproduced or copied in any form by any mean graphic electronic or mechanical including photocopying typing or information retrieval systems without written permission SHO...

Page 3: ...Restart the Imager 2 6 View the Film Cartridge Information 2 7 Replace an Empty Film Cartridge 2 9 Load a Different Film Size to Match a Print Request 2 10 Delete All Pending Jobs 2 11 Calibrate the...

Page 4: ...de 324 or 325 Jam in Area 2 3 24 Clear Film Jam Code 326 Jam in Area 2 or 3 3 25 Clear Film Jam Code 543 Jam in Area 3 3 26 Clear Film Jam code 544 Jam in Area 3 3 26 Display Screen is Not Functional...

Page 5: ...int jobs simultaneously from multiple image sources The open design lets you connect to modalities of all types and vendors 1 Top cover Covers the processor rollers The top cover is interlocked 2 Disp...

Page 6: ...cs module Writes the image onto the film while the film is moved through the exposure transport 4 Charcoal filter Absorbs the odors caused by heat processing 5 Accumulator Receives the film as it is i...

Page 7: ...t 7 Feed rollers Move the film through the imager 8 Pickup assemblies upper and lower Lift a single sheet of film from the supply cartridge and feed it into the rollers 9 Transport guides Orient and c...

Page 8: ...he imager can continue to accept incoming print jobs even if temporarily unable to print if the film supply is empty etc During normal operation the imager requires very little attention It prints aut...

Page 9: ...0 x 25 cm 8 x 10 in Clear blue and mammography film types are supported Mammography Imaging To manage and support mammography imaging the imager provides these features You can load mammography film i...

Page 10: ...ons over the network configure features view error messages and access general status information at the Web Portal You can also check film count film size and film type Related topics Access the Web...

Page 11: ...tion that affects how you use this guide and this product Caution Cautions point out procedures that you must follow precisely to avoid damage to the system or any of its components loss of data or co...

Page 12: ...SHORT TERM CONFIDENTIAL...

Page 13: ...the film cartridges Monitor the display screen for status and operating conditions Sometimes it will be necessary to perform preventive maintenance filter replacement and other corrective actions such...

Page 14: ...he associated film cartridge is not inserted or not fully inserted into the imager Center right Error or status code The 3 digit code displays when the error or status condition is present If the imag...

Page 15: ...r there is an error such as a failed calibration The indicator light associates the error code to the film cartridge Pause Important To avoid exposing the film to light do not open the film supply unt...

Page 16: ...Restart the Imager Preventive Maintenance Film Jam Film is jammed from the upper or lower cartridge The error code confirms the film jam and gives direction on where to find the film inside the image...

Page 17: ...e how soon the imager will be ready to print In this example the imager will be ready to print in 7 minutes The amber power symbol also indicates that the imager is not ready to print The warm up peri...

Page 18: ...reprints any films that were in process when the power was interrupted Restart the Imager If the imager encounters an error that is usually corrected with a restart the display screen shows the Resta...

Page 19: ...and the lower has 113 Size Type of the Loaded Film To check the size of the loaded film open the film supply and view the loaded cartridges Note Make sure the Pause symbol is off before you open the...

Page 20: ...and the requested film flashes Change the loaded film to match the print request Figure 7 View and load the requested film size type in the error code location amber text In this example M represents...

Page 21: ...close the film cartridge cover 2 Open the film supply 3 Hold the edges of the film cartridge and lift the empty cartridge out of the film supply 4 Discard the empty cartridge 5 Insert the new film car...

Page 22: ...raphy 10 x 12 in film is requested The amber text changes between M10 and M12 Load it to continue with the print request 1 If the Pause symbol is on press it and wait until it turns off 2 Open the fil...

Page 23: ...and the requested film flashes Change the loaded film to match the print request Figure 7 View and load the requested film size type in the error code location amber text In this example M represents...

Page 24: ...e appears on the Web Portal Home screen Manual Calibration 1 Press the Calibrate symbol for the film cartridge upper or lower Figure 9 In this example the imager is running a calibration on the lower...

Page 25: ...d during installation If you need a different type of test print for mammography film you can change the default at the Web Portal SMPTE Image Prints 1 Press and hold the Calibrate symbol for the film...

Page 26: ...ing installation and you can change it any time from the Web Portal Press and hold the Calibrate symbol for the film cartridge upper or lower where the mammography film is loaded for three seconds Fig...

Page 27: ...re protected with an interlock mechanism to keep the imager from printing when they are open to keep you safe Code 701 alerts you that a cover and an interlock are open and internal power to the image...

Page 28: ...RER version 6 7 or 8 2 In the address field type http imager s IP address Note If you do not know the IP address check with your network administrator or the person who installed the imager 3 Click Go...

Page 29: ...l Error Indicators on the Display Screen Learn about the amber and red error symbols Using the Web Portal to Gain More Information on Errors Learn how and why to access the Web Portal Subsystem Error...

Page 30: ...ft The display screen reports 3 digit codes Some codes are associated with symbols on the display screen such as the Film Jam symbol to help you quickly understand the condition At the Web Portal Acce...

Page 31: ...Municipality owned and licensed solid waste management facilities are an appropriate disposal option Contact your local or state solid waste authorities to determine if additional disposal requirement...

Page 32: ...2 07 27 Replace the Filter When the filter must be replaced the display screen shows the error code and the Maintenance symbol 1 Remove the filter cover 2 Remove the filter by lifting it up and pullin...

Page 33: ...filter and to clear the Maintenance symbol press and then release the Maintenance and Calibrate symbols at the same time 550 Code and Maintenance Symbol If the imager needs a preventive maintenance s...

Page 34: ...calibration has failed the display screen shows a 624 631 or 632 error and the Calibrate symbol is amber Figure 1 In this example the amber indicator light and Calibration symbol indicate that calibr...

Page 35: ...r Power symbol together with the Restart symbol indicates that you must restart the imager to continue printing 1 Press the power switch on the back of the imager off 2 Press the power switch on If th...

Page 36: ...tinue to print After the jam has been cleared the imager will reprint the image on a new sheet of film Figure 3 In this example the red jam symbol alerts you to the jam and the amber indicator light s...

Page 37: ...and the Display Screen The 3 digit error and status codes on the display screen are reported at the Web Portal as 5 digit codes The last three digits on the Web Portal codes match the three digits on...

Page 38: ...rinter Status Info Printer Status Printer Status Info FAILURE ELEC DOWN PRINTER DOWN PROC DOWN WARNING BAD SUPPLY MGZ CALIBRATION ERR CHECK PRINTER COVER OPEN EMPTY MEDIASZ MEDIATP FILM JAM FILM TRANS...

Page 39: ...e imager is not ready to print Warming Power symbol is yellow and flashing Number of minutes count down until ready Warming xx WARNING PROC INIT The processor is warming up and will not be ready to pr...

Page 40: ...new film cartridge Ready Power symbol is green Calibrate symbol is on Normal Tray Info The film cartridge is ready for use Requires calibration Power symbol is yellow Calibrate symbol is on Requires C...

Page 41: ...DICOM job requests and film is available for all current jobs No Media Power symbol is green Film Size symbol is yellow The required film size is shown on the display screen Shows how many jobs with t...

Page 42: ...call for service 410 06410 MIM Core Image Rendering Error Resend the print job from the image source If the error persists call for service 411 06411 MIM Core Image Data Error Resend the print job fr...

Page 43: ...the imager If the error persists call for service 701 20701 None Replace the cover 704 20704 None The network connection to the imager has been lost Restart the imager 705 20705 None The imager is re...

Page 44: ...the imager If the error persists call for service 139 21139 Film Supply Unable to Identify Film Cartridge If the Pause symbol is on press it to cover the film cartridge When the Pause symbol stops fl...

Page 45: ...ity of the film is too high Calibration results for this film are outside the normal range Printing will continue with these parameters If the prints are not optimal do the calibration procedure again...

Page 46: ...rnal Hardware Failure Restart the imager If the error persists call for service 501 28501 Processor Internal Hardware Failure Restart the imager If the error persists call for service 509 28509 Proces...

Page 47: ...am Code 323 Jam in Area 2 Clear Film Jam Code 324 or 325 Jam in Area 2 Clear Film Jam Code 326 Jam in Area 2 or 3 Clear Film Jam Code 543 Jam in Area 3 Clear Film Jam code 544 Jam in Area 3 931 29931...

Page 48: ...m is jammed the display screen indicates a jam and an error code that provides guidance on where to check for the jammed film Figure 4 In this example the indicator light shows you that the jam is rel...

Page 49: ...012 07 27 3 21 Figure 5 Film Jam Areas Jam Areas Description Interlocks Description 1 Upper and Lower film supply I1 Lower film supply 2 Film path I2 Left cover 3 Processor densitometer I3 Top cover I...

Page 50: ...nobs For some jams you can remove the film by turning a knob to move the film out of the imager See details in the film jam instructions Figure 6 Knobs for manual film removal Knobs Description 1 Exit...

Page 51: ...ove any film 4 Reinsert the film cartridge in the imager Related topics Film Jam Indication and Areas Clear Film Jam Code 323 Jam in Area 2 Note This error displays as code 26323 at the Web Portal 1 I...

Page 52: ...wait until it goes off 2 Remove the left cover a Open the film supply b Remove the top cover c Turn the knurled knobs by hand 3 Reach into Area 2 and remove any film 4 If the film is not loose carefu...

Page 53: ...n the film supply b Remove the top cover c Turn the knurled knobs by hand 3 Rotate the exit roller knob clockwise until a film exits the imager 4 If a film does not exit a Reach into Area 2 and remove...

Page 54: ...led knobs by hand 3 Rotate the exit roller handle clockwise until a film exits the imager 4 Reinstall the covers Related topics Film Jam Indication and Areas Clear Film Jam code 544 Jam in Area 3 Note...

Page 55: ...and then on If the display screen is still non responsive turn the imager off and contact a qualified service provider Call for Support If you cannot correct a condition and need help call for suppor...

Page 56: ...SHORT TERM CONFIDENTIAL...

Page 57: ...ger Spectral Sensitivity of the Film The Laser Imaging Film is infrared sensitive and has been sensitized to the infrared laser diode of the imagers When handled according to instructions on the dayli...

Page 58: ...onsidered hazardous to the environment As a result you can develop recycle and dispose of film with less impact on the environment than if you were using wet developed silver halide films Table 1 Lase...

Page 59: ...24 hours In extreme cases in which the light boxes are exceptionally hot equal to or greater than 49 C or 120 F the manufacturer recommends removing them prior to eight hours of continuous exposure T...

Page 60: ...vel odors and prevents them from dissipating into the work environment To help maintain optimum performance the filter requires periodic replacement The imager requires no special venting Heat Dissipa...

Page 61: ...is required to let the imager perform normal operator functions Place the imager in an area with good ventilation A small confined room is not recommended Avoid placing the imager in direct or excessi...

Page 62: ...1 m during normal operation Power Requirements A power cord is provided with this equipment All countries must use an Agency approved power cord with a plug type suitable for the country of use Contac...

Page 63: ...AA2204_en 2012 07 27 6 1 6 Publication History Revision Date Reason for Change A 2012 07 27 Preliminary for Gate 2 preliminary review SHORT TERM CONFIDENTIAL...

Page 64: ...nc 150 Verona Street Rochester NY 14608 United States Carestream Health Inc 2012 Printed in China CARESTREAM and DRYVIEW are trademarks of Carestream Health Inc Pub No AA2204_en Rev A preliminary SHOR...

Reviews: