background image


Version 08.04.2021 

HW CAM(V31)/(V22) 

CI-RL2-RLINK 

P

a

g

e

19


5.


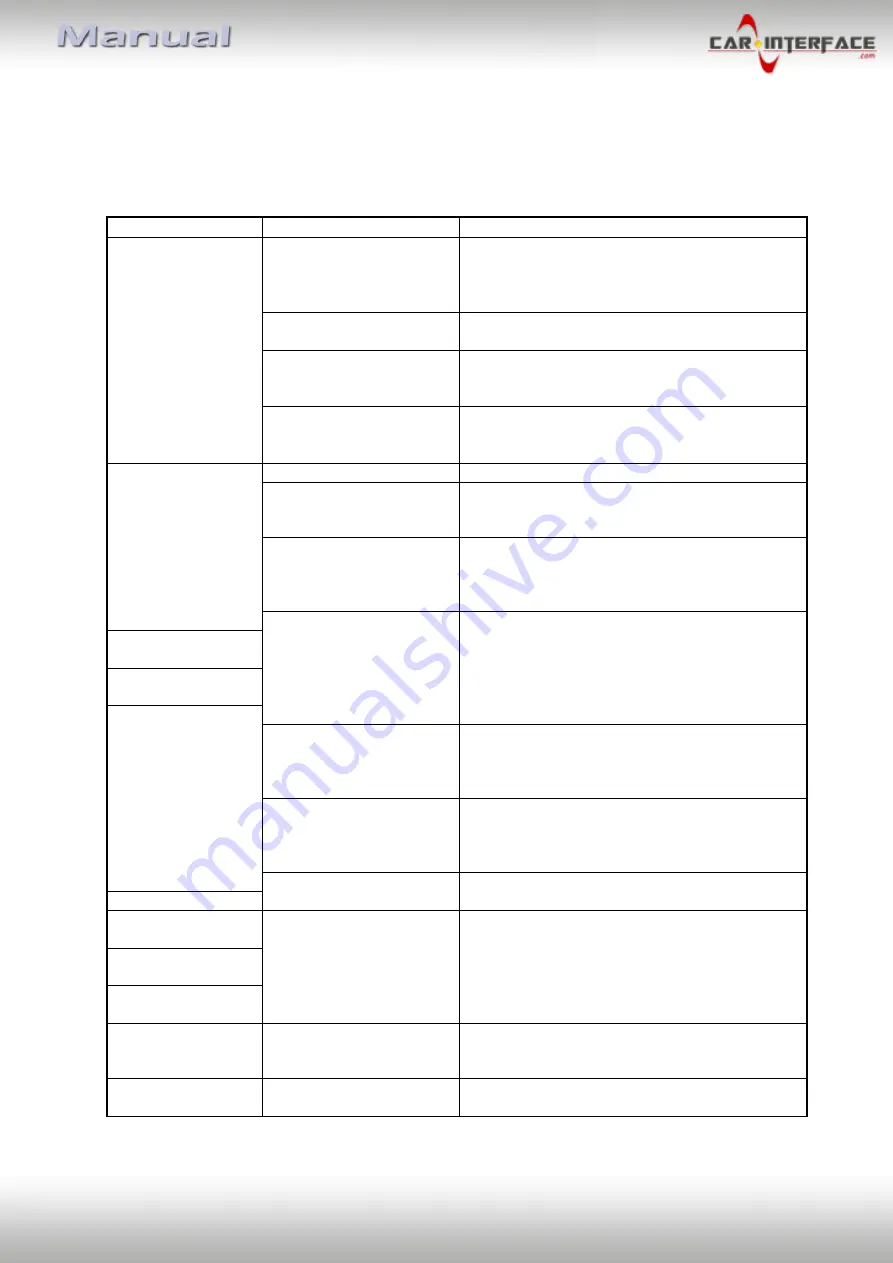
FAQ – Trouble shooting Interface functions 

 
For any troubles which may occur, check the following table for a solution before requesting 
support from your vendor.


Symptom 

Reason 

Possible solution 

No picture/black 
picture (factory 
picture). 

Not all connectors have been 
reconnected to factory head-
unit or monitor after 
installation. 

Connect missing connectors. 

No power on CAN-bus box (all 
LED CAN-bus box are off). 

Check power supply of CAN-bus box. Check CAN-bus 
connection of CAN-bus box. 

CAN-bus box connected to 
CAN-bus in wrong place. 

Refer to the manual where to connected to the CAN-
bus. If not mentioned, try another place to connect to 
the CAN-bus. 

No power on video-interface 
(all LED video-interface are 
off). 

Check whether CAN-bus box de12V ACC on red 
wire output of 8pin to 6pin cable. If not cut wire and 
supply ACC +12V directly to video-interface. 

No picture/black 
picture/white picture 
(inserted picture) but 
factory picture is OK. 

No picture from video source.  Check on other monitor whether video source is OK. 

No video-source connected to 
the selected interface input. 

Check settings dips 1 to 3 of video interface which 
inputs are activated and switch to corresponding 
input(s). 

LVDS cables plugged in wrong 
place. 

Double-check whether order of LVDS cables is exactly 
connected according to manual. Plugging into head-
unit does not work when the manual says to plug into 
monitor and vice versa. 

Wrong monitor settings of 
video-interface. 

Try different combinations of dips 7 and 8 of video-
interface. Unplug 6pin power after each change. 

Inserted picture totally 
wrong size or position. 
Inserted picture double 
or 4 times on monitor. 

Inserted picture 
distorted, flickering or 
running vertically. 

Video sources output set to 
AUTO or MULTI which causes 
a conflict with the interfaces 
auto detection. 

Set video source output fixed to PAL or NTSC. It is best 
to set all video sources to the same standard. 

If error occurs only after 
source switching: Connected 
sources are not set to the 
same TV standard. 

Set all video sources to the same standard. 

Some interfaces can only 
handle NTSC input. 

Check manual whether there is a limitation to NTSC 
mentioned. If yes, set source fixed to NTSC output. 

Inserted picture b/w. 
Inserted picture qual. 
bad. 

Picture settings have not been 
adjusted. 

Use the 3 buttons and the interface's OSD to adjust the 
picture settings for the corresponding video input. 

Inserted picture size 
slightly wrong. 
Inserted picture 
position wrong. 

Camera input picture 
flickers. 

Camera is being tested under 
fluorescent light which shines 
directly into the camera. 

Test camera under natural light outside the garage. 

Camera input picture is 
bluish. 

Protection sticker not 
removed from camera lens. 

Remove protection sticker from lens. 


Summary of Contents for r.LiNK CI-RL2-RLINK

Page 1: ...puts and rear view camera input Product features Video inserter for factory infotainment systems 2 video inputs for after market devices e g DVD Player DVB T tuner Rear view camera video input Automat...

Page 2: ...Connection scheme 2 3 Connecting video interface and CAN box 2 4 Installation of ribbon cables into monitor panel 2 4 1 50Pin Version MediaNav 2 4 2 60Pin Version RLink 2 4 2 1 Warning notes concerni...

Page 3: ...ra video when the vehicle is moving for example the MP3 menu for DVD upgrades Changes updates of the vehicle s software can cause malfunctions of the interface We offer free software updates for our i...

Page 4: ...6 Smart Media System R Link Vehicles with MediaNav 50 Pin only compatible until 09 2019 to be recognized by model no LAN52xxWRx on the sticker Limitations Video only The interface inserts ONLY video s...

Page 5: ...nputs because the disabled inputs will be skipped while switching through the video interfaces inputs 1 3 1 3 Rear view camera setting dip 5 If set to OFF the interface switches to factory LVDS pictur...

Page 6: ...t does not succeed disconnect the battery with a resistor lead If power source is not taken directly from the battery the connection has to be checked for being start up proven and permanent 2 1 Place...

Page 7: ...Version 08 04 2021 HW CAM V31 V22 CI RL2 RLINK Page 7 2 2 Connection Scheme...

Page 8: ...8pin Micro Fit connector of the 6pin to 8pin cable to the male 8pin Micro Fit connector of the CAN box Note Check LEDs on video interface after reconnecting the battery one must be on Connect the blac...

Page 9: ...or systems Both 50pin Ribbon cables and both 60pin Ribbon cables are easily recognizable as they differ in size Depending on the system the two unneeded ribbon cables have to be removed by unclipping...

Page 10: ...e ribbon cable PNL OUT of the daughter PCB to the ribbon cable base of the monitor s platinum take care again for a platinum faced installation of the connector pins Carefully fix the daughter PCB to...

Page 11: ...ping them Connect the daughter PCB s ribbon cable PNL OUT to the ribbon cable base of the monitor panel s short original Flex cable by using the enclosed Ribbon cable merger pay same attention to plat...

Page 12: ...ut cutting these original cables of the vehicle Use the 4pin cable diagram below Connect the stripped ends of the 4pin cable to Ground Battery 12V CAN high and low of the vehicle s monitor harness wit...

Page 13: ...bility of vehicle and interface Due to changes in the production of the vehicle manufacturer there s always a possibility of incompatibility Connect the 6pin connector of the video cable to the 6pin c...

Page 14: ...t compatible with In this case there are two different ways of installation If the CAN box is able to detect an enabled vehicle s reverse gear the green wire of the 6pin to 8pin cable carries 12V whil...

Page 15: ...en relay e g AC RW 1230 with wiring AC RS5 or filter e g AC PNF RVC is required Below schema shows the use of a relay normally open Cut the green cable of the 6pin to 8pin cable close to the black 8pi...

Page 16: ...terface and keypad Connect the keypad s female 4pin connector to the male 4pin connector of the video interface Note Even if the switching through several video sources by the keypad mightn t be requi...

Page 17: ...be done separately for RGB AV1 AV2 and CAM while the corresponding input is selected and visible on the monitor Note The OSD menu is only shown when a working video source is connected to the selected...

Page 18: ...e The white wire of the 6pin cable can be used with a 5 12V pulse to switch the video sources alternatively 3 2 By external keypad or white wire of the 6pin cable Alternatively or additionally to the...

Page 19: ...er order of LVDS cables is exactly connected according to manual Plugging into head unit does not work when the manual says to plug into monitor and vice versa Wrong monitor settings of video interfac...

Page 20: ...nction RET or ALL is ON function for Asian market in the interface OSD Set interface OSD menu item UI CNTRL to ALLOFF or PDCON Not possible to switch video sources by OEM button CAN bus interface does...

Reviews: