background image

PEDESTAL CONTROL FUNCTIONS

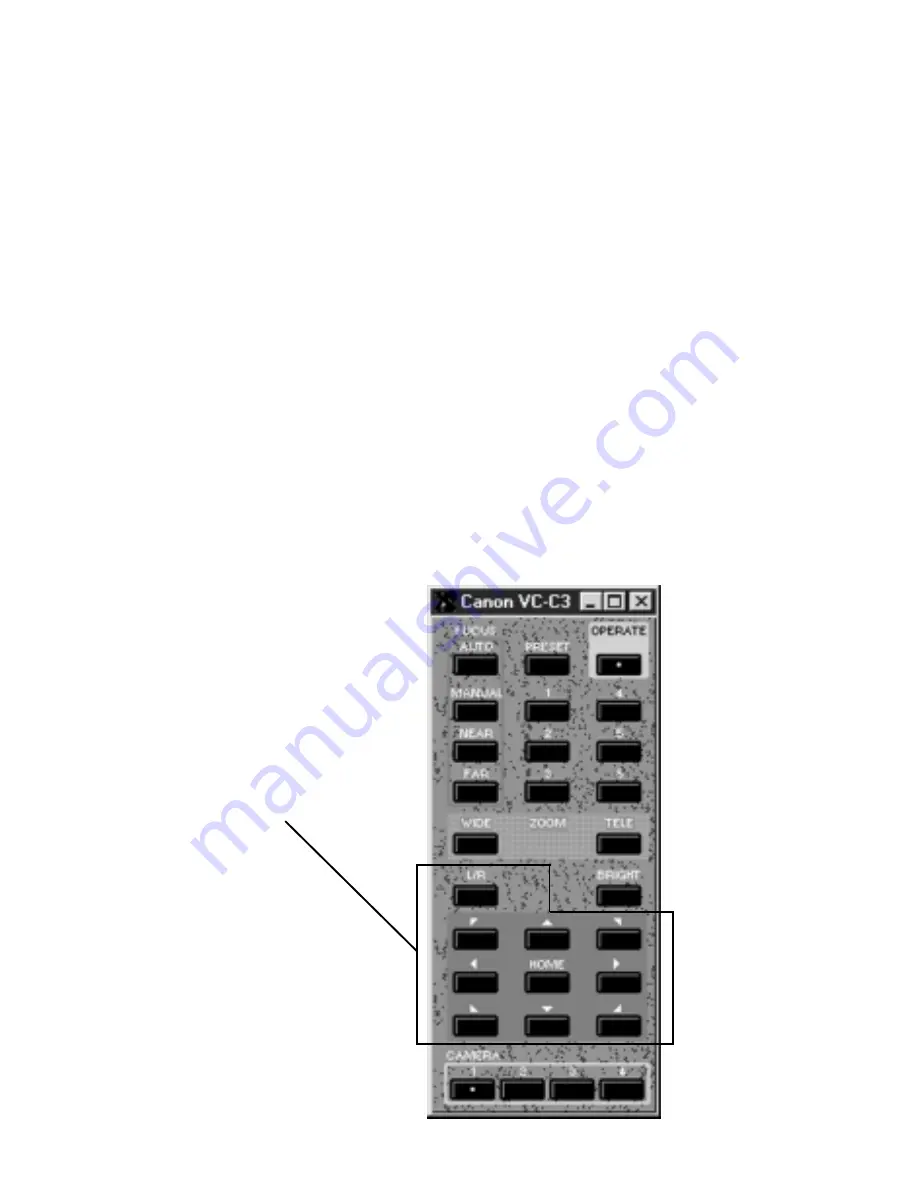
Pan/Tilt Control

The Pan/Tilt buttons, marked with up, down, left, right and diagonal
arrows can be used to control the movement of the camera head.
Pressing one of these buttons will make the 

VC-C3

 move in the respec-

tive direction. For additional control of the Pan/Tilt, the arrow keys on
most computer keyboards will allow you to Pan/Tilt the camera.

L/R

The 

L/R

 button will swap the left and right Pan buttons. This can be

used to adjust the button operation depending if you are facing the
camera or if you are behind the camera.

Home

The Home button sends a command to the camera to go to the home
position. The home position is the center of the horizontal and vertical
movement of the camera. In addition to the home button within the
software, the camera can also be moved to the home position by
pressing the home key on the keyboard.

Pan Control Buttons

12

Summary of Contents for VC-C3

Page 1: ...VC C3 Control Software v1 0 Users Guide For Windows 95 VISUAL COMMUNICATION SYSTEMS...

Page 2: ...in a retrieval system or translated into any language in any form by any means without the expressed written permission of Raster Builders Inc and Canon U S A Inc Licenses and Trademarks Canon is a r...

Page 3: ...art Up Operation PROGRAM OPTIONS CONFIGURATION 8 Communications Pan Tilt Speed Zoom Speed Options CAMERA CONTROL FUNCTIONS 11 PEDESTAL CONTROL FUNCTIONS 12 SETTING PRESETS 13 PRESET CYCLE MODE 14 IMAG...

Page 4: ...ications System Requirements To use the VC C3 Control Software you need A Windows 95 Compatible PC running Microsoft Windows 95 A Microsoft compatible mouse A Canon VC C3 Communication Camera The VC C...

Page 5: ...ardware from your computer always turn your computer off first Connect the 8 pin DIN connector end of the cable to the RS 232 port on the back of the VC C3 camera and connect the 9 pin DSUB connec tor...

Page 6: ...t on the back of the VC C3 camera and connect the 9 pin DSUB connec tor end of the cable to any available serial port on the back of your computer COM1 COM4 Repeat this for as many cameras up to 4 tha...

Page 7: ...u select New folder and name it VC C3 Control 3 Drag copy all of the files from the VC C3 Control Software distribu tion diskette into that folder 4 Open the newly created VC C3 Control folder 5 The V...

Page 8: ...ill blink red Select another of the four camera buttons as required at the bottom of the control window The camera buttons 1 4 correspond to serial ports COM1 COM4 on the computer If an error occurred...

Page 9: ...as a modem this error will be displayed 4 If the VC C3 is not connected to the selected configured COM port this error will be displayed Note There may be a several second delay before an error messag...

Page 10: ...OGRAM OPTIONS CONFIGURATION Program Options To access the Program Options window choose Program Options under the System Menu in the upper left corner of the VC C3 Control Software application window...

Page 11: ...e as what is set in the software Consult your computers manual for the speeds your computer supports Dip switch setting Below is the table for setting the communication speed on the VC C3 Camera Make...

Page 12: ...To adjust the motor speed slide the Zoom Speed control bar to the desired speed setting and choose OK Options The VC C3 software control window size can be set to small or large for your convenience...

Page 13: ...uter keyboards will allow you to zoom the camera to a tele or wide position Focus The VC C3 camera has the capabilities to be set in a Auto Focus or Manual focus mode When the software is initially ac...

Page 14: ...allow you to Pan Tilt the camera L R The L R button will swap the left and right Pan buttons This can be used to adjust the button operation depending if you are facing the camera or if you are behind...

Page 15: ...e of the preset buttons 1 6 which will be used for the camera s current position 6 The desired preset will now be programmed Repeat steps 1 6 to set the remaining preset positions A preset position ca...

Page 16: ...sitions whether they have been defined by the user or not 2 Using the Set Cycles box enter a value that will represent the number of times the VC C3 camera should cycle through all six presets 3 Use t...

Page 17: ...s programming or the user can choose a Manual Mode and adjust those image controls manually Exposure Settings Auto The VC C3 camera will automatically adjust the AGC Auto Gain Control Shutter Speed an...

Page 18: ...amplitude to conform it to a pre specified target value for proper image quality Note By boosting the AGC any video noise will also increase since you are boosting the whole video signal including the...

Page 19: ...open the Iris is the more light is let in to the camera White Balance Manual This slider will adjust the White Balance White Balance is the adjustment of an image to calibrate it so that a white obje...

Page 20: ...the RS 232 connection on the VC C3 When the VC C3 software program is initially started the wireless remote is always active To disable the use of the wireless controller select the System Menu butto...

Page 21: ...n the upper left corner of the application window and selecting About the VC C3 information window will appear This window is helpful in determining the version of application software and ROM hardwar...

Page 22: ...erencing dealer NOTE As of this printing it is not possible to share applications between different vendors Although most vendors support T 120 sharing protocols they are generally not interchangeable...

Page 23: ...able pin out diagram of the cable required to control the Canon VC C3 camera from a computer with a 9 pin serial port 8 pin to 8 pin VC C3 Connection Below is a cable pin out diagram of the cable requ...

Reviews: