


2-4
■
Entering the Date and Time
1
Press
Menu
.
2
Use
or
to select
FAX SETTINGS
.
3
Press
OK
three times.
The date and time currently set for the machine are displayed.
4
Use the numeric buttons to enter the correct day, month,
year, and time in this order.
• Use
or
to move the cursor under the number you want
to change, then press the numeric button.
• Enter only the last two digits of the year.
• Use the 24-hour format for the time (e.g., 1:00 p.m. as 13:00).
5
Press
OK
.
6
Press
Stop/Reset
to return to standby mode.
■
Registering Your Fax/Telephone Number and Name
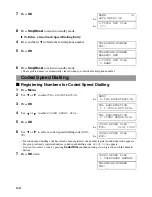
1
Press
Menu
.
2
Use
or
to select
FAX SETTINGS
.
3
Press
OK
twice.
4
Use
or
to select
UNIT TELEPHONE #
.
5
Press
OK
.
6
Use the numeric buttons to enter your fax/telephone
number (max. 20 digits, including spaces).
• If your fax/telephone number has already been registered, the
number appears.
• Use
to enter a space.
• To enter a plus sign (+) before the number, press .
• If you make a mistake, press
to delete the last number or
press and hold
to delete all numbers you entered.
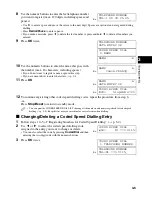
Ex:
MENU
5.FAX SETTINGS
▲
▼
FAX SETTING
1.USER SETTINGS
USER SETTINGS
1.DATE & TIME
Ex:
DATE & TIME
20/12 2002
15:10
Ex:
DATE & TIME
27/12 2002
22:30
▲
▼
DATE & TIME
DATA ENTRY OK
USER SETTINGS
2.DATE SETUP
Ex:
MENU
5.FAX SETTINGS
▲
▼
FAX SETTINGS
1.USER SETTINGS
USER SETTINGS
1.DATE & TIME
USER SETTINGS
3.UNIT TELEPHONE #
▲
▼
Ex:
UNIT TELEPHONE #
TEL=
Ex:
UNIT TELEPHONE #
TEL=
123 4567
▼
▲
▲
Summary of Contents for SmartBase MPC600F/400
Page 1: ...Canon SmartBase MPC600F 400 Fax Guide ...
Page 8: ......
Page 18: ...2 8 ...
Page 44: ...4 16 ...
Page 66: ...8 8 ...
Page 74: ...9 8 ...
Page 76: ...A 2 ...
Page 82: ...I 6 ...


