background image

9-1

9

Summ

a

ry of

 Settin

g

s

Chapter 9

Summary of Settings

Understanding the Menu System

The machine menu system allows you to customise the way your machine operates. It consists of various 
menus, each containing settings that control different functions of your machine.
Available menus and the LCD display differ depending on the current mode (Copy, Fax, or Scan Mode). This 
section explains the procedure to access the menus related only to Fax Mode.
Press 

Fax

to select Fax Mode.

• For the menus related to all modes in common, and menus related only to Copy and Scan Modes, 

 Reference Guide.

• Before adjusting any settings, you may want to print the USER’S DATA LIST to check the current settings. 

(

 p. 2-5)

Accessing the Menus

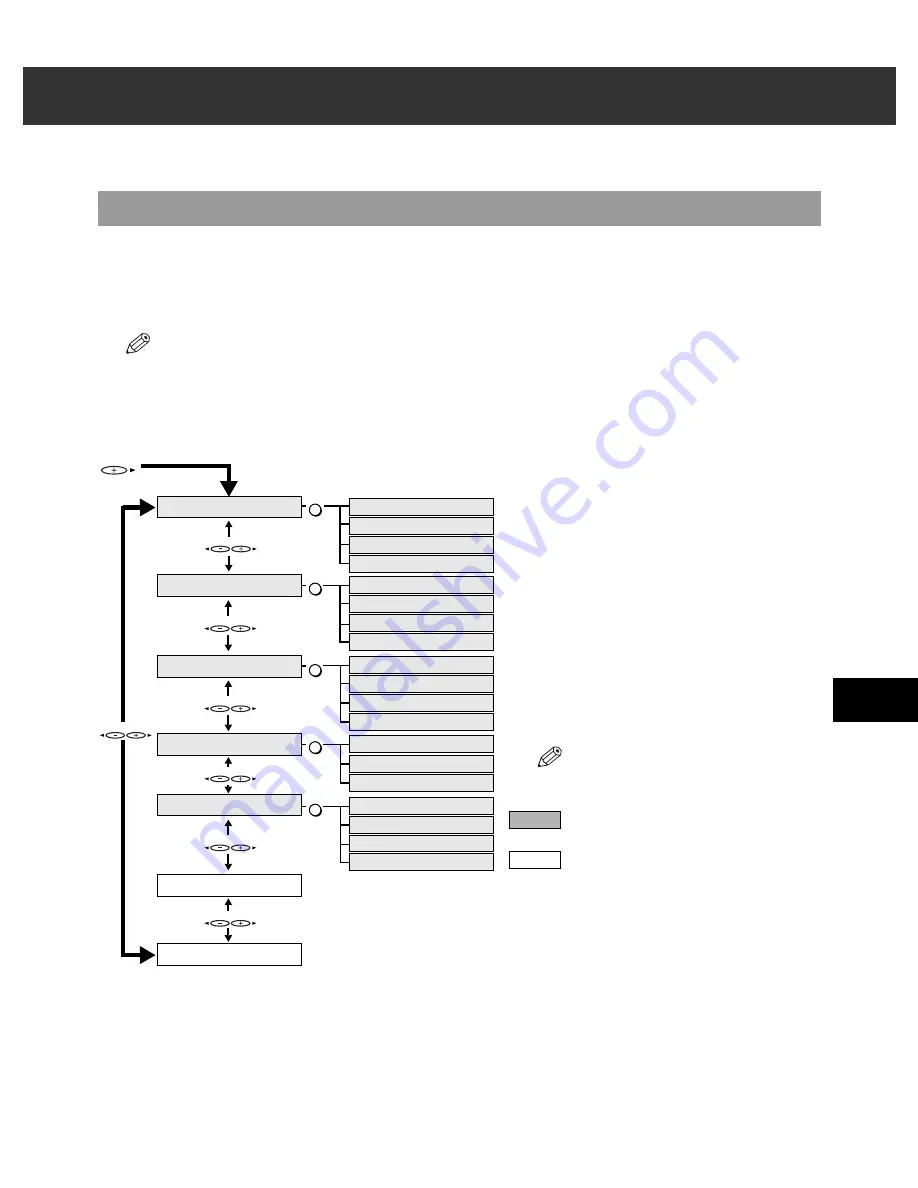
The following illustrates the menu items in hierarchical order.

* If your machine is connected to a PC, you can access these settings using the MultiPASS Suite. 

(→ 

MultiPASS Suite User’s Guide)

Menu

To select the desired menu, complete the 
procedure as shown on the left.

1

Press 

Menu

 to display the menus.

2

Use 

 or 

 to select the menu you 

want to make a change to.

3

Press 

OK

.

4

Use 

 or 

 to select the sub menu you 

want to make a change to.

5

Press 

OK

.

• For details on sub menus, 

p. 9-2.

• Press 

Stop/Reset

to exit from menu 

system.

For details on these menus, 

following 

pages.

For details on these menus and 

SPECIAL

COPY

Reference Guide.

1.RECEIVE MODE

Menu

2.MEMORY REFERENCE

3.REPORTS/LISTS

4.TEL REGISTRATION*

5.FAX SETTINGS*

6.PRINTER SETTINGS

7.SYSTEM SETTINGS

Menu

OK

FAX ONLY MODE

MANUAL MODE

ANS. MACHINE MODE

FAX/TEL AUTO SW

1.DOC.MEMORY LIST

2.PRINT DOCUMENT

3.DELETE DOCUMENT

4.FILE PRINT

1.ACTIVITY REPORT

2.SPEED DIAL LIST

3.USER DATA LIST

4.DOC.MEMORY LIST

1.1-TOUCH SPD DIAL

2.CODED SPEED DIAL

3.GROUP DIAL

1.USER SETTINGS

2.REPORT SETTINGS

3.TX SETTINGS

4.RX SETTINGS

OK

OK

OK

OK

Menu

Menu

Menu

Menu

Menu

Summary of Contents for SmartBase H12219

Page 1: ...Canon SmartBase MPC600F 400 Fax Guide ...

Page 2: ...clare that this product conforms with the EMC requirements of EC Directive 1999 5 EC at nominal mains input 230V 50Hz although the rated input of the product is 200V 240V 50 60Hz If you move to another EU country and are experiencing trouble please call the Canon Help Desk For Europe Only ...

Page 3: ... or computer language in any form or by any means electronic mechanical magnetic optical chemical manual or otherwise without the prior written permission of Canon Inc Setting up the machine Software installation Components of the machine Basic operation of the machine Summary of settings Quick Start Guide Document and paper handling Making copies Maintenance Troubleshooting feed and copy issues R...

Page 4: ...eneration of fax machines that use ITU T V 34 standard 33 6 Kbps modems Super G3 High Speed Fax machines allow transmission time of approximately 3 seconds per page which results in reduced telephone line charges Approximately 3 seconds per page fax transmission time based on Canon FAX Standard Chart No 1 Standard Mode at 33 6 Kbps modem speed The Public Switched Telephone Network PSTN currently s...

Page 5: ...ists 3 9 Printing Speed Dialling Lists 3 9 Chapter 4 Sending Faxes Preparing to Send a Fax 4 1 Documents You Can Fax 4 1 Adjusting the Quality of Your Faxes 4 1 Dialling Methods 4 3 Sending Methods 4 6 Memory Sending 4 6 Manual Sending Via the Handset 4 8 Cancelling Sending 4 9 Redialling When the Line is Busy 4 10 Manual Redialling 4 10 Automatic Redialling 4 10 Sequential Broadcasting 4 11 Delay...

Page 6: ...7 4 Chapter 8 Troubleshooting LCD Messages 8 1 Faxing Problems 8 3 Sending Problems 8 3 Receiving Problems 8 4 Telephone Problems 8 6 If a Power Cut Occurs 8 7 If You Cannot Solve the Problem 8 7 Chapter 9 Summary of Settings Understanding the Menu System 9 1 Accessing the Menus 9 1 Menus in FAX Mode 9 2 Appendix Specifications Facsimile A 1 Telephone A 1 Index I 1 ...

Page 7: ...ick Start Guide Refer to the Quick Start Guide for details on the topic of the previous sentence Reference Guide Refer to the Reference Guide for details on the topic of the previous sentence MultiPASS Suite User s Guide Refer to the MultiPASS Suite for Windows Software User s Guide for details on the topic of the previous sentence machine The word machine is the general term used to represent the...

Page 8: ......

Page 9: ... prompts during operation In Use Memory Light Blinks when the machine is using the telephone line Lights when there are documents in memory Alarm Light Flashes when an error occurs or when the machine is out of paper or ink Fax Button Switches the standby display to Fax Mode Colour B W Button Sets the machine for colour or black white transmission For colour transmission press this button to turn ...

Page 10: ... two digit code to dial a pre registered fax telephone number or group Redial Pause Button Redials the last number that was dialled with the numeric buttons Also enters pauses between or after the fax telephone number when dialling or registering numbers R Button Dials the outside line access number when the machine is connected through a switchboard PBX Polling Button Polls another fax machine D ...

Page 11: ...PASS Suite Software You can adjust settings using the MultiPASS Suite software included with your machine For instructions MultiPASS Suite User s Guide Guidelines for entering Numbers Letters and Symbols When you come to a step that requires you to enter a name or number refer to the table below to determine which numeric button to press for the character you want If you pause for more than two mi...

Page 12: ...appears Use to enter a space and move the cursor to the right Entering Numbers 1 Press to switch to number mode 1 2 Press the numeric button that contains the number you want Use to enter a space and move the cursor to the next digit 3 Continue entering other numbers using the numeric buttons Entering Symbols 1 Press repeatedly until the symbol you want appears 2 If you want to enter another symbo...

Page 13: ...r machine You can set the sender information to print inside or outside the image area TTI POSITION p 9 4 You can enter the sender information from the operation panel following page or from the MultiPASS Suite MultiPASS Suite User s Guide 27 12 2002 15 33 FAX 123 4567 CANON CANON CANADA 001 THE SLEREXE COMPANY LIMITED SAPORS LANE BOOLE DORSET BH25 8ER TELEPHONE BOOLE 945 13 51617 FAX 1234567 Our ...

Page 14: ...elect FAX SETTINGS 3 Press OK twice 4 Use or to select UNIT TELEPHONE 5 Press OK 6 Use the numeric buttons to enter your fax telephone number max 20 digits including spaces If your fax telephone number has already been registered the number appears Use to enter a space To enter a plus sign before the number press If you make a mistake press to delete the last number or press and hold to delete all...

Page 15: ...settings of your machine 1 Press Menu 2 Use or to select REPORTS LISTS 3 Press OK 4 Use or to select USER DATA LIST 5 Press OK The machine prints the USER S DATA LIST The sender information is shown at the beginning of the list The current settings of the machine are listed after this UNIT TELEPHONE DATA ENTRY OK USER SETTINGS 4 UNIT NAME Ex UNIT NAME A Ex UNIT NAME A CANON Ex UNIT NAME A DATA ENT...

Page 16: ...lling Through a Switchboard A PBX Private Branch Exchange is an on site telephone switchboard If your machine is connected through a PBX or other telephone switching system you have to dial the outside line access number first and then the number of the party you are calling To facilitate this procedure you can register the PBX access type and the outside line access number under the R button so t...

Page 17: ...mode If you selected PREFIX in step 8 9 Press OK 10 Use the numeric buttons to enter the outside line access number max 19 digits 11 Press Redial Pause to enter a pause 12 Press OK 13 Press Stop Reset to return to standby mode FAX SETTINGS 1 USER SETTINGS USER SETTINGS 1 DATE TIME USER SETTINGS 10 R KEY SETTING R KEY SETTING PSTN R KEY SETTING PBX Ex PBX EARTH CONNECTION Ex PBX HOOKING FAX SETTING...

Page 18: ...2 8 ...

Page 19: ... one touch speed dialling Coded Speed Dialling p 3 4 Allows you to dial a fax or telephone number by pressing Coded Dial followed by a two digit code of your choice You can register up to 100 different destinations Group Dialling p 3 7 Allows you to dial a group of registered one touch and or coded speed dialling fax numbers By registering a group for one touch or coded speed dialling you press on...

Page 20: ...er a space and move the cursor to the next digit Spaces are optional and are ignored during dialling Press Redial Pause to enter a pause If you make a mistake press to delete the last number or press and hold to delete all numbers you entered 7 Press OK twice 8 Use the numeric buttons to enter the name that goes with the number max 16 characters including spaces If you do not want to register a na...

Page 21: ...e previous entry then re enter the fax telephone number If you do not want to change the fax telephone number ignore this step Use to enter a space and move the cursor to the next digit Spaces are optional and are ignored during dialling Press Redial Pause to enter a pause Press and hold to delete all numbers you entered 5 Press OK twice 6 Press and hold to delete the previous entry then re enter ...

Page 22: ... a coded speed dialling code 00 to 99 If a coded speed dialling code has already been registered the number registered under that code appears If a group is already registered under a coded speed dialling code GROUP DIAL appears You can also select a code by pressing Coded Dial and then entering a two digit code with the numeric buttons 7 Press OK twice Ex NAME A DATA ENTRY OK Ex 1 TOUCH SPD DIAL ...

Page 23: ...peat the procedure from step 6 or Press Stop Reset to return to standby mode You can print the CODED SPEED DIAL LIST showing all the numbers and names registered for coded speed dialling p 3 9 Keep this list near your machine for easy reference when dialling Changing Deleting a Coded Speed Dialling Entry 1 Follow steps 1 to 5 of Registering Numbers for Coded Speed Dialling p 3 4 2 Use or to select...

Page 24: ... enter the name If you do not want to change the name ignore this step If you are unsure how to enter characters p 2 1 7 Press OK 8 Press Stop Reset to return to standby mode To Delete a Coded Speed Dialling Entry 4 Press and hold to delete the fax telephone number 5 Press OK 6 Press Stop Reset to return to standby mode The registered name is automatically cleared when you clear the fax telephone ...

Page 25: ...uch speed dialling button Use or to select the button under which you want to register the group 01 to 09 If a one touch speed dialling button has already been registered 1 TOUCH SPD DIAL or GROUP DIAL appears To register a group under a coded speed dialling code Press Coded Dial then use the numeric buttons to enter the code under which you want to register the group 00 to 99 If a coded speed dia...

Page 26: ...tered for one touch speed dialling Press the one touch speed dialling button assigned to each number you want to register in the group Repeat for other buttons To enter a destination registered for coded speed dialling Press Coded Dial then use the numeric buttons to enter the two digit code assigned to the number you want to register in the group Repeat for other codes 9 Press OK twice 10 Use the...

Page 27: ...u want to print You can select from the following 1 TOUCH LIST CODED DIAL LIST GROUP DIAL LIST 7 Press OK If you selected 1 TOUCH LIST or CODED DIAL LIST above select in what order you want the destinations to be printed Press to print the list with the names of the destinations in alphabetical order or Press to print the list in code or button order The machine prints the list Ex MENU 3 REPORTS L...

Page 28: ...STED IN ALPHABETICAL ORDER 27 12 2002 17 04 FAX 123 4567 CANON 001 27 12 2002 17 05 FAX 123 4567 CANON 001 NO CODED SPEED DIAL LIST 00 2131 02 1 49 3 03 516p4 NO CONNECTION TEL CONNECTION ID 21 GROUP 00 2131 1250 Canon DEUTSCH 32 81 77 02 1 49 39 25 25 Canon FRANCE 21 GROUP DIAL Canon GROUP 1 03 516p488 6700 Canon U S A 32 81 773 3173 Canon UK UNSORTED LIST DESTINATIONS LISTED IN BUTTON ORDER SORT...

Page 29: ...you need to adjust whether the document will be sent in colour or in black white only Colour B W Button and Light Press Colour B W to switch between colour mode and black white mode When the machine is in colour mode the Colour B W light is turned on When the machine is in black white mode the light is turned off Notice for Colour Faxing If you attempt to send a colour document to a fax machine th...

Page 30: ... are automatically scanned with 64 levels of grey rather than just two black white In colour mode you can select from the following COLOUR STANDARD Suitable for normal colour documents COLOUR FINE Suitable for fine colour documents 3 Press OK Setting the Scanning Contrast Contrast is the difference in brightness between the lightest and darkest parts of a printed document You can select from three...

Page 31: ...s or print each list and check the numbers Printing Speed Dialling Lists p 3 9 For details on registering a fax number for speed dialling Chapter 3 When You Dial from Your PC PC Dialling Regular Dialling Dial a fax number by using the numeric buttons just like dialling a telephone number Ex Ä Press Start If you enter the wrong number press Stop Reset or use to delete the number then enter the corr...

Page 32: ... code is displayed If you enter the wrong code press Stop Reset Then press Coded Dial and enter the correct code NO TEL appears if no fax number is assigned to the coded speed dialling code you entered Ex TEL 905 795 1111 01 Canon CANADA Ex TEL 1 49 39 25 25 02 Canon FRANCE ABC Copy Fax Scan DEF Colour B W Coded Dial Hook D T Polling R Enlarge Reduce Redial Pause Paper Select Contrast Image Qualit...

Page 33: ... number is assigned to the one touch speed dialling button you pressed To enter a group registered under a coded speed dialling code Press Coded Dial then use the numeric buttons to enter the two digit code assigned to the group you wish to fax p 4 4 The name of the group is displayed If you enter the wrong code press Stop Reset Then press Coded Dial and enter the correct code NO TEL appears if no...

Page 34: ...ing press Colour B W to turn on its light p 4 1 To adjust the resolution and contrast p 4 2 3 Dial the other party s fax number For dialling methods p 4 3 If you enter the wrong number press Stop Reset then enter the correct number If you must first dial a digit to get an outside line 9 for example add a pause after that digit by pressing Redial Pause 4 Press Start to begin scanning for sending Wh...

Page 35: ...utside line 9 for example add a pause after that digit by pressing Redial Pause 4 Press Start to begin scanning When you use speed dialling scanning starts automatically after a few seconds if the TIME OUT setting is on p 9 5 If you want to scan other documents set the next document on the platen glass and press Start 5 Press OK to send To cancel sending after dialling has started press Stop Reset...

Page 36: ...er party s voice but they will not be able to hear you through the speaker Pick up the handset to talk to the other party If you hear a high pitched signal instead of the other party s voice press Start If you picked up the handset to dial press Start and hang up the handset The machine will begin sending the document 6 When you are ready to send the document ask the other party to press the start...

Page 37: ... scanning is completed 1 Press Stop Reset The machine asks you to confirm that you want to cancel sending 2 Press to cancel sending If you change your mind and want to continue sending press To cancel transmission of a document waiting to be sent you will have to delete it from memory p 4 15 The machine prints an ERROR TX REPORT p 7 3 Using the Platen Glass 1 Press Stop Reset The transmission is c...

Page 38: ...an also be set off and on p 9 5 If all attempts are unsuccessful the machine cancels the transmission and prints an ERROR TX REPORT p 7 3 You can also set the automatic redialling feature from the MultiPASS Suite MultiPASS Suite User s Guide When automatic redialling is in use the LCD alternately displays AUTO REDIAL and the transaction number TX RX NO while it is waiting to redial Cancelling Auto...

Page 39: ... glass the LCD displays the standby mode For colour sending press Colour B W to turn on its light p 4 1 To adjust the resolution and contrast p 4 2 3 Enter up to 110 fax numbers using any of the following methods One touch speed dialling Press the desired one touch speed dialling button s Coded speed dialling Press Coded Dial then use the numeric buttons to enter the two digit code Repeat for othe...

Page 40: ...u specified in step 3 will be cancelled you cannot cancel only one destination and the machine will print a MULTI TX RX REPORT p 7 4 If a number is busy the machine will continue sending to the other destinations and then redial the number that was busy If the machine s memory becomes full while scanning your document MEMORY FULL will appear in the LCD If this happens remove the other documents fr...

Page 41: ...f Documents in Memory The machine can print a list of documents stored in memory along with the transaction number TX RX NO of each document 1 Press Menu 2 Use or to select MEMORY REFERENCE 3 Press OK twice The machine prints the DOC MEMORY LIST Alternatively you can select DOC MEMORY LIST in the REPORTS LISTS menu pp 9 2 9 3 Once you know the transaction number of a document stored in memory you ...

Page 42: ...document displayed in the LCD p 4 15 7 Press OK 8 Press to print the first page only or press to print all pages of the document The machine prints the document 9 To continue printing other documents in memory repeat the procedure from step 6 or Press Stop Reset to return to standby mode Ex MENU 2 MEMORY REFERENCE MEMORY REFERENCE 1 DOC MEMORY LIST MEMORY REFERENCE 2 PRINT DOCUMENT Ex PRINT DOCUME...

Page 43: ...op Reset to return to standby mode Checking a Document s Details Before you print or delete a document in memory you can check the details of the document The transaction number TX RX NO means the following 0001 to 4999 A sent document 5001 to 9999 A received document The marks before the transaction number TX RX NO mean the following No mark Black white document Colour document Black white docume...

Page 44: ...4 16 ...

Page 45: ...in the lower left of the LCD Receive Mode Main Use Operation Requirements FAX ONLY MODE Fax Machine answers all calls as fax calls It receives faxes automatically and disconnects voice calls Separate telephone line for fax use only MANUAL MODE Tel Machine rings for every call whether a fax call or a voice call For a fax call you have to manually activate reception of the fax Telephone connected to...

Page 46: ...appens When FAX TEL AUTO SW is Selected Telephone charges begin for the caller Type of call Telephone Fax Fax Sending document manually Sending document automatically The machine answers without ringing RING START TIME F T RING TIME The machine listens for the fax tone The fax tone is detected The document is received automatically The fax tone is detected and the machine switches to receive mode ...

Page 47: ...his setting tells the machine what to do if no one picks up the handset within the specified ring time set in step 11 14 Press OK 15 Press Stop Reset to return to standby mode The default settings and selectable settings vary depending on the current country selection Ex 27 12 2002 FRI 15 30 FaxTel STANDARD Ex MENU 5 FAX SETTINGS FAX SETTINGS 1 USER SETTINGS FAX SETTINGS 4 RX SETTINGS RX SETTINGS ...

Page 48: ...low beep tone or silence Someone is trying to send you a fax If the telephone is close to your machine press Start on the machine to begin receiving the fax Hang up the handset When the multi purpose tray is empty the LCD displays LOAD PAPER Load paper in the multi purpose tray and then press Resume Quick Start Guide If the telephone is located away from your machine dial 25 the remote receiving I...

Page 49: ...memory and can no longer be transferred to the PC Polling Receiving In normal faxing a fax machine sends a document to another fax machine With polling however a fax machine calls another fax machine and requests that a document be sent to it in other words it polls that fax machine Your machine has the capability of polling another fax machine to retrieve a document from it Your machine can only ...

Page 50: ...our task the machine automatically prints the fax Receiving Faxes in Memory When a Problem Occurs If the machine encounters a problem when it is receiving a fax the machine automatically stores the unprinted pages of the fax in memory and the LCD displays REC D IN MEMORY as well as one or more messages For an explanation of the message s and details on the action to take p 8 1 The machine memory c...

Page 51: ...ic buttons to dial the international access code If you enter the wrong number press Stop Reset then enter the correct number For details on international access codes contact your local telephone company 4 If necessary press Redial Pause to enter a two second pause p For a longer pause press Redial Pause again for another two second pause Alternatively you can change the length of the pause MID P...

Page 52: ...ecorded message of the information service answers press T to switch to tone dialling When T is pressed T is displayed in the LCD If you pressed Hook in step 2 you can pick up the handset if you need to talk to the other party 5 Use the numeric buttons to enter the numbers requested by the information service Numbers entered after pressing T will be dialled using tone dialling 6 When you have fini...

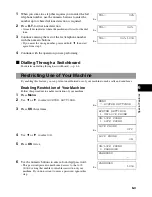
Page 53: ...Restricting Use of Your Machine By enabling this feature you can prevent unauthorised use of your machine to make calls and send faxes Enabling Restriction of Your Machine Follow this procedure to enable restriction of your machine 1 Press Menu 2 Use or to select SYSTEM SETTINGS 3 Press OK three times 4 Use or to select ON 5 Press OK twice 6 Use the numeric buttons to enter a four digit password T...

Page 54: ...nter the four digit password you registered when you enabled restriction If you did not register a password ignore this step 5 Press OK twice 6 Use or to select OFF 7 Press OK three times 8 Press Stop Reset to return to standby mode Restriction of your machine is now disabled Anyone can make calls or send faxes Ex SYSTEM SETTINGS 2 DISPLAY LANGUAGE Ex MENU 7 SYSTEM SETTINGS SYSTEM SETTINGS 1 UN LO...

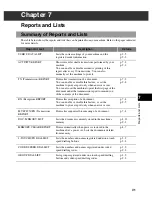
Page 55: ... machine to print the first page of the document under the transmission report to remind you of the contents of the document p 7 3 p 9 4 RX Reception REPORT Prints after reception of a document You can enable or disable this feature or set the machine to print a report only when an error occurs p 7 4 p 9 5 MULTI TX RX Transaction REPORT Prints after sequential broadcasting of a document p 7 4 DOC ...

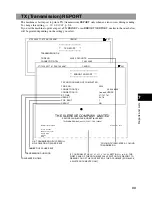
Page 56: ...TO RX ECM 1 OK 00 33 27 12 15 14 905 795 1111 Canon CANADA 5002 AUTO RX ECM 1 OK 00 24 27 12 15 22 03 3758 2111 Canon TOKYO 0001 B CAST ECM 3 OK 01 18 27 12 15 45 2 887 0166 Canon AUSTRALIA 0001 B CAST ECM 3 OK 01 18 27 12 16 10 905 795 1111 Canon CANADA 5003 AUTO RX ECM 1 OK 00 18 27 12 16 16 2 887 0166 Canon AUSTRALIA 5004 AUTO RX ECM 4 OK 00 59 27 12 16 27 20 545 8545 Canon EUROPE 0002 TRANSMIT...

Page 57: ...OR TX REPORT TX FUNCTION WAS NOT COMPLETED TX RX NO 0004 CONNECTION TEL 20 545 8545 CONNECTION ID Canon EUROPE ST TIME 27 12 17 21 USAGE T 00 18 PGS SENT 1 RESULT NG THE SLEREXE COMPANY LIMITED SAPORS LANE BOOLE DORSET BH25 8ER TELEPHONE BOOLE 945 13 51617 FAX 1234567 OUR Ref 350 PJC EAC December 27 2002 Dr P N Cundall Mining Suerveys Ltd Holroyd Road Reading Berks OK TRANSMISSION SUCCESFULL NG SO...

Page 58: ... below will be printed 27 12 2002 18 16 FAX 123 4567 CANON 001 MULTI TX RX REPORT TX RX NO 0054 PGS 1 TX RX INCOMPLETE _____ TRANSACTION OK 01 905 795 1111 Canon CANADA 00 2131 1250 Canon DEUTSCH 02 1 49 39 25 25 Canon FRANCE ERROR INFORMATION _____ 27 12 2002 17 52 FAX 123 4567 CANON 001 RX REPORT RECEPTION OK TX RX NO 5004 COLOUR RX CONNECTION TEL 905 795 1111 CONNECTION ID Canon CANADA ST TIME ...

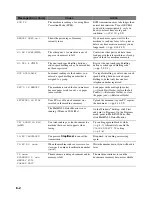
Page 59: ... machine Contact the other party and ask them to send or receive the document using a G3 machine The touch tone rotary pulse setting on your machine is incorrect Set your machine to the setting that matches your telephone line p 2 6 The receiving fax machine did not answer within 55 seconds after all automatic redialling attempts Contact the other party and have them check their fax machine You ca...

Page 60: ...e that only has one fax telephone number registered REC D IN MEMORY The machine received the fax in memory because paper or ink ran out or a paper jam occurred Load paper in the multi purpose tray Quick Start Guide replace the Ink Tank s Reference Guide or clear the paper jam Reference Guide RECEIVED IN FILE Your PC was off and a document was received in the machine s memory Upload the document to...

Page 61: ...CD will display TRY AGAIN IN B W Try sending again in black white Alternatively you can enable the COLOUR DIRECT TX setting p 9 6 that converts colour faxes to black white if the other party s fax machine does not support colour faxing thus enabling you to send colour documents to any fax machine without an error occurring There may be other documents being sent from memory Allow time for those do...

Page 62: ... s memory Then ask the other party to resend the fax An error may have occurred during reception Check the LCD for an error message p 8 1 Print an ACTIVITY REPORT and check for an error p 7 2 The telephone line may not be connected properly Make sure all line connections are secure Quick Start Guide The machine does not switch automatically between telephone and fax reception The machine may not b...

Page 63: ... Cartridge and Ink Tanks are installed properly Reference Guide Be sure to remove the orange protective cap from the Printhead Cartridge before you install it Quick Start Guide The printhead may need cleaning Refer to the flow chart and clean the printhead if necessary Reference Guide The Ink Tanks may need to be replaced Determine if the problem is with the Ink Tanks and replace if necessary Refe...

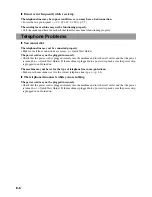
Page 64: ...hat the power cord is plugged securely into the machine and into the wall outlet and that the power is turned on Quick Start Guide If the machine is plugged into a power strip make sure the power strip is plugged in and turned on The machine may not be set for the type of telephone line in use pulse tone Make sure the machine is set for the correct telephone line type p 2 6 The telephone disconnec...

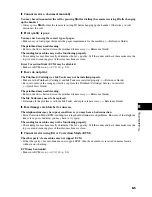
Page 65: ...erence Guide If the ink in the Ink Tank is empty or there is no paper in the multi purpose tray when power is restored the LCD displays CMYK INK EMPTY or LOAD PAPER If this occurs press Resume to return to standby mode In these cases the MEMORY CLEAR REPORT will not be printed even after the Ink Tank is replaced or paper is loaded If You Cannot Solve the Problem If you have a problem with your mac...

Page 66: ...8 8 ...

Page 67: ...d to a PC you can access these settings using the MultiPASS Suite MultiPASS Suite User s Guide Menu To select the desired menu complete the procedure as shown on the left 1 Press Menu to display the menus 2 Use or to select the menu you want to make a change to 3 Press OK 4 Use or to select the sub menu you want to make a change to 5 Press OK For details on sub menus p 9 2 Press Stop Reset to exit...

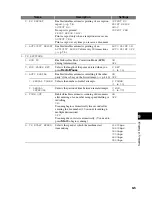
Page 68: ... to FAX TEL AUTO SW p 5 1 Name Description Settings 1 DOC MEMORY LIST Prints the DOC MEMORY LIST p 4 13 2 PRINT DOCUMENT Selects a document in memory and prints the document p 4 14 3 DELETE DOCUMENT Selects a document in memory and deletes the document p 4 15 4 FILE PRINT Prints a document in memory instead of uploading it to your PC p 5 5 Name Description Settings 1 ACTIVITY REPORT Prints the ACT...

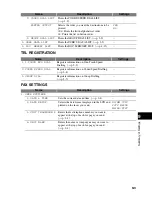
Page 69: ...Description Settings 1 1 TOUCH SPD DIAL Registers information on One Touch Speed Dialling p 3 2 2 CODED SPEED DIAL Registers information on Coded Speed Dialling p 3 4 3 GROUP DIAL Registers information on Group Dialling p 3 7 Name Description Settings 1 USER SETTINGS 1 DATE TIME Sets the current date and time p 2 4 2 DATE SETUP Selects the date format displayed in the LCD and printed on the faxes ...

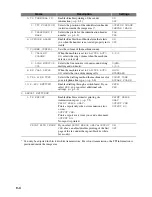
Page 70: ...2 LINE MONITOR VOL Selects the line monitor volume sound during dialling and on hook 0 off 1 2 3 8 RX CALL LEVEL When the machine is set to FAX TEL AUTO SW selects the tone of incoming calls HIGH STANDARD 9 TEL LINE TYPE Selects the dialling method the machine uses for your telephone line type p 2 6 TOUCH TONE ROTARY PULSE 10 R KEY SETTING Enables dialling through a switchboard If you select PBX y...

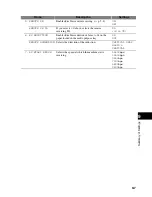
Page 71: ...of the pause entered when you press Redial Pause 2 SEC 1 to 15 3 AUTO REDIAL Enables disables automatic redialling if the other party s line is busy on the first attempt p 4 10 ON OFF 1 REDIAL TIMES Selects the number of redial attempts 2 TIMES 1 to 10 2 REDIAL INTERVAL Selects the period of time between redial attempts 2 MIN 1 to 99 4 TIME OUT Enbles disables automatic scanning of documents after...

Page 72: ...the machine takes to check whether a call is from a fax machine or a telephone 8 SEC 0 to 30 2 F T RING TIME Selects the length of time the machine rings when the call is a voice call 22 SEC 10 to 60 3 DEFAULT ACTION Sets whether the machine switches to receive mode after the ring time set in F T RING TIME has elapsed RECEIVE DISCONNECT 3 INCOMING RING When the machine is set to FAX ONLY MODE or F...

Page 73: ...ts the remote receiving ID 25 00 to 99 6 RX REDUCTION Enables disables reduction of faxes to fit on the paper loaded in the multi purpose tray ON OFF REDUCE DIMENSION Selects the direction of the reduction VERTICAL ONLY HORIZ VERTICAL 7 RX START SPEED Selects the speed at which the machine starts receiving 33600bps 14400bps 9600bps 7200bps 4800bps 2400bps ...

Page 74: ...9 8 ...

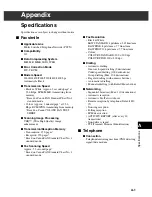
Page 75: ...X Standard Chart No 1 standard mode Fax Scanning Speed Approx 5 3 seconds page Based on Canon FAX Standard Chart No 1 standard mode Fax Resolution Black White B W STANDARD 8 pels mm 3 85 lines mm B W FINE 8 pels mm 7 7 lines mm B W PHOTO 8 pels mm 7 7 lines mm Colour COLOUR STANDARD 200 200 dpi COLOUR FINE 200 200 dpi Dialling Automatic dialling One touch speed dialling 9 destinations Coded speed ...

Page 76: ...A 2 ...

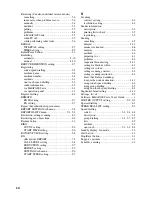
Page 77: ...c 1 1 one touch speed dial 1 2 C CALLING VOLUME setting 9 4 Cancelling automatic redialling 4 10 manual redialling 4 10 polling receiving 5 6 receiving 5 6 restriction 6 3 sending 4 9 CHANGE PAPERSIZE FAX message 8 1 Coded Dial button 1 2 CODED DIAL LIST setting 9 3 CODED SPEED DIAL LIST description 7 1 printing 3 9 sample 3 10 CODED SPEED DIAL setting 9 3 Coded speed dialling changing deleting 3 ...

Page 78: ... 9 1 9 3 FAX TEL AUTO SW description 5 1 setting 9 2 9 6 setting options for 5 2 FILE PRINT setting 9 2 G GROUP DIAL LIST description 7 1 printing 3 9 sample 3 10 setting 9 3 GROUP DIAL setting 9 3 Group dialling creating groups 3 7 description 3 1 using 4 5 H Hook button 1 2 HORIZ VERTICAL setting 9 7 I Image Quality button 1 1 In Use Memory light 1 1 INCOMING RING setting 9 6 INSIDE IMAGE settin...

Page 79: ...ialling changing deleting 3 3 description 3 1 registering 3 2 using 4 4 Operation panel 1 1 registering information via 2 1 OUTSIDE IMAGE setting 9 4 Overseas number dialling 6 1 P Paper Select button 1 1 Pauses dialling with 6 1 PC dialling 4 5 when off 5 5 Polling button 1 2 receiving 5 5 Power cut 8 7 PRINT DOCUMENT setting 9 2 WITH IMAGE setting 9 4 Printing 1 TOUCH SPD DIAL LIST 3 9 ACTIVITY ...

Page 80: ... REPORT 7 4 CALL LEVEL setting 9 4 REDUCTION setting 9 7 REPORT setting 9 5 SETTINGS sub menu 9 6 START SPEED setting 9 7 S Scanning contrast setting 4 2 resolution setting 4 2 Sender information description 2 3 printing list to check 2 5 registering 2 3 Sending cancelling 4 9 delayed 4 13 manual via handset 4 8 memory 4 6 methods 4 6 preparing for 4 1 problems 8 3 sequential broadcasting 4 11 set...

Page 81: ...ansmission REPORT 7 3 nnnn SCANNING P nnn MEMORY FULL PLEASE WAIT message 8 2 REPORT setting 9 4 SETTINGS sub menu 9 5 START SPEED setting 9 5 TERMINAL ID setting 9 4 TX RX CANCELLED message 8 2 NO nnnn message 8 2 Type conventions this guide v U UNIT NAME setting 9 3 TELEPHONE setting 9 3 USER DATA LIST setting 9 3 SETTINGS sub menu 9 3 USER S DATA LIST description 7 1 printing 2 5 sample 2 5 V V...

Page 82: ...I 6 ...

Reviews: