background image

Configuring the Method of 

Connecting to a Computer

1.


2.

 Follow the instructions on the screen to 

perform the following:
• Set the language
• Set the country and region
• Set the time zone
• Set the date and time
• Perform color correction

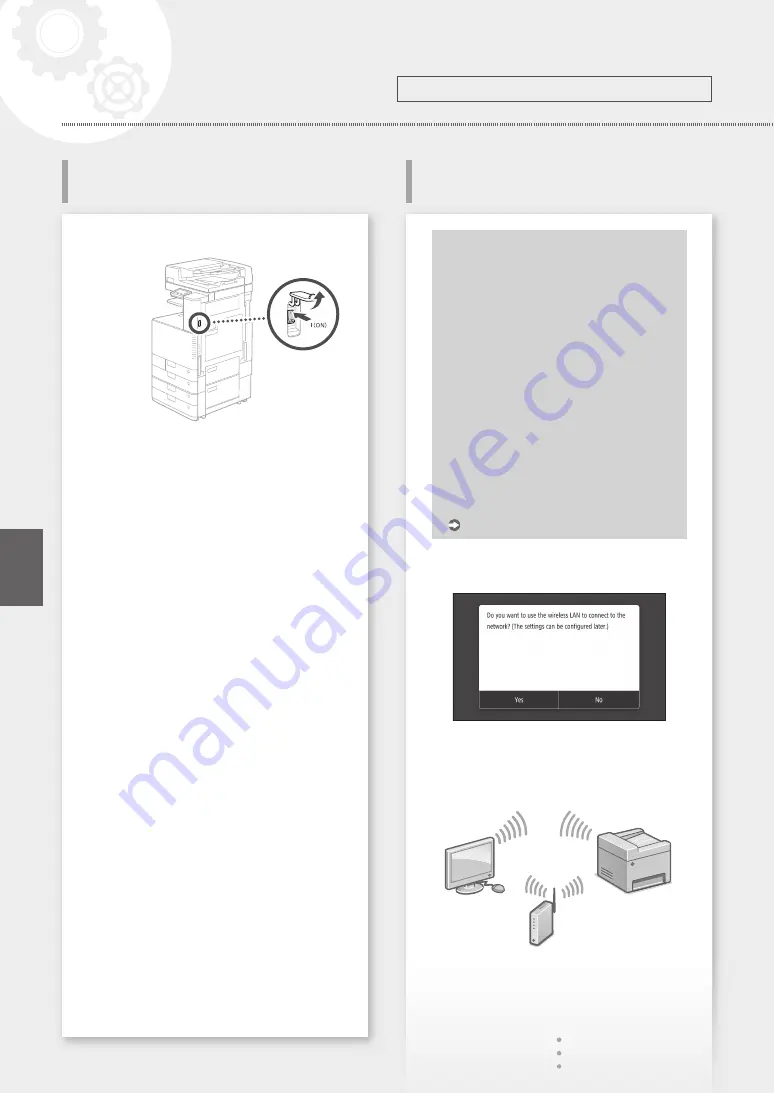
Before starting the configuration

• The machine cannot be connected to 

both wired and wireless LANs at the 
same time.

• If the machine is connected to an 

unsecured network, your personal 
information might be leaked to a third 
party. Please be aware and careful of this.

• The machine does not come with a 

router. Please have one ready, if necessary.

• Even in an environment without wireless 

LAN router, you can use Access Point 
Mode to make a wireless connection to 
the machine directly from your mobile 
device (Direct Connection).

 User's Guide

Specifying the connection method

• To connect via wireless LAN : <Yes>
• To connect via wired LAN or USB : <No>

To connect via wireless LAN

1.

 Make sure that the computer is connected to a 

router properly.

4

Configuring the Machine

Configuring the Initial Settings of 

the Machine

Configure the settings in the following order.

En

Quick Setup

Summary of Contents for imageRUNNER C3025i

Page 1: ... operating this product After you finish reading this guide store it in a safe place for future reference The information in this document is subject to change without notice You can access canon com oip manual to read the User s Guide that describes all functions of this machine Getting Started Introducción ...

Page 2: ......

Page 3: ...uctions before operating this product After you finish reading this guide store it in a safe place for future reference The information in this document is subject to change without notice Introducción Lea el artículo Instrucciones de seguridad importantes antes de hacer funcionar este producto Después de leer esta guía guárdela en un lugar seguro para consultas posteriores La información de este ...

Page 4: ...a third party Please be aware and careful of this The machine does not come with a router Please have one ready if necessary Even in an environment without wireless LAN router you can use Access Point Mode to make a wireless connection to the machine directly from your mobile device Direct Connection User s Guide Specifying the connection method To connect via wireless LAN Yes To connect via wired...

Page 5: ...ware Installing the software on P 6 Now you are finished with the configuration of the initial settings To configure the optional fax function proceed to configuring the fax settings P 7 To connect via wired LAN The machine does not come with a LAN cable Please have one ready if necessary 1 Make sure that the computer is connected to a router properly 2 Check the network settings on the computer 3...

Page 6: ... then perform the following procedure from step 1 1 Install the driver and software Installing the software on P 6 Now you are finished with the configuration of the initial settings To configure the optional fax function proceed to configuring the fax settings P 7 Installing the software You can download the latest printer driver from the Canon website http www canon com For more details on the s...

Page 7: ...t of the paper output from the destination machine as sender information 02 02 2017 10 00AM CANON 123XXXXXXX FAX 0001 Sent Time Unit Name Page Number Number s Type Fax Number 4 Set the reception mode Make the setting by answering the questions on your purposes of using the fax function 5 Connect to a telephone line A B Telephone line jack Telephone 6 Press End 7 Press Yes Now you are finished with...

Page 8: ...ondientes El equipo no viene con enrutador Consiga uno con antelación si lo necesita Incluso en un ambiente sin enrutador de LAN inalámbrica puede usar el Modo de punto de acceso para realizar una conexión inalámbrica al equipo directamente desde su dispositivo móvil conexión directa Guía de usuario Especificación del método de conexión Para conectar por medio de LAN inalámbrica Sí Para conectar p...

Page 9: ...do 5 Instale el controlador y el software Instalación de software en P 10 Ha finalizado la configuración de las opciones de inicio Para configurar la función de fax continúe con la configuración de las opciones de fax P 11 Para conectar por medio de LAN con cable El equipo no viene con cable LAN Consiga uno con antelación 1 Asegúrese que el ordenador esté conectado a un enrutador adecuadamente 2 R...

Page 10: ...uiente procedimiento desde el paso 1 1 Instale el controlador y el software Instalación de software en P 10 Ha finalizado la configuración de las opciones de inicio Para configurar la función de fax continúe con la configuración de las opciones de fax P 11 Instalación de software Puede descargar el último controlador de impresora desde el sitio web de Canon http www canon com Para obtener más deta...

Page 11: ...quipo de destino como información de remitente 02 02 2017 10 00AM CANON 123XXXXXXX FAX 0001 Hora de envío Nombre de unidad Número de página Tipo de número Número de fax 4 Configuración del modo de recepción Realice la configuración contestando las preguntas acerca de sus propósitos al usar la función de fax 5 Conecte a línea telefónica A B Toma de la línea telefónica Teléfono 6 Presione Fin 7 Pres...

Page 12: ...12 ...

Page 13: ...Quick Operation Es En Funciones Rápidas Quick Operation 13 ...

Page 14: ...tinuously scanning many pages of literature quotation etc En 14 Place the Original Document Properly Start the Operation from the Operation Panel Scanning 1 Place the original document 2 Press and select Scan 3 Select the type of scan and enter the necessary information 4 Select Start or B W Start or Color Start Types of scan Store in USB memory device Send e mail Send to file server To scan from ...

Page 15: ...Broadcast Memory Reception PC Fax 1 Open the document to print and select the print function of the application 2 Select the printer driver for the machine and select Preferences or Properties 3 Specify the paper size 4 Specify the paper source and paper type 5 Specify the print settings as necessary 6 Select OK 7 Select Print or OK Useful print settings 2 sided N on 1 Booklet Printing For details...

Page 16: ...ded Paper Envelope The print side face up 1 2 3 Place the paper drawer back into the machine CAUTION Be careful not to get your fingers caught between the paper drawer and the machine NOTE If you have changed the paper size replace the label with one corresponding to the paper size as necessary If you have changed the paper type be sure to change the paper settings Press and then select Paper Sett...

Page 17: ...es on a flat surface and then load it Make sure that this line is not exceeded The print side face down 1 2 3 Check the paper size and type and press Apply on the screen If the paper size type setting does not match the paper you have loaded on the screen shown in step 4 change the setting manually Press Standard Size Specify the paper size Press Change Ppr Type Specify the paper type 4 5 6 7 8 Lo...

Page 18: ... correctly If the problem persists see the User s Guide If a Problem Has Occurred En The Machine Does Not Seem to Work Paper Jams Have Occurred Replacing Consumables Toner Cartridge Canon genuine toner cartridge Canon GPR 53 Toner Black Canon GPR 53 Toner Cyan Canon GPR 53 Toner Magenta Canon GPR 53 Toner Yellow Canon GPR 53L Toner Cyan Canon GPR 53L Toner Magenta Canon GPR 53L Toner Yellow Staple...

Page 19: ... Clean Feeder Start on the screen NOTE It takes approximately 20 seconds to clean the feeder Irregularities Appear in Images Images Are Faint Solution 1 The paper may have absorbed moisture Replace it with paper that has not absorbed moisture Solution 2 Perform gradation adjustment 1 Press and then select Menu 2 Press Adjustment Maintenance Adjust Image Quality Auto Adjust Gradation on the screen ...

Page 20: ...ing stick Slide the stick to the right to take it out 3 Insert the cleaning stick into the hole with the pad on its tip facing down Pad 4 Insert the cleaning stick in until it hits the bottom of the hole and gently move it back and forth CAUTION Insert the cleaning stick into all four holes to clean them 5 Put the cleaning stick back in the original location and close the front cover 20 Quick Oper...

Page 21: ...En 21 ...

Page 22: ...e to the machine Let the machine adjust to the ambient temperature and humidity for at least 2 hours before use In altitudes of above sea level 3 000 m or higher Machines with a hard disk may not operate properly when used at high altitudes of about 3 000 meters above sea level or higher Leveling feet only for products with leveling feet Do not remove the machine s leveling feet after the machine ...

Page 23: ...Do not turn the main power switch OFF or open the covers while the machine is in operation This may result in paper jams Maintenance and Inspections Clean this machine periodically If dust accumulates the machine may not operate properly When cleaning be sure to observe the following If a problem occurs during operation see Troubleshooting If the problem cannot be resolved or you feel the machine ...

Page 24: ...ment Electrical interference and vibrations generated by the machine while printing can adversely affect the operation of such equipment Avoid installing the machine near televisions radios or similar electronic equipment The machine might interfere with sound and picture signal reception Insert the power plug into a dedicated power outlet and maintain as much space as possible between the machine...

Page 25: ... are designed to provide reasonable protection against harmful interference when the equipment is operated in a commercial environment This equipment generates uses and can radiate radio frequency energy and if not installed and used in accordance with the instruction manual may cause harmful interference to radio communications Operation of this equipment in a residential area is likely to cause ...

Page 26: ...ces not ringing in response to an incoming call In most but not all areas the sum of RENs should not exceed five 5 0 To be certain of the number of devices that may be connected to a line as determined by the total RENs contact the local telephone company For products approved after July 23 2001 the REN for this product is part of the product identifier that has the format US AAAEQ TXXXX The digit...

Page 27: ...vailable only if the FAX Board is installed About This Manual Screens Screens of the touch panel display used in this manual are those taken when the imageRUNNER C3025i has the following optional equipment attached to it Inner 2way Tray J Cassette Feeding Unit AP Super G3 FAX Board Note that functions that cannot be used depending on the model or options do not appear on the touch panel display Il...

Page 28: ... the conditions governing the SOFTWARE and PRODUCT and b such transferee agrees in writing to be bound by all these conditions 6 You may not decrypt decompile reverse engineer disassemble or otherwise reduce the code of the SOFTWARE to human readable form 7 You may not modify adapt translate rent lease or loan the SOFTWARE or create derivative works based on the SOFTWARE 8 You are not entitled to ...

Page 29: ...29 En ...

Page 30: ... de literatura extractos etc 30 Coloque el documento original adecuadamente Comience la operación desde el panel de control Lectura 1 Coloque el documento original 2 Presione y luego seleccione Lectura 3 Seleccione el tipo de lectura e ingrese la información necesaria 4 Seleccione Iniciar o Inicio en B N o Inicio en color Tipos de lectura Almacenar en dispositivo de almacenamiento USB Enviar por e...

Page 31: ... el documento para imprimir y seleccione la función de impresión en la aplicación 2 Seleccione el controlador de impresora y seleccione Preferencias o Propiedades 3 Especifique el tamaño del papel 4 Especifique el origen del papel y el tipo de papel 5 Especifique las opciones de impresión según sea necesario 6 Seleccione Aceptar 7 Seleccione imprimir o Aceptar Funciones útiles para imprimir a 2 ca...

Page 32: ...se sobrepase esta línea Papel Sobre Lado de impresión hacia arriba 1 2 3 Coloque el casete nuevamente dentro del equipo PRECAUCIÓN Asegúrese de no apretar sus dedos entre el casete y el equipo NOTA Si ha cambiado el tamaño de papel reemplace la etiqueta con una que corresponda al tamaño del papel si es necesario Si cambió el tipo de papel asegúrese de cambiar las opciones de papel Presione y luego...

Page 33: ...ego cárguela Asegúrese de no exceder la línea Lado de impresión hacia abajo 1 2 3 Revise el tipo y tamaño de papel y presione Aplicar en la pantalla Si las opciones de tamaño o tipo de papel no coinciden con el papel que ha cargado en pantalla como se muestra en el paso 4 cambie las opciones manualmente Presione Tamaños normales Especifique el tamaño del papel Presione Cambiar tipo papel Especifiq...

Page 34: ...n conectado correctamente Si el problema persiste consulte la Guía de usuario Si ha ocurrido un problema El equipo no parece funcionar Han ocurrido atascos de papel Reemplazo de insumos Cartucho de tóner Cartucho de tóner original de Canon Canon GPR 53 Toner Black Negro Canon GPR 53 Toner Cyan Cian Canon GPR 53 Toner Magenta Magenta Canon GPR 53 Toner Yellow Amarillo Canon GPR 53L Toner Cyan Cian ...

Page 35: ...ento Mantenimiento Limpiar alimentador Iniciar en la pantalla NOTA La limpieza del alimentador toma aproximadamente 20 segundos Se ven irregularidades en las imágenes o se ven desteñidas Solución 1 El papel pudo haber absorbido humedad Reemplace con papel seco Solución 2 Realice un ajuste de gradación 1 Presione y luego seleccione Menú 2 Presione Ajuste Mantenimiento Ajustar calidad de imagen Ajus...

Page 36: ...za Deslice la varilla hacia la derecha para tomarla 3 Inserte la varilla en el agujero con la almohadilla de la punta hacia abajo Almohadilla 4 Inserte la varilla de limpieza hasta que tope en el fondo del agujero y muévala suavemente hacia arriba y abajo PRECAUCIÓN Inserte la varilla de limpieza en los cuatro agujeros para limpiarlos 5 Coloque la varilla de limpieza nuevamente en su posición orig...

Page 37: ...Es 37 ...

Page 38: ...biente durante un mínimo de dos horas antes de utilizarlo En altitudes de 3 000 m o más sobre el nivel del mar Las máquinas que llevan incorporado un disco duro podrían no funcionar correctamente si se utilizan en altitudes elevadas de unos 3 000 metros o más por encima del nivel del mar Patas niveladoras solo en productos con patas niveladoras No quite las patas de nivelación del equipo una vez i...

Page 39: ... hace pueden producirse atascos de papel Mantenimiento e inspecciones Limpie este equipo periódicamente Si se acumula el polvo es posible que el equipo no funcione correctamente Durante la limpieza asegúrese de tener en cuenta lo siguiente Si se produce algún problema durante el funcionamiento consulte Solución de problemas Si el problema no se resuelve o cree que el equipo necesita una revisión c...

Page 40: ...encia eléctrica y las vibraciones generadas por el equipo durante la impresión pueden afectar de manera negativa la operación de estos equipos Evite instalar el equipo cerca de televisores radios o equipos electrónicos similares El equipo puede interferir con la recepción de la señal de imagen y sonido Inserte el enchufe de alimentación en una toma de corriente dedicada y mantenga tanto espacio co...

Page 41: ... la Parte 15 de las reglas de la FCC Estos límites están diseñados para proporcionar una protección razonable frente la interferencia dañina cuando se opera el equipo en un entorno comercial Este equipo genera usa y puede irradiar energía de frecuencia de radio y si no se instala y usa de acuerdo con el manual de instrucciones puede causar una interferencia dañina a las comunicaciones de radio El ...

Page 42: ...ebe dar este número a la compañía telefónica El REN se usa para determinar el número de dispositivos que se pueden conectar a la línea telefónica Una cantidad excesiva de REN en una línea telefónica puede causar que los dispositivos no suenen como respuesta a una llamada entrante En la mayoría de las áreas la suma de los REN no debe exceder los cinco 5 0 Para conocer con certeza el número de dispo...

Page 43: ...las Las pantallas del panel táctil utilizado en este manual son las que se toman cuando imageRUNNER C3025i tiene el siguiente equipo opcional conectado Bandeja Interna de 2 Vías J Unidad de Alimentación por Casete AP Tarjeta de Fax Súper G3 Tenga en cuenta que las funciones que no se pueden usar según el modelo o las opciones no aparecen en la pantalla del panel táctil Ilustraciones Las ilustracio...

Page 44: ...TO a otra persona y todos los derechos y obligaciones según las condiciones que rigen el SOFTWARE y PRODUCTO y b esta persona accede por escrito a estas condiciones 6 No puede descifrar descompilar realizar ingeniería inversa desensamblar o reducir el código del SOFTWARE a un formato que se pueda leer por otras personas 7 No puede modificar adaptar traducir rentar o prestar el SOFTWARE o crear tra...

Page 45: ...45 ...

Page 46: ...46 ...

Page 47: ......

Page 48: ... Road Brampton ON L6Y 5Z7 Canada CANON EUROPA N V Bovenkerkerweg 59 1185 XB Amstelveen The Netherlands See http www canon europe com for details on your regional dealer CANON AUSTRALIA PTY LTD Building A The Park Estate 5 Talavera Road Macquarie Park NSW 2113 Australia CANON CHINA CO LTD 2F Jinbao Building No 89 Jinbao Street Dongcheng District Beijing 100005 China CANON SINGAPORE PTE LTD 1 Fusion...

Reviews: