


■ FAQ on General Matters of Updater
No.1
Q: What preparation is needed in each installation method?
A: See the table below for preparation required in each installation method.
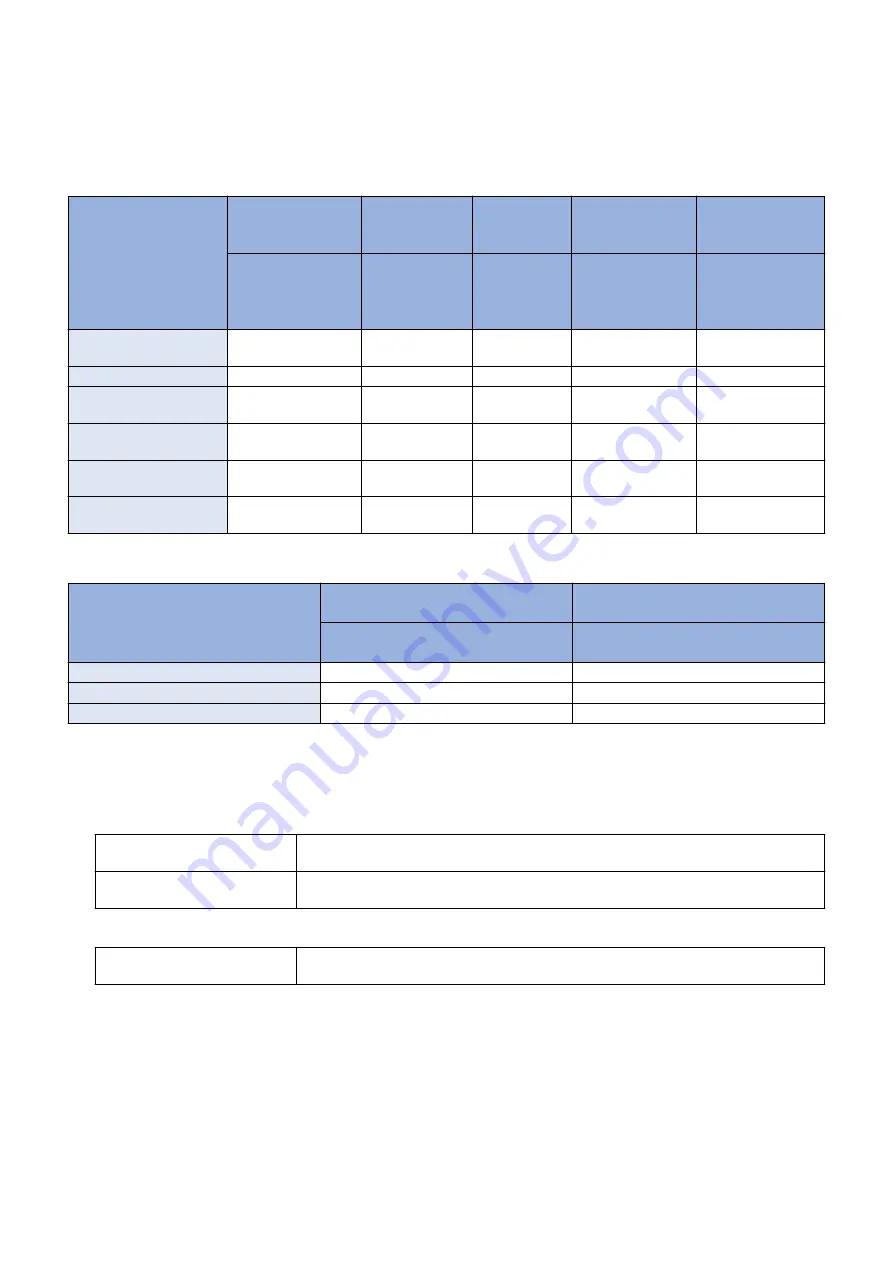
• For updating firmware
Installation Method
Setting Sales Com-
pany’s HQ
Network Set-
tings
Enabling UGW
Link
Enabling [Update
Firmware] Button
Enabling [Manual
Update] Button of
Remote UI
“Enabling [Update
Firmware] Button”
UGW-linked Download and
Update
Yes
Yes
Yes
-
-
UGW-linked Download
Yes
Yes
Yes
-
-
Manual Download and Up-
date
Yes
Yes
-
-
-
Manual Download and Up-
date via Local UI
Yes
Yes
-
Yes
-
Manual Download and Up-
date via Remote UI
Yes
Yes
-
Yes
-
Special Download and Up-
date via Remote UI
Yes
-
-
-
Yes
• For install Application
Installation Method
Network Settings
Enabling [Install Application/Options]
Button
“Network Settings” on page 203
“Enabling [Install Application/Options]
LMS-linked Installation
Yes
-
LMA-linked installation via Local UI
Yes
Yes
LMS-linked installation via Remote UI
Yes
Yes
No.2
Q: How can operations using Updater be masked on the users' side?
A: Be sure to perform the following from the service mode.
• Masking Firmware Installation
Setting Device Service Mode
(Level 1)
COPIER >OPTION >FNC-SW >CDS-FIRM
(1 -> 0)
Setting Device Service Mode
(Level 1)
COPIER >OPTION >FNC-SW >LOCLFIRM
(1 -> 0)
• Masking Application Installation
Setting Device Service Mode
(Level 1)
COPIER >OPTION >FNC-SW >CDS-MEAP
(1 -> 0)
No.3
Q: Can the communication be cancelled during the communication test?
A: Yes. During the communication test, “Cancel” button is displayed.
2. Technology
215
Summary of Contents for imageRUNNER ADVANCE C3320 Series
Page 1: ...Revision 7 0 imageRUNNER ADVANCE C3330 C3325 C3320 Series Service Manual ...
Page 18: ...Product Overview 1 Product Lineup 7 Features 11 Specifications 17 Parts Name 26 ...
Page 518: ...Error Jam Alarm 7 Overview 507 Error Code 511 Jam Code 617 Alarm Code 624 ...
Page 1020: ...9 Installation 1008 ...
Page 1022: ...2 Perform steps 3 to 5 in each cassette 9 Installation 1010 ...
Page 1024: ...5 6 Checking the Contents Cassette Feeding Unit 1x 3x 2x 1x 9 Installation 1012 ...
Page 1027: ...3 4 NOTE The removed cover will be used in step 6 5 2x 2x 9 Installation 1015 ...
Page 1046: ...When the Kit Is Not Used 1 2 Close the Cassette 2 When the Kit Is Used 1 9 Installation 1034 ...
Page 1068: ... Removing the Covers 1 2x 2 1x 9 Installation 1056 ...
Page 1070: ...3 1x 1x 9 Installation 1058 ...
Page 1083: ...6 7 TP M4x8 2x 2x 9 Installation 1071 ...
Page 1084: ...When Installing the USB Keyboard 1 Cap Cover Wire Saddle 9 Installation 1072 ...
Page 1129: ...9 2x 10 2x 11 9 Installation 1117 ...
Page 1135: ...Remove the covers 1 ws 2x 2 1x 9 Installation 1123 ...
Page 1140: ...2 2x 3 Connect the power plug to the outlet 4 Turn ON the power switch 9 Installation 1128 ...
Page 1176: ... A 2x Installing the Covers 1 1x 2 2x 9 Installation 1164 ...
Page 1190: ...14 Install the Cable Guide to the HDD Frame 4 Hooks 1 Boss 9 Installation 1178 ...


