background image

Important

Used maintenance cartridges are heavy. Always grasp the cartridge firmly and keep the cartridge level during
removal and storage. If you drop a used Maintenance Cartridge or store it at an angle, ink may leak and
cause stains.

The remaining Maintenance Cartridge capacity is recorded on each printer. Do not install a used Mainte-
nance Cartridge in another printer.

4


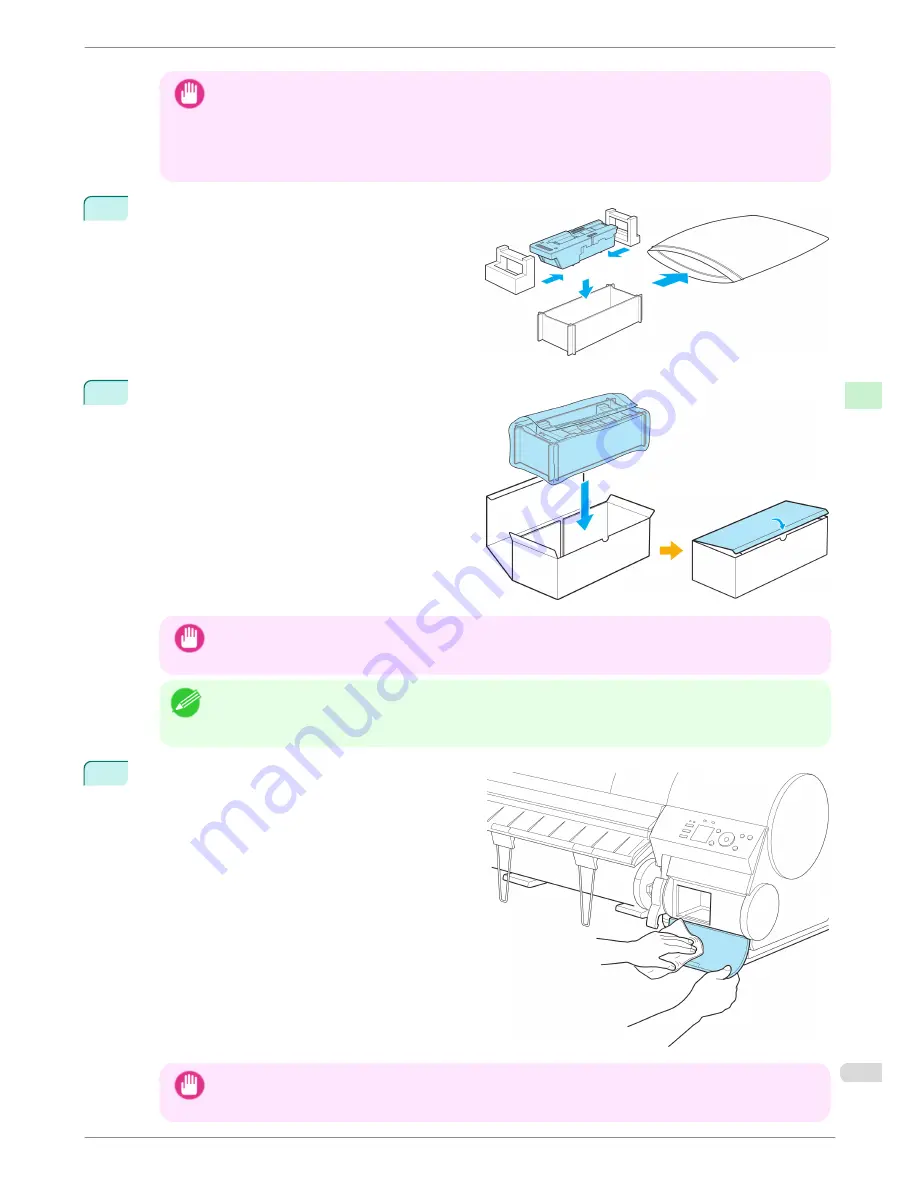
Attach the packaging material to the used Mainte-
nance Cartridge and put it in the box. Keep it level
as you put it in the plastic bag. Expel excess air
from the plastic bag and seal the zipper.

5


Confirm the Maintenance Cartridge is right-side up,
put it in the box, and store it so that it stays level.

Important

Always put the used Maintenance Cartridge back in the box and store the box on a flat surface. Otherwise,
ink may leak and cause stains.

Note

In accordance with active and ongoing environmental programs, Canon supports recycling of used mainte-
nance cartridges. Follow the instructions provided with the new Maintenance Cartridge that describe how to
process the used Maintenance Cartridge.

6


Wipe away any soiling on the Maintenance Car-
tridge Cover.

Important

Support the Maintenance Cartridge Cover from underneath as you wipe it.


iPF8400


Replacing the Maintenance Cartridge

Basic Guide


Consumables and Maintenance

Maintenance Cartridge

49


Summary of Contents for imagePROGRAF iPF8400

Page 1: ...sting the feed amount 99 Troubleshooting Problems Regarding Paper 102 Printing does not start 111 The printer stops during a print job 112 Problems with the printing quality 113 Cannot print over a ne...

Page 2: ...e power cable from the outlet as soon as possible to prevent fire and electrical shocks Do not install the printer near sources of strong electromagnetic fields whether equipment that generates such f...

Page 3: ...the printer may cause personal injuries Pacemakers Warning This printer generates a low level magnetic field Anyone wearing a pacemaker who experiences discomfort while work ing around the printer sho...

Page 4: ...C Regulations U S A Canon Large Format Printer iPF8400 This device complies with Part 15 of the FCC Rules Operation is subject to the following two conditions 1 This device may not cause harmful inter...

Page 5: ...duct names in this manual are trademarks or registered trademarks of their respective owners Copyright Unauthorized reproduction of this user manual in whole or part is prohibited Legal Notice It is i...

Page 6: ...es and specifications of the available media on the printer Setup Guide Basic Guide User s Guide Paper Reference Guide Viewing the Electronic manuals Viewing the Electronic manuals Install the Electro...

Page 7: ...errors Note Indicates helpful reference information and supplemental information on particular topics Button names and user interface elements Key and button names on the control panel and user interf...

Page 8: ...ns because of subsequent updates May we request The information in this user manual is subject to change without notice We strive to ensure accuracy of information in this user manual but if you notic...

Page 9: ...roll or fall Rolls are heavy and dropping a roll may cause injury Important When handling the roll be careful not to soil the printing surface This may affect the printing quality We recommend wearin...

Page 10: ...ide Align the tips a of the 2 Inch Paper Core Attachment with the holes b of the Holder Stopper and insert it firmly No attachment is needed Using rolls with a 3 inch paper core Holder Stopper Side Ro...

Page 11: ...r Stopper lever c by pushing it down toward the shaft side Loading Rolls in the Printer Loading Rolls in the Printer Follow these steps to load rolls in the printer Important Always load rolls when th...

Page 12: ...ft the Ejection Guide 4 Holding the Roll Holder so that the side with the white gear faces the side of the Roll Holder Slot with a white gear load the Roll Holder shaft a into the grooves b on both en...

Page 13: ...the printing surface Otherwise it may affect printing quality We recommend wearing clean cloth gloves when handling rolls to protect the printing surface If the paper is wrinkled or warped straighten...

Page 14: ...straight or if it wrinkles it may jam or rub against the Printhead Do not force the roll paper into alignment with the paper alignment line b This may prevent the paper from being advanced straight No...

Page 15: ...the roll using the Paper Cutting function if the edge is creased or soiled See Specifying the Cutting Method for Rolls User s Guide Note For details on types of paper to select see the Paper Reference...

Page 16: ...nRoll On in the Control Panel menu a barcode is printed on the leading edge of the roll Do not remove the roll before the barcode is printed You will be unable to keep track of the amount of roll pape...

Page 17: ...he Roll Holder from Rolls User s Guide 8 Lower the Ejection Guide and close the Top Cover Note To load new paper in the printer at this point see Loading Rolls in the Printer P 11 Clean inside the top...

Page 18: ...side the Top Cover and around the Ejection Guide If these areas are dirty we recommend cleaning them in advance See Cleaning Inside the Top Cover P 53 Store unused paper in the original package away f...

Page 19: ...a sheet lengthwise and printing side up insert it between the Platen a and the Paper Retainer b Align the edges of the sheet as follows 1 Align the sheet with the Paper Alignment Line c at right 2 Al...

Page 20: ...ufficient to hold some types of paper against the Platen well In this case use your hand to load the paper Sheets are held in place by suction through holes on the Platen Although the suction may prod...

Page 21: ...vent printed sheets from being bent See Using the Output Stacker User s Guide Removing Sheets Removing Sheets Remove sheets from the printer as follows 1 On the Tab Selection screen of the Control Pan...

Page 22: ...6 Lower the Release Lever and close the Top Cover Removing Sheets iPF8400 Basic Guide Handling Paper Handling sheets 22...

Page 23: ...er Ink Type Capacity Matte black PFI 706 MBK Pigment ink 700 ml 23 7 fl oz Black PFI 706 BK Cyan PFI 706 C Magenta PFI 706 M Yellow PFI 706 Y Photo cyan PFI 706 PC Photo magenta PFI 706 PM Red PFI 706...

Page 24: ...e course of printing within six months after breaking the seal Printing quality may be affected if you use older ink tanks Do not leave the printer without ink tanks installed for extended periods a m...

Page 25: ...b Selection screen of the Control Panel press or to select the Ink tab Note If the Tab Selection screen is not displayed press the Menu button 2 Press the OK button The Ink Menu is displayed 3 Press o...

Page 26: ...s not return to the original position 3 Hold the Ink Tank by the grips a and remove it Press the OK button Important If there is still ink in the Ink Tank you removed store it with the ink holes a fac...

Page 27: ...nter during printing may deteriorate print quality 2 Lift the stopper a of the Ink Tank Lock Lever for the color to replace Lift the Ink Tank Lock Lever until it stops and then push it down to the fro...

Page 28: ...ations Load the Ink Tank 330 ml 1 Before opening the pouch tilt the Ink Tank to the left and right gently seven or eight times Important Do not remove and agitate ink tanks that have already been inst...

Page 29: ...facing as shown with the ink holes down Important Ink tanks cannot be loaded in the holder if the color or orientation is incorrect If the Ink Tank does not fit in the holder do not force it into the...

Page 30: ...p is not lit in red reload the tank 6 Close the Ink Tank Cover Important After Ink Tank replacement always close the Ink Tank Cover If the Ink Tank Cover cannot close some Ink Tank Lock Lever may not...

Page 31: ...just your wrist you may injure your wrist Important Do not remove and agitate ink tanks that have already been installed in the printer Ink may leak out If you do not agitate the Ink Tank the ink may...

Page 32: ...If the Ink Tank does not fit in the holder do not force it into the holder Make sure the color of the Ink Tank Lock Lever matches the color of the Ink Tank and check the orientation of the Ink Tank be...

Page 33: ...nk Tank Cover cannot close some Ink Tank Lock Lever may not be closed completely Make sure all ink tank lock levers are fully closed To close the Ink Tank Cover when no Ink Tank is installed as when m...

Page 34: ...ad Replace the Printhead on the left side If the Display Screen indicates Open top cover and replace the right printhead Replace the Printhead on the right side If the Display Screen indicates Open to...

Page 35: ...idge 1 Remove any paper that has been advanced by selecting Eject Paper in the Control Panel menu When using a roll rewind it See Removing the Roll from the Printer P 15 When using sheets remove the s...

Page 36: ...t completely to wipe it clean Important Do not touch the Linear Scale a Carriage Shaft b or Fixed Blade c This may stain your hands and damage the printer Never touch the metal contacts of the Carriag...

Page 37: ...he Carriage is obscuring the ventilation duct move the Carriage manually before cleaning the duct 4 Pull up the Carriage Cover to open it completely 5 Pull the Printhead Fixer Lever forward all the wa...

Page 38: ...e the Printhead and press the OK button Note Dispose of the used Printhead in accordance with local regulations 8 Holding the new Printhead by the grips a remove it from the pouch Replacing the Printh...

Page 39: ...Part b as you hold it over the Printhead package or safely out of the way to avoid spilling ink and staining your clothes or the surrounding area If ink accidentally spills wipe off the ink with a dr...

Page 40: ...ront to lock the Printhead in place 12 Push the Printhead Fixer Lever toward the back of the printer until it clicks 13 Push the Carriage Cover down toward the front Replacing the Printhead iPF8400 Ba...

Page 41: ...in Head Posi Adj in the Control Panel menu See Adjustment When Installing the Printhead User s Guide 15 Feed paper by following the instructions on the Display Screen After the paper has advanced Ini...

Page 42: ...On the Tab Selection screen of the Control Panel press or to select the Settings Adj tab Note If the Tab Selection screen is not displayed press the Menu button 2 Press the OK button The Set Adj Menu...

Page 43: ...have wrung out completely to wipe it clean Important Do not touch the Linear Scale a Carriage Shaft b or Fixed Blade c This may stain your hands and damage the printer 3 Push the Cutter Unit Detachmen...

Page 44: ...Note Dispose of the used Cutter Unit in accordance with local regulations 5 Holding the new Cutter Unit by the Lock Lever a and grip b insert it on the Carriage until it clicks into place c Important...

Page 45: ...select Yes and then press the OK button 9 The Carriage is moved and a confirmation message is displayed about resetting the cut count To reset the cut counter press or to select Yes and then press the...

Page 46: ...e P 46 Precautions when handling the Maintenance Cartridge Take the following precautions when handling the Maintenance Cartridge Caution For safety keep the Maintenance Cartridge out of the reach of...

Page 47: ...enance Cartridge during initialization immediately after turning on the printer during Printhead cleaning or when ink is being absorbed Ink may leak out Access the menu for Maintenance Cartridge repla...

Page 48: ...This may dam age the Maintenance Cartridge 2 At this point open the Maintenance Cartridge Cov er 3 Hold the used Maintenance Cartridge by the grip a with one hand and put your other hand under the Mai...

Page 49: ...ipper 5 Confirm the Maintenance Cartridge is right side up put it in the box and store it so that it stays level Important Always put the used Maintenance Cartridge back in the box and store the box o...

Page 50: ...aft Cleaner is included with re placement Maintenance Cartridge After you execute Repl maint cart and replace the Maintenance Cartridge a message will appear on the Display Screen requesting you to re...

Page 51: ...e Carriage moves When it finishes moving instructions are displayed on the Display Screen 5 Open the Top Cover Note If you do not respond within two minutes shaft cleaner replacement is canceled In th...

Page 52: ...by the grips a at tach it to the Carriage Note Be sure to put the used Shaft Cleaner in the small box before putting it in the larger box with the used Mainte nance Cartridge for disposal 8 Close the...

Page 53: ...g on paper that generates a lot of cutting debris If you have replaced the roll After printing on paper that generates a lot of paper dust If the message Blue platen switch is dirty is displayed Impor...

Page 54: ...ris from cutting on the Top Cover Roller a all over the Platen b on the Paper Retainer c the Border less Printing Ink Grooves d the Ejection Guide e the cutter guide f around the ink suction holes at...

Page 55: ...he Printhead If printing is faint cleaning the Printhead may improve results Choose one of two Printhead cleaning modes Head Cleaning A or Head Cleaning B depending on the problem to resolve Head Clea...

Page 56: ...s User s Guide Perform cleaning as follows 1 On the Tab Selection screen of the Control Panel press or to select the Settings Adj tab Note If the Tab Selection screen is not displayed press the Menu b...

Page 57: ...c Message Lamp orange On A warning message is displayed Flashing An error message is displayed Off The printer is off or is operating normally d Menu button Displays the Tab Selection screen See Menu...

Page 58: ...button Displays the screen before the current screen k Cut button Pressing this button when rolls are loaded cuts the paper if you have specified Automatic or Eject in Cutting Mode in the Control Pane...

Page 59: ...mmands P 61 Accessing menus Printer menus are grouped by function Menus are displayed with the upper line selected You can use the buttons on the Control Panel to access each menu Press Back to access...

Page 60: ...r level menu Note If a confirmation message is displayed regarding the setting you entered press the OK button The setting is applied and the printer is now in Standby Specifying numerical values Foll...

Page 61: ...you entered press the OK button The setting is applied and the printer is now in Standby Executing menu commands Menu commands can be executed as follows 1 Press or to select the action to execute an...

Page 62: ...Level Fourth Level Fifth Level Load Paper Roll Paper Cut Sheet Eject Paper Chg Paper Type 1 Roll Paper The paper type is displayed here 1 Cut Sheet The paper type is displayed here 1 Chg Paper Size Sh...

Page 63: ...he printer driver 6 see Specifying the Cutting Method for Rolls User s Guide Ink Menu First Level Rep Ink Tank Head Cleaning A Job Menu First Level Second Level Third Level Fourth Level Fifth Level Pr...

Page 64: ...og Date Paper Type Adjustment Type Use Adj Val ue Disabled Enabled Set Exec Guide Off On Return Defaults Maintenance Head Clean ing Head Cleaning A Head Cleaning B Nozzle Check Replace P head Printhea...

Page 65: ...ot Use Use MAC Ad dress 8 xxxxxxxxxxxx Interface Print 8 Return Defaults 8 System Setup Sleep Tim er 11 5 min 10 min 15 min 20 min 30 min 40 min 50 min 60 min 210 min Shut Down Timer Off 5 min 10 min...

Page 66: ...Job Log 8 Off On Take up Reel 12 Use Take up Reel Disable Enable Auto Feed 13 Skip Take Up Err 14 Off On Prep Move Printer Level 1 Level 2 Level 3 Admin Menu 9 Change Pass word 9 The screen for setti...

Page 67: ...Pv6 Support is Off 11 Default setting for the time to enter the power save mode Sleep mode is recommended 12 Displayed only when the Media Take up Unit is attached 13 Available if a Use Take up Reel i...

Page 68: ...ually with scissors over this groove c Ejection Guide Guides printed documents as they are ejected Raise the guide when loading a roll d Roll Holder Slot Slide the Roll Holder into this slot e Roll Ho...

Page 69: ...e Paper Retainer Lift this lever toward the front of the printer when loading paper m Maintenance Cartridge Absorbs ink used for maintenance purposes such as head cleaning Replace the cartridge when i...

Page 70: ...the power cord of the optional Media Take up Unit here c Ethernet Port Connect an Ethernet cable to this port d USB Port Connect a USB cable to this port It supports Hi Speed USB e Manual Pocket Stor...

Page 71: ...s retainer holds paper as it is fed f Platen The Printhead moves across the platen to print Vacuum holes on the platen hold paper in place g Borderless Printing Ink Grooves For catching ink outside th...

Page 72: ...cts the Carriage b Printhead Fixer Cover Holds the Printhead in place c Printhead L The printhead is equipped with ink nozzles The carriage serves a key role in printing d Printhead R The printhead is...

Page 73: ...lower the lever when replacing an Ink Tank To open it lift the stopper of the lever until it stops and then push it down toward the front To close it push it down until it clicks into place a Ink Colo...

Page 74: ...Tank is installed or the ink level detection function is disabled Flashing Slowly Not much ink is left Flashing Rapidly Ink tank is empty Ink Tank Cover Inside iPF8400 Basic Guide Printer Parts Print...

Page 75: ...aintenance Cartridge before Level 2 or Level 3 printer transfer as described in the follow ing table Prepare the Maintenance Cartridge in advance Always follow the instructions of the service represen...

Page 76: ...e and then press the OK button to display the confirmation screen 7 Press or to select Yes and then press the OK button The printer is now prepared for transfer Level 1 Once preparations are finished...

Page 77: ...pper a of the Ink Tank Lock Lever a Lift the Ink Tank Lock Lever until it stops and then push it down to the front 3 Hold the Ink Tank by the handle a and remove it iPF8400 Preparing to Transfer the P...

Page 78: ...ll ink tank lock levers to the original position 6 Close the Ink Tank Cover At this point ink is drawn out from inside the tubes Important Do not remove the Maintenance Cartridge except when the messa...

Page 79: ...cable and Media Take up Unit Power Inlet Important Turn off the printer before you unplug it It may damage the printer if you unplug it before it is off and transfer it in that state If you accidenta...

Page 80: ...is the one that was removed and stored after initial installation Neglecting to attach the Belt Stopper may damage the printer Do not touch the Linear Scale a Carriage Shaft b or Fixed Blade c This m...

Page 81: ...Printer Reinstalling the Printer The basic workflow for reinstalling the printer is as follows For detailed instructions see the Setup Guide Assemble the stand 1 Referring to the Printer Stand Setup G...

Page 82: ...g the printer firmly grasp the Carry ing Handles a under each side The printer may be unsteady if you hold it at oth er positions which poses a risk of injury from dropping the printer 2 If you are us...

Page 83: ...s and spacers inside the printer 4 Connect the power cord to the Power Supply Con nector on the back of the printer 5 Plug the power cord into the outlet 6 Press the power button to turn the printer o...

Page 84: ...86 See Installing the Software Mac OS X P 88 Important When the printer is connected to a network via TCP IP the printer s IP address may be changed if you reinstall the printer In this case be sure...

Page 85: ...10 Load the Roll Media in the printer See Loading Rolls in the Printer P 11 iPF8400 Reinstalling the Printer Basic Guide Printer Relocation Preparing to Transfer the Printer 85...

Page 86: ...ring printer driver installation following the instructions displayed If you accidentally connect the USB cable first the printer driver may not be installed correctly When the printer is connected to...

Page 87: ...ow and click Restart Software settings take effect after the computer re starts Next install the Electronic manuals 5 When the Install User Manual dialog box is displayed insert the provided User Manu...

Page 88: ...s Installing the software and electronic manuals Important When the printer is used over a network the printer s IP address may be changed if you reinstall the printer In this case be sure to reconfig...

Page 89: ...ork 6 Click Next and follow the instructions displayed to register the printer to set up and update the paper information Next install the Electronic manuals 7 Insert the provided User Manuals CD ROM...

Page 90: ...printed beforehand without the need to print them Change the layout orientation relative to the paper You can save paper by correcting the direction in which the document is arranged on the paper if...

Page 91: ...e menu item for printer settings to display the Print dialog box 2 Access the Main pane 3 Select the Print Preview check box 4 After you click Print the Canon imagePROGRAF Preview window will be displ...

Page 92: ...s you to con serve paper Note If the page would exceed the roll paper width after rotation you can use this function with Scale to fit Roll Paper Width to print rotated pages Configuring Settings in W...

Page 93: ...e Borderless Printing check box to dis play the Information dialog box 3 Click the width of the loaded roll in the Roll Paper Width list 4 Click OK to close the Information dialog box 5 Select Fit Pap...

Page 94: ...size 3 Select the Enlarged Reduced Printing check box 4 After you click Fit Roll Paper Width the Informa tion dialog box is displayed 5 Click the width of the loaded roll in the Roll Paper Width list...

Page 95: ...tion 4 Select the Enlarged Reduced Printing check box 5 Select Fit Paper Size Fit Roll Paper Width or Scaling Configuring Settings in Mac OS X 1 Access the Page Setup pane 2 Make sure the width of the...

Page 96: ...the sides of the frame by using the Layout Plug In that is installed at the same time as the Print Plug In for Photo shop Loss of gradation in dark areas can be reduced by performing black point comp...

Page 97: ...ustment to Straighten Lines and Colors User s Guide Note Because the results of adjustment vary depending on the type of paper used for adjustment use the same type of paper as you will use for printi...

Page 98: ...Adjust Printer and then press the OK button 5 Press or to select Head Posi Adj and then press the OK button 6 Press or to select Standard or Simple and then press the OK button A test pattern is prin...

Page 99: ...h are applied Automatic Print Quality or Print Length is selected depending on Print Priority as selected in the printer driver at the time of printing Note Either A High or B Standard Draft in the Ad...

Page 100: ...ecommend executing the adjustment if you have changed the paper type or paper size Always check the Adj Priority values before using Adjust Length See Selecting a Feed Amount Adjustment Meth od P 99 P...

Page 101: ...te A test pattern is printed in black when you choose A High or in magenta if you choose B Standard Draft To cancel printing the test pattern for adjustment hold down the Stop button When Stop printin...

Page 102: ...g the Printer On and Off User s Guide 2 Open the Top Cover Note If the leading edge of the roll jams in the carriage such as when the paper curls strongly you may be able to avoid paper jamming by set...

Page 103: ...h the Linear Scale a Carriage Shaft b or Fixed Blade c This may stain your hands and damage the printer 4 Lift the Release Lever iPF8400 Clearing Jammed Roll Paper Basic Guide Troubleshooting Problems...

Page 104: ...ing paper be careful to avoid injury or damage to the printer 6 If the Carriage is on the left move the Carriage to the right until it stops Important Always move the Carriage to the right side If the...

Page 105: ...per from being advanced straight 8 Close the Top Cover 9 Turn the printer on See Turning the Printer On and Off User s Guide The roll is advanced and the printer is ready to print Note For a neater ed...

Page 106: ...eparation to cut the paper Be careful not to pinch your fingers between the Carriage and Platen if you have pushed the Carriage to the left edge or if a paper jam occurs during cutting Important Do no...

Page 107: ...per is not visible lift the Ejection Guide re move the Roll Holder and clear the paper jam from below After removing the paper make sure there are no other scraps of paper in the printer and then lowe...

Page 108: ...en out curls and reload the roll Paper is jammed by the paper feed slot Remove the jammed paper See Clearing Jammed Roll Paper P 102 See Clearing a Jammed Sheet P 105 The paper source selection is inc...

Page 109: ...cified in Automatic Cutting Specify Yes in Automatic Cutting in the printer driver See Page Setup Sheet Windows User s Guide See Paper Detailed Settings Dialog Box Mac OS X User s Guide In the Control...

Page 110: ...tion The Platen is soiled with ink or other substances Open the Top Cover and clean the entire Platen See Cleaning Inside the Top Cover P 53 Margins are wide Margins are wide Cause Corrective Action R...

Page 111: ...rint Center in other versions of Mac OS X 2 Select the printer and then Resume Printer or Start Jobs in the Printers menu to restart the print job The printer does not respond even if print jobs are s...

Page 112: ...ting on Rolls User s Guide The printer ejects blank unprinted paper The printer ejects blank unprinted paper Cause Corrective Action The leading edge of the roll paper was cut to straighten it The lea...

Page 113: ...side the Top Cover Follow the steps below to remove the jammed piece of paper inside the Top Cover 1 Open the Top Cover and make sure the Carriage is not over the Platen 2 Remove any scraps of paper i...

Page 114: ...menu when loading paper See Loading Rolls in the Printer P 11 See Loading Sheets in the Printer P 18 Since the leading edge of the paper strongly warps upward or ripples the leading edge of the paper...

Page 115: ...that does not dry easily is used for printing it may curl during printing and touch the Out put Tray In this case in the Control Panel menu complete the settings for Dry time and Area in Scan Wait Tim...

Page 116: ...f individual variation among printheads Execute color calibration Printhead characteristics gradually change through repeated use and colors may change Execute color calibration Color may change sligh...

Page 117: ...han in Highest quality or High modes but the printing quality is lower See Giving Priority to Particular Graphic Elements and Colors for Printing User s Guide Color may be uneven between dark and ligh...

Page 118: ...ser s Guide The type of paper specified in the printer driver does not match the type loaded in the printer Load paper of the same type as you have specified in the printer driver See Loading Rolls in...

Page 119: ...Cleaning Brush a 4 Using the back of the Cleaning Brush move the first Switch to the side opposite iPF8400 Setting the Blue Switch on the Platen Basic Guide Troubleshooting Problems with the printing...

Page 120: ...mm 10 00 in 3 355 6 mm 14 00 in 4 431 8 mm 17 00 in 5 515 0 mm JIS B2 or B3 6 594 0 mm ISO A1 or A2 or 609 6 mm 24 00 in 7 841 0 mm ISO A0 or A1 8 914 4 mm 36 00 in 9 1030 0 mm JIS B0 or B1 10 1066 8...

Page 121: ...e Loading Sheets in the Printer P 18 Make sure the same type of paper is specified in the printer driver as you have loaded in the printer 1 Press the Stop button and stop printing 2 Change the type o...

Page 122: ...menu of the source applica tion and follow these steps to print 1 Clear the option Open Preview When Print Job Starts on the Main sheet 2 Clear the option Page Layout on the Layout sheet 3 Click the S...

Page 123: ...inting 2 Change the type of paper in the printer driver and try printing again Depending on the type of paper printed lines may be noticeably misaligned Specify Proof in Print Priority in the printer...

Page 124: ...print over a TCP IP network Cause Corrective Action The printer s IP address is not config ured correctly Make sure the printer s IP address is configured correctly See Configuring the IP Address Usi...

Page 125: ...Corrective Action The AppleTalk protocol is not en abled on the printer Activate AppleTalk on the printer See Configuring the Printer s AppleTalk Network Settings User s Guide The computer you are tr...

Page 126: ...tware CD ROM provided with the printer in the CD ROM drive 2 Start the printer driver installer included in the User Software CD ROM Open the OS X folder and double click iPF Driver Installer X 3 In t...

Page 127: ...imagePROGRAF Device Setup Utility to start the wizard 2 In the wizard window click Delete and then click Next 3 Follow the instructions on the screen to remove imagePROGRAF Device Setup Utility iPF84...

Page 128: ...ng sounds do not indicate a problem with the printer There is a sound of suction from the Platen To prevent paper from rising paper is held against the Platen by suction from Vacuum holes under it Rol...

Page 129: ...on will be deactivated if you load ink tanks once emptied Ink level detection Ink tanks specified for this printer feature an ink level detection function to prevent the ink from running out during pr...

Page 130: ...r checking the message press the button 4 After checking the message press the button 5 Press or to select Yes and then press the OK button 6 Check the message and press the button 7 Check the message...

Page 131: ...age about updating ink information is shown on the Display Screen After checking the message press the button 10 Press or to select Yes and then press the OK button Ink level detection is now released...

Page 132: ...nt a test pattern for printer adjustment on several sheets but sheets of different types or sizes of paper were used When printing a test pattern for adjustment use sheets of the same size and type of...

Page 133: ...t Print and then press the OK button to resume printing However note that this error may cause paper jams and affect the printing quality Adjust the paper size setting in the printer driver to match t...

Page 134: ...OK button to resume printing However note that this error may cause paper jams and affect the printing quality Press or to select Stop Printing and then press the OK button Follow these steps to repl...

Page 135: ...may not be able to print all of the document Press or to select Change Paper and then press the OK button Change the Paper Source of the printer driv er or replace the roll with a roll that has enoug...

Page 136: ...used roll with a new roll of the same type and size 1 Lift the Release Lever and remove the roll See Removing the Roll from the Printer P 15 See Removing the Roll Holder from Rolls User s Guide 2 Load...

Page 137: ...s the OK button to stop printing 2 After removing the roll load and print on a sheet of the type and size of paper you have specified in the printer driver See Removing the Roll from the Printer P 15...

Page 138: ...Cannot detect papr Cause Corrective Action The printer could not detect the paper Reload the paper as follows 1 Remove the paper and press the OK button 2 Reload the paper See Loading Sheets in the Pr...

Page 139: ...End of paper feed End of paper feed Cause Corrective Action Although an attempt was made to advance the paper manually it reached the limit position that can be advanced Canceling manual advancing See...

Page 140: ...er note that this error may cause paper jams and affect the printing quality Press or to select Print With Border and then press the OK button to continue printing The document will be printed with a...

Page 141: ...Holder to Rolls P 9 Select None when you have set Detect Mismatch in the Control Panel menu to Warning However note that this error may affect the printing quality Press or to select Print With Border...

Page 142: ...rrective Action There is no ink left There are no ink colors with displayed above the re maining ink indicator Press the OK button open the Ink Tank Cover and replace the Ink Tank for the color that i...

Page 143: ...k with a new Ink Tank at this point if you plan to print large format or high quantity jobs No ink tank loaded No ink tank loaded Cause Corrective Action There is no Ink Tank of the indicated color in...

Page 144: ...lored paper Press the OK button to clear the error Load unused paper compatible with color calibration See Paper Reference Guide The test pattern was printed too faintly Press the OK button to clear t...

Page 145: ...e executed but there is no record of having executed color calibration on that paper or a record of having executed Common cali bration other any other type of paper If the printer is loaded with a ty...

Page 146: ...nt a test pattern to check the nozzles See Checking for Nozzle Clogging User s Guide 3 Clean the Printhead if the nozzles are clogged See Cleaning the Printhead P 55 4 Execute Adj Quality again See Au...

Page 147: ...the right side Switch the Printhead used once in the left side to the left side Wrong x printhead x is L R or not displayed Wrong x printhead x is L R or not displayed Cause Corrective Action An incom...

Page 148: ...L and Printhead R See Replacing the Printhead P 34 Execute printhead cleaning Execute printhead cleaning Cause Corrective Action The Printhead noz zles are clogged Follow these steps to clean the Pri...

Page 149: ...an continue to print but prepare a new Maintenance Cartridge to use when the message for replacement is displayed No Maintenance Cartridge capacity No Maintenance Cartridge capacity Cause Corrective A...

Page 150: ...es See Deleting Saved Jobs User s Guide Mail box full Now printing without saving data Mail box full Now printing without saving data Cause Corrective Action No more space is available on the printer...

Page 151: ...0 jobs are stored in the Personal Box Delete unneeded jobs stored in personal boxes See Deleting Saved Jobs User s Guide iPF8400 Mail box full Delete unwanted data Basic Guide Error Message Messages r...

Page 152: ...or xxxxxxxx xxxx x represents a letter or number Hardware error xxxxxxxx xxxx x represents a letter or number Cause Corrective Action The last portion of roll paper was used during a print job The pap...

Page 153: ...ware version Turn off the printer and wait a while before restor ing power and then resend the firmware If the message is displayed again contact your Canon dealer for assistance Calibration There is...

Page 154: ...x represents a letter or number 152 Ink insufficient 142 Ink tank is empty 143 Insufficient paper for job 135 Mail box full Delete unwanted data 150 Mail box full Now printing without saving data 150...

Page 155: ...et printing is selected 137 The following ink tanks cannot be recognized 143 The mail box is full 150 The paper is too small 133 The paper is too small 133 The roll is empty 136 This paper cannot be u...

Page 156: ...9 Ink level detection 129 L Large Format Printing 94 M Maintenance Cartridge 3 46 69 149 Media Take up Unit 70 82 Menu Operations 58 Menu Structure 62 N Navigate 58 NetWare network 124 P Paper Feed Sl...

Page 157: ...aza Lake Success NY 11042 U S A Canon Europe Ltd 3 The Square Stockley Park Uxbridge Middlesex UB11 1ET United Kingdom Canon China Co Ltd 15F Jinbao Building No 89 Jinbao Street Dongcheng District Bei...

Reviews: