background image

46

2

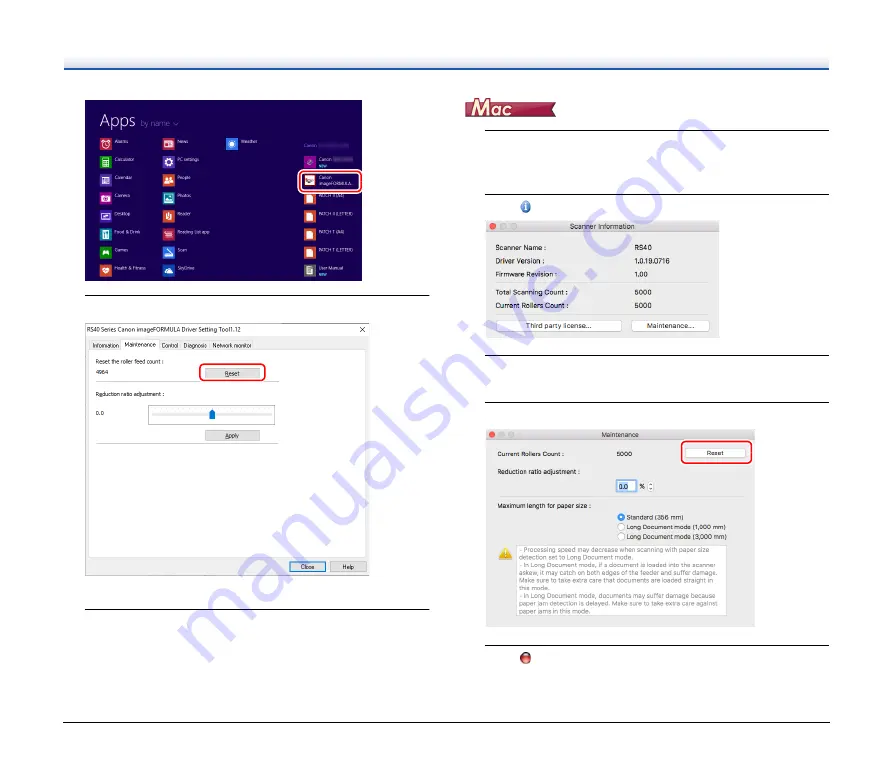
Click the [Maintenance] tab and then select [Reset].

The counter resets.

3

Click [Close] to close the imageFORMULA Driver Setting 
Tool.

1

Open the scanner driver's Detail Settings screen.

For details on the setting screen, see the Help of the scanner 
driver.

2

Click 

 to display the [Scanner Information] dialog box.

3

Click [Maintenance] to display the [Maintenance] dialog 
box.

4

Click [Reset].

5

Click 

 to close the dialog box. 

Summary of Contents for imageFORMULA RS40

Page 1: ...User Manual Please read this manual before operating this scanner After you finish reading this manual store it in a safe place for future reference ...

Page 2: ...ELECTRONICS INC has determined that this machine meets the ENERGY STAR Program guidelines for energy efficiency The ENERGY STAR Office Equipment Program is an international program that promotes energy saving through the use of computers and other office equipment The program backs the development and dissemination of products with functions that effectively reduce energy consumption It is an open...

Page 3: ...by copyright law and copyrighted items may not be reproduced without the express permission of the copyright holder except for personal or household use under limited circumstances Trademarks Canon and the Canon logo are registered trademarks of Canon Inc in the United States and may also be trademarks or registered trademarks in other countries imageFORMULA is a trademark of CANON ELECTRONICS INC...

Page 4: ...LIABLE FOR ANY DIRECT INCIDENTAL OR CONSEQUENTIAL DAMAGES OF ANY NATURE OR LOSSES OR EXPENSES RESULTING FROM THE USE OF THIS MATERIAL CANON ELECTRONICS INC IS NOT LIABLE FOR THE STORAGE AND HANDLING OF DOCUMENTS SCANNED WITH THIS PRODUCT OR THE STORAGE AND HANDLING OF RESULTING SCANNED IMAGE DATA IF YOU INTEND TO DISCARD THE ORIGINALS OF SCANNED DOCUMENTS YOU THE CUSTOMER ARE RESPONSIBLE FOR INSPE...

Page 5: ...uture reference Manuals for the Scanner Documentation for this scanner consists of the following manuals Product Safety Guide Before using the scanner be sure to read and follow these instructions Setup Guide This describes setup procedures for the scanner Read this manual when you first use the scanner User Manual this manual This manual contains the operating procedures of the scanner PDF electr...

Page 6: ...ath or injury to persons if not performed correctly To use the scanner safely always pay attention to these warnings CAUTION Indicates a caution concerning operations that may lead to injury to persons or damage to property if not performed correctly To use the scanner safely always pay attention to these cautions IMPORTANT Indicates operational requirements and restrictions Be sure to read these ...

Page 7: ... Scanning Notes on the Backs of Photos Scanning with Carrier Sheet 24 Scanning Documents 29 How to Place Documents 29 Scanning multiple documents 29 Placing Cards 30 Setting the Long Document Mode 31 Detecting a document double feed 33 How to Scan Documents 37 One Touch Scan 37 Maintenance 38 Daily Maintenance 38 Cleaning the Scanner 38 Cleaning the Inside of the Scanner 38 Cleaning the Sensor Gla...

Page 8: ...rovided as standard with your computer However normal operation is not guaranteed with all USB interfaces even if present as standard equipment on the computer For details consult your local authorized Canon dealer Scanning speeds are lower if your computer s standard USB interface is USB Full Speed equal to USB 1 1 The USB cable you are using should be the one originally included with the scanner...

Page 9: ...Check the status of the power switch and USB cable When the scanner is properly connected to the computer the CaptureOnTouch icon appears on the taskbar as follows If the taskbar icon appears as the scanner is not properly connected to the computer Check the status of the power switch and USB cable Turning Off the Power Press and hold the power button until the indicator goes out IMPORTANT After t...

Page 10: ...oticeable degradation in scanning quality The following conditions are recommended for optimal scanning quality Room temperature 10 C to 32 5 C 50 F to 90 5 F Humidity 20 to 80 RH Avoid installing the scanner near equipment that generates a magnetic field e g speakers televisions or radios AC Adapter Connect only to a power outlet of the rated voltage and power supply frequency 120 V 60 Hz or 220 ...

Page 11: ...the power supply Clean the scanner using a slightly dampened cloth which has been well wrung out Never use alcohol benzene paint thinner or any other flammable substances If the scanner makes strange noises or gives off smoke heat or strange odors or the scanner does not function or other abnormalities occur when you use the machine immediately push the power button to turn it off and disconnect t...

Page 12: ...en not using the scanner for a long period of time such as overnight Also push the power switch to turn it OFF and disconnect the power cord from the power outlet for safety when the machine will not be used for an extended period of time such as during consecutive holidays Do not wear loose clothing or jewelry that may get caught in the scanner while you are using it as this may result in persona...

Page 13: ... scanned document and eliminates any unnecessary space around the edges of the image when storing the image even when storing a document of irregular size Auto Color Detection The scanner detects whether the scanned document is in color grayscale or black and white and saves the image accordingly Full Auto Mode A Full Auto Mode is provided in CaptureOnTouch and the scanner driver to allow scanning...

Page 14: ...tion If characters and lines in scanned images are not clearly visible you can use this function to adjust their thickness during scanning Start Scanning from the Operating Panel You can start scanning by launching CaptureOnTouch with the operating panel buttons By default two One Touch buttons are assigned to Job Nos 1 and 2 which allows you to easily scan a document by just following the instruc...

Page 15: ...tton again to turn off the power The power button lights or flashes as follows depending on the scanner status C Document Feed Tray Place the document D Document Guides Align the document guides with both edges of the document to ensure that the document feeds straightly Power Button Indication Description Lit Power is on Flashing slowly Sleep mode Flashing quickly An error paper jam front unit is...

Page 16: ...Open this when cleaning the inside of the scanner or replacing rollers E Document Eject Tray Pull this out to scan documents Scanned documents are output here When scanning multiple documents of varying sizes at one time pulling out and lifting up this tray locks the angle of the tray so the documents ejected onto the tray are aligned F Document Eject Stopper This prevents the document coming out ...

Page 17: ... Job No displayed in the Job No Indicator changes C Start Button This executes the job displayed in the Job No Indicator D Stop Button This stops active jobs E DFR Double Feed Release Button This is lit when a document double feed is detected Pressing this button cancels the double feed detection function allowing you to continue scanning Displayed Error Codes When a scanning error occurs the foll...

Page 18: ...uck to them ones that are tightly stuck on Photos that have hardened glue or adhesive on them Photos on photosensitive paper from instant cameras that are not sheet film types IMPORTANT Curled photos should have the curl smoothed and flattened Check that the labels or stickers are tightly stuck on and that no glue has oozed out Photos that cannot be scanned Do not scan the following photos Photos ...

Page 19: ...ch the protective finish on your photos For best results wipe off the front and back of your photos before scanning and use microfiber cloth to clean the scanner rollers after every 300 scans or even before each scanning session 2 Organize your photos by subject date or location Hint You can give each batch of photos a custom file name Step 2 Place Photos 1 Pull out the document eject tray The doc...

Page 20: ...align the document guides with both edges of the photo Hint If you have both portrait and landscape oriented photos in the same stack you can rotate the portrait images after scanning IMPORTANT When placing photos into the feed tray take care not to cut your hand on the edges of the paper Before you place a photo check to make sure it does not contain paper clips staples or other small metal objec...

Page 21: ...blem make sure that the scanned image of the last page that was successfully fed has been stored and then resume scanning the remaining photos After you finish scanning push in the document eject tray to prevent damage to the scanner while it is not being used If double feeding occurs press the scanner s DFR button to continue the scan or clear the Detect by Ultrasonic check box in the Feeding tab...

Page 22: ...anning conditions that consume a large amount of the computer s memory scanning may stop because of insufficient memory If an error message appears due to insufficient memory while scanning is in progress stop scanning change the scanning conditions and then try scanning again A multiple page scan cannot be saved when it reaches the file size of 2 GB Change the save settings if an error message is...

Page 23: ...lick the Cancel button to discard the scanned image and return to the main window When the output has finished a popup window will be displayed If saving the scanned image a link to open the save destination folder will be displayed Hint If you click Open storage folder the folder in which the saved scanned images were saved opens Depending on the output settings the Open storage folder link may n...

Page 24: ...oto Scanning Scanning Notes on the Backs of Photos Scanning with Carrier Sheet Scanning Notes on the Backs of Photos 1 Click of the Photo scan button 2 Select Double sided for Scanning Side and click the Close button ...

Page 25: ...es of the photo CAUTION If the photo is not placed properly inside the carrier sheet you may get a document jam or not get a scan image as intended IMPORTANT Insert documents straight into the center of the carrier sheet Proper scanning will not be possible if the photo is too close to either side tilted or protruding from the carrier sheet When scanning instant photos put the thick part enclosed ...

Page 26: ... is visible damage or smudging Before following the steps below make sure the RS40 driver is selected in CaptureOnTouch 1 In CaptureOnTouch click of the Photo scan button 2 Open the Document tab select the Enable check box for Use advanced settings dialog box and click the Setting button ...

Page 27: ...K button to close the settings screen 1 In CaptureOnTouch click of the Photo scan button 2 Open the Document tab select the Enable check box for Use advanced settings dialog box and click the Setting button 3 Click the More button The scanner driver s Detail Settings screen opens ...

Page 28: ...28 4 Select the Carrier sheet check box 5 Click to close the dialog box ...

Page 29: ...l out the document eject tray The document eject tray can be adjusted to 3 lengths Pull out the document eject tray according to the length of the document Also erect the document eject stopper on the front edge if necessary IMPORTANT Pull the document eject tray forward according to the various lengths 2 Pull out the feed support Open the feed extension support when placing long documents 3 Adjus...

Page 30: ...into the feeder If the leading edge of a document is curled it may cause a paper jam If feeding stops due to a system error or paper jam while the scanner is scanning resolve the problem make sure that the scanned image of the last page that was successfully fed has been stored and then resume scanning the remaining document pages After you finish scanning push in the document eject tray to preven...

Page 31: ...e Long Document mode if the document is placed on the scanner in a skewed position it may hit the edges of the feeding area and be damaged Be careful to place the document so that it is not skewed When scanning with the Long Document mode paper jam detection may react slowly resulting in damage to the document Be careful to avoid paper jams When scanning long documents scan the documents one at a ...

Page 32: ...ol tab 3 Click the Setting button of Hardware 4 Select Long Document mode 1000 mm or Long Document mode 3000 mm depending on the length of the document 5 Click OK 6 Click Close to close the imageFORMULA Driver Setting Tool ...

Page 33: ... automatically stop when it detects that multiple documents have been fed at the same time You can also specify whether to save the scanned image after scanning has finished and continue scanning the document double feed detection ignore function To use the double feed detection function you must first open the scanner driver settings screen and enable double feed detection It is also necessary to...

Page 34: ...e scanner driver s Detail Settings screen For details on the setting screen see the Help of the scanner driver 2 Select the Double Feed Detection check box and then select any one of Detect by Ultrasonic Detect by Length and Detect by Ultrasonic and Length 3 Click the More button when the Double Feed Detection Ignore function is also used The scanner driver s Detail Settings screen opens 4 Select ...

Page 35: ...that a double feed has been detected When this happens stop the scanning in the application and then scan the documents again When using the double feed detection ignore function If a document double feed is detected during scanning document feeding stops when the double fed documents are ejected The following error code is displayed in the Job No Indicator of the operating panel and the DFR butto...

Page 36: ... DFR button Saves the preview image as a scanned image and scans the rest of the document STOP Stop button Discards the preview image and stops scanning DISCARD CONTINUE Start button Discards the preview image and continues scanning Place the double fed document again before clicking this button ...

Page 37: ...ut methods as a One Touch button Just click the One Touch button to implement the scan Hint If you assign an One Touch button to a job number you can execute One Touch Scan by selecting the job number from the scanner 1 Place the document in the scanner How to Place Documents See p 29 2 Configure the CaptureOnTouch settings For details on CaptureOnTouch see the Help of CaptureOnTouch 3 Click the S...

Page 38: ... with a cloth that has been dampened with water and thoroughly wrung out and then wipe the scanner dry with a clean dry cloth Cleaning the Inside of the Scanner Dust or paper particles inside the scanner may cause lines or smudges to appear on scanned images Use compressed air to periodically clean dust and paper particles from the document feed opening and the inside of the scanner After finishin...

Page 39: ...e a malfunction IMPORTANT Scratches on the sensor glass may cause marks on the images as well as feeding errors If there are scratches on the sensor glass contact your local authorized Canon dealer or service representative Take care to ensure the anti static brush in the front unit does not become deformed 4 Clean the rollers Clean the rollers while turning them Wipe the rollers with a cloth that...

Page 40: ... front unit by gently pushing it up on both sides until it clicks into place Make sure that the front unit is completely closed by pushing until you hear a click Adjusting the Reduction Ratio As the rollers installed in the scanner wear out scanned images may become stretched in the vertical direction If this happens you can reduce the amount of stretching of the image by adjusting the reduction r...

Page 41: ...f Reduction ratio adjustment The adjustment value can be set within the range from 3 0 to 3 0 3 Click Apply 4 Click Close to close the imageFORMULA Driver Setting Tool 1 Open the scanner driver s Detail Settings screen For details on the setting screen see the Help of the scanner driver 2 Click to display the Scanner Information dialog box ...

Page 42: ...by the scanner exceeds the number of pages for the service life of the rollers a message prompting you to replace the rollers is displayed when the computer is started If this message begins to be displayed at startup purchase an exchange roller kit and replace the worn parts with the consumable parts included in the kit feed roller and retard roller See p 60 for details about the exchange roller ...

Page 43: ... you Hint The location of each of the consumable parts is shown below 2 When closing the front unit make sure that it is completely closed by gently pressing the left and right until you hear a click Replacing the Feed Roller 1 Open the roller cover Retard roller inside the front unit Feed Roller ...

Page 44: ... the feed roller 3 Install the new feed roller 4 Close the roller cover Replacing the Retard Roller 1 Open the roller cover 2 Pull the left lever that secures the retard roller to the scanner and remove the roller ...

Page 45: ...secure it to the scanner 5 Close the roller cover Resetting the counter IMPORTANT Log on to Windows as an Administrator 1 Click the Start button and then click Canon RS40 and Canon imageFORMULA Driver Setting Tool imageFORMULA Driver Setting Tool starts Hint In Windows 8 1 it is registered at the following location ...

Page 46: ...FORMULA Driver Setting Tool 1 Open the scanner driver s Detail Settings screen For details on the setting screen see the Help of the scanner driver 2 Click to display the Scanner Information dialog box 3 Click Maintenance to display the Maintenance dialog box 4 Click Reset 5 Click to close the dialog box ...

Page 47: ...ure below IMPORTANT Log on to Windows as an Administrator 1 Click the Start button and then click Canon RS40 and Canon imageFORMULA Driver Setting Tool imageFORMULA Driver Setting Tool starts Hint In Windows 8 1 it is registered at the following location 2 Click the Control tab 3 Click the Setting button of Hardware 4 Clear the Turn off automatically after 4 hours check box ...

Page 48: ...s Information tab You can check the firmware s version information and scanner information Maintenance tab You can reset the counter of the roller or carry out the shrinkage rate control Control tab You can carry out the control settings of hardware and drivers and perform the read or write of the control settings From the configuration of the hardware you can set the automatic power off function ...

Page 49: ...49 ...

Page 50: ... the document guides to fit the documents as closely as possible and load the documents so that they feed straightly 2 Open the document feed extension support and place the document 3 Enable Automatically straightens skewed in the scanner driver settings 4 If many pages have been scanned since roller cleaning clean the rollers If documents still feed askew roller replacement or other maintenance ...

Page 51: ...ing is selected as the feeding method on the scanner driver s Detail Settings screen a scanning operation will not continue after all of the documents are fed as the scanner awaits additional documents to be fed You can finish the operation and send the scanned images to the application by pressing the Stop button on the operating panel Problem 10 Memory becomes insufficient and scanning stops Sol...

Page 52: ...Carrier sheet to None in the Feeding tab Problem 13 Photos do not feed correctly Solutions If the photos are curled flatten them until the curl is less than 2 mm Photos may stick together depending on the thickness and type of paper used for the photo If they stick together feed them one at a time Reduce the number of photos loaded at one time Problem 14 Double feed error occurs because of instant...

Page 53: ...he cable with the supplied compliant cable 6 When the scanner is connected to the computer via a USB hub that is not Hi Speed USB 2 0 compliant remove the hub and connect the scanner directly to the computer If scanned image files cannot be opened in an application 1 Scanned images saved as multi page TIFF files can be opened only by programs that support this file format 2 Images saved as compres...

Page 54: ...You can set the file names of scanned images by setting all or some of the three items shown below A sample file name is displayed as the File name in the File name settings dialog box How can I skip blank pages and scan only non blank pages Specify Skip Blank Page on the scanner driver setting screen then scan How do I scan cards Set a card in landscape orientation in the scanner Specify the same...

Page 55: ... attach scanned data to an e mail or send it as e mail For both Standard Scanning and One Touch Scan select Attach to E mail in the Select output panel To use this function you need to install a plug in The plug in can be installed by selecting its checkbox when installing CaptureOnTouch ...

Page 56: ...ing scanning use the following procedures to clear them CAUTION Be careful when removing jammed paper Take care not to cut your hand on the edges of the paper 1 Remove any documents that have been left in the feed Tray 2 Pull the OPEN lever and pull open the front unit toward you Hint The C error code appears in the operating panel when the front unit is open 3 Remove the jammed document Paper jam...

Page 57: ... click After removing the jammed paper check to see if the last page was scanned correctly and then continue scanning Hint When the Rapid recovery system check box is enabled in the scanner driver settings screen you can resume a scanning operation even if it is interrupted by a paper jam by removing the document and resuming from the document that was being fed when the interruption occurred As t...

Page 58: ...tart button and then Control Panel 2 Click Uninstall a program The Uninstall or change a program dialog box appears 3 From the Programs list select the software you want to remove and then click Remove The delete confirmation screen appears 4 Click Yes Uninstallation of the software is now complete No uninstaller is provided for macOS drivers To uninstall use Finder to delete the following files L...

Page 59: ...Color Scanning resolution Primary Scan Lines x Secondary Scan Lines 100 x 100dpi 150 x 150dpi 200 x 200dpi 240 x 240dpi 300 x 300dpi 400 x 400dpi 600 x 600dpi 1200 x 1200dpi Interface Hi Speed USB 2 0 Other functions Folio scanning double feed detection ignore External Dimensions 11 46 291 mm W x 9 84 250 mm D x 9 65 245 mm H With the feed tray attached and the document eject tray pushed in 11 46 ...

Page 60: ...able Parts on p 42 Contact your local authorized Canon dealer or service representative for detailed information about the replacement parts Consumables Carrier Sheet product code 5349C001 This is a carrier sheet for small delicate or important photos For the detail see Scanning with Carrier Sheet on p 25 Dimensions 245 mm 9 65 291 mm 11 46 600 mm 23 62 382 mm 15 04 ...

Page 61: ...ent Card 30 Loading method 29 Double Feed Detection 33 F Feed roller 42 43 Front unit 43 J Job No display 17 Job Select button 17 L Long Document Mode 31 O Operating Panel 17 P Paper jam 56 Power supply 9 R Reduction ratio adjustment 40 Resetting the counter 45 Retard roller 42 44 Roller 39 Cleaning 38 Replace 42 S Scanning glass 39 Cleaning 38 Start Button 17 Stop Button 17 U Uninstall 58 ...

Page 62: ...lace par les collectivités locales pour le recyclage des Déchets des Équipements Électriques et Électroniques DEEE Le traitement inapproprié de ce type de déchet risque d avoir des répercussions sur l environnement et la santé humaine du fait de la présence de substances potentiellement dangereuses généralement associées aux équipements électriques et électroniques Parallèlement votre entière coop...

Page 63: ...gida designados como por ejemplo entregándolo en el lugar de venta al comprar un producto similar o depositándolo en un lugar de recogida autorizado para el reciclado de residuos de aparatos eléctricos y electrónicos RAEE La manipulación inapropiada de este tipo de desechos podría tener un impacto negativo en el entorno y la salud humana debido a las sustancias potencialmente peligrosas que normal...

Page 64: ...naturressurser Du kan få mer informasjon om hvor du kan avhende utrangert utstyr til resirkulering ved å kontakte lokale myndigheter et godkjent WEEE program eller husholdningens renovasjonsselskap Du finner mer informasjon om retur og resirkulering av WEEE produkter på www canon europe com weee Suomi Vain Euroopan unionin sekä ETA n Norja Islanti ja Liechtenstein alueelle Tämä tunnus osoittaa ett...

Page 65: ...eden nově prodaný podobný výrobek nebo v autorizovaném sběrném místě pro recyklaci odpadních elektrických a elektronických zařízení OEEZ Nevhodné nakládání s tímto druhem odpadu by mohlo mít negativní dopad na životní prostředí a lidské zdraví protože elektrická a elektronická zařízení zpravidla obsahují potenciálně nebezpečné látky Vaše spolupráce na správné likvidaci tohoto výrobku současně napo...

Page 66: ...eszélyes anyagok révén ártalmasak lehetnek a környezetre és az emberek egészségére Továbbá a termékből származó hulladék megfelelő kezelésével hozzájárulhat a természetes nyersanyagok hatékonyabb hasznosításához A berendezésekből származó újrahasznosítható hulladékok elhelyezésére vonatkozó további tudnivalókért forduljon a helyi önkormányzathoz a közterület fenntartó vállalathoz a háztartási hull...

Page 67: ...sabilă cu colectarea deşeurilor schema DEEE aprobată sau serviciul de colectare a deşeurilor menajere Pentru mai multe informaţii privind returnarea şi reciclarea produselor DEEE vizitaţi www canon europe com weee Slovenčina Samo za Evropsko unijo in EGP Norveška Islandija in Lihtenštajn Ta simbol pomeni da tega izdelka v skladu z direktivo OEEO 2012 19 EU in državno zakonodajo ne smete odvreči v ...

Page 68: ... elektroonikaseadmete jäätmete ümbertöötlemiseks mõeldud kogumispunkti Täiendava teabe saamiseks elektri ja elektroonikaseadmetest tekkinud jäätmete tagastamise ja ümbertöötlemise kohta võtke ühendust kohaliku omavalitsusega asjakohase valitsusasutusega asjakohase tootjavastutusorganisatsiooniga või olmejäätmete käitlejaga Lisateavet leitate ka Interneti leheküljelt www canon europe com weee Latvi...

Page 69: ...nom vezuju za EEE U isto vreme vaša saradnja na ispravnom odlaganju ovog proizvoda će doprineti efikasnom korišćenju prirodnih resursa Za više informacija o tome gde možete da predate vašu staru opremu radi recikliranje vas molimo da kontaktirate lokalne gradske vlasti komunalne službe odobreni plan reciklaže ili Gradsku čistoću Za više informacija o vraćanju i recikliranju WEEE proizvoda posetite...

Page 70: ...RKERWEG 59 1185 XB AMSTELVEEN THE NETHERLANDS CANON AUSTRALIA PTY LTD BUILDING A THE PARK ESTATE 5 TALAVERA ROAD MACQUARIE PARK NSW 2113 AUSTRALIA CANON SINGAPORE PTE LTD 1 FUSIONOPOLIS PLACE 14 10 GALAXIS SINGAPORE 138522 CANON KOREA INC 607 TEHERAN RO GANGNAM GU SEOUL KOREA CANON INDIA PVT LTD 7TH FLOOR TOWER B DLF CYBER TERRACES DLF PHASE III GURGAON 122002 HARYANA INDIA PUB 6T3 0125 E1 10 CANO...

Reviews: