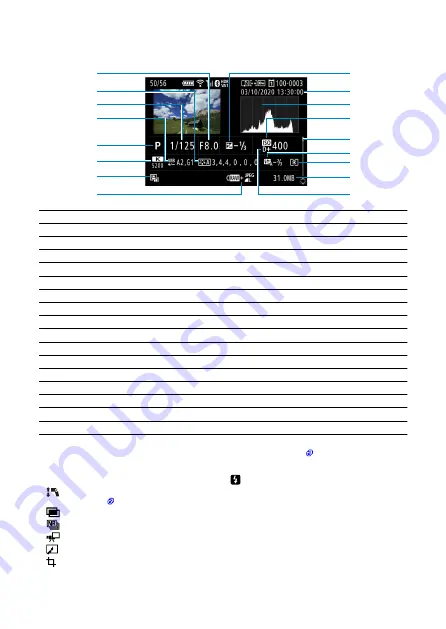
Detailed information display for still photos
(2)
(1)
(9)
(10)
(11)
(12)
(13)
(14)
(15)
(16)
(17)
(4)
(5)
(6)
(7)
(8)
(3)
(1)
Aperture value
(2)
Picture Style/Settings
(3)
Shutter speed
(4)
White balance correction/Bracketing
(5)
Shooting mode/Multiple exposure/Frame Grab
(6)
White balance
(7)
Auto Lighting Optimizer
(8)
Image quality/Edited image/Cropping
(9)
Exposure compensation amount
(10)
Shooting date and time
(11)
Histogram (Brightness/RGB)
(12)
ISO speed
(13)
Scroll bar
(14)
Flash exposure compensation amount/Bounce/HDR shooting/Multi Shot Noise Reduction
(15)
Metering mode
(16)
File size
(17)
Highlight tone priority
* For images captured in RAW+JPEG/HEIF shooting, indicates RAW file sizes.
* Lines indicating the image area will be displayed for images taken with the aspect ratio set (
) and with RAW or RAW+JPEG
set for image quality.
* For images with added cropping information, lines are shown to indicate the image area.
* During flash photography without flash exposure compensation, [
] will be displayed.
* [
] indicates images shot with bounce flash photography.
* An icon for the effect (
) and the dynamic range adjustment amount is displayed for images captured in HDR shooting.
* [
] indicates images captured in multiple-exposure shooting.
* [
] indicates images processed with Multi Shot Noise Reduction.
* [
] indicates test shots for time-lapse movies.
* [
] indicates images created and saved by performing RAW image processing, resizing, cropping, or frame-grabbing.
* [
] indicates images cropped and then saved.
894
Summary of Contents for EOS R5
Page 1: ...Advanced User Guide E CT2 D091 A CANON INC 2020 ...
Page 29: ... 15 20 6 8 7 12 13 14 9 10 11 16 17 19 3 4 5 21 24 25 22 23 2 1 18 29 ...
Page 36: ...3 Using a slim cable 36 ...
Page 37: ...Using a thick cable 3 Included interface cable 4 Using a slim cable Using a thick cable 37 ...
Page 38: ...5 Using a slim cable Using a thick cable 38 ...
Page 39: ...6 Using a slim cable Using a thick cable 4 HDMI cable sold separately 39 ...
Page 62: ...Changing the Interface Language To change the interface language see Language 62 ...
Page 84: ... AF Start Button Equivalent to pressing the shutter button halfway except in mode 84 ...
Page 90: ...Menu Screen in Mode In mode some tabs and menu items are not displayed 90 ...
Page 97: ...Dragging Sample screen Menu screen Slide your finger while touching the screen 97 ...
Page 260: ...Note High speed display is always used when Shutter mode is set to Electronic 260 ...
Page 274: ...Clearing Settings 1 Select Shooting info disp 2 Select Reset 3 Select OK 274 ...
Page 275: ...Viewfinder Display Format 1 Select VF display format 2 Select an option 275 ...
Page 287: ... Other Menu Functions General Movie Recording Precautions 287 ...
Page 300: ...ISO Speed in Mode ISO speed is set automatically See ISO Speed in Movie Recording 300 ...
Page 318: ...Total Movie Recording Time and File Size Per Minute For details see Movie recording 318 ...
Page 350: ...Caution IS mode is not displayed when an IS equipped lens is attached 350 ...
Page 382: ...AF2 1 Focus ring rotation 2 RF lens MF focus ring sensitivity 3 sensitivity AF pt select 382 ...
Page 470: ...Magnified view Note You can also magnify display by double tapping with one finger 470 ...
Page 475: ...475 ...
Page 500: ...4 Erase the images Press the button then press OK 500 ...
Page 502: ...4 Erase the images Select OK 502 ...
Page 544: ...2 Select Portrait relighting Turn the dial to select an image to adjust then press 544 ...
Page 588: ...4 Select Enable 5 Select Wi Fi Bluetooth connection 6 Select Connect to smartphone 588 ...
Page 606: ...4 Set Size to send 5 Take the picture 606 ...
Page 609: ... 2 Sending multiple selected images 1 Press 2 Select Send selected 609 ...
Page 614: ... 4 Sending all images on the card 1 Press 2 Select Send all card 614 ...
Page 634: ...7 Select OK The selected images are transferred to the computer 634 ...
Page 637: ...5 Select OK The selected images are transferred to the computer 637 ...
Page 646: ...Steps on the camera 2 10 Select OK The icon changes to 11 Select Upload to Web service 646 ...
Page 663: ...6 Select FTP transfer 7 Select OK The selected images are transferred to the FTP server 663 ...
Page 666: ...5 Select OK The selected images are transferred to the FTP server 666 ...
Page 685: ...4 Select OK 685 ...
Page 689: ...Note To delete connection settings see Changing or Deleting Connection Settings 689 ...
Page 728: ...In and mode the following screen is displayed for 5 1 Battery info 2 Manual software URL 728 ...
Page 737: ...3 Select Create folder 4 Select OK To rename the folder select Change folder name 737 ...
Page 758: ...Note Auto power off time may be extended while the Date Time Zone screen is displayed 758 ...
Page 759: ...Language 1 Select Language 2 Set the desired language 759 ...
Page 762: ...Example Multi function lock 762 ...
Page 763: ...Changing the Help Text Size 1 Select Help text size 2 Select an option 763 ...
Page 825: ...Note and dials cannot be customized in mode Control ring on RF lenses and mount adapters 825 ...


