background image

8

Index

Appendix

Errors and Warnings

Troubleshooting

Settings

Playback

Shooting

Setup and Basics

Learning About the Camera

Accessories

Wireless Features

Wireless Features/Accessories

Sending Images to a Bluetooth Enabled Smartphone

Once you have paired with a smartphone via Bluetooth, simply operate 

your smartphone to view and save camera images.

Install Camera Connect.


For Android smartphones, find Camera 

Connect in Google Play and download 

and install the app.


For an iPhone or iPad, find Camera 

Connect in the App Store and download 

and install the app.

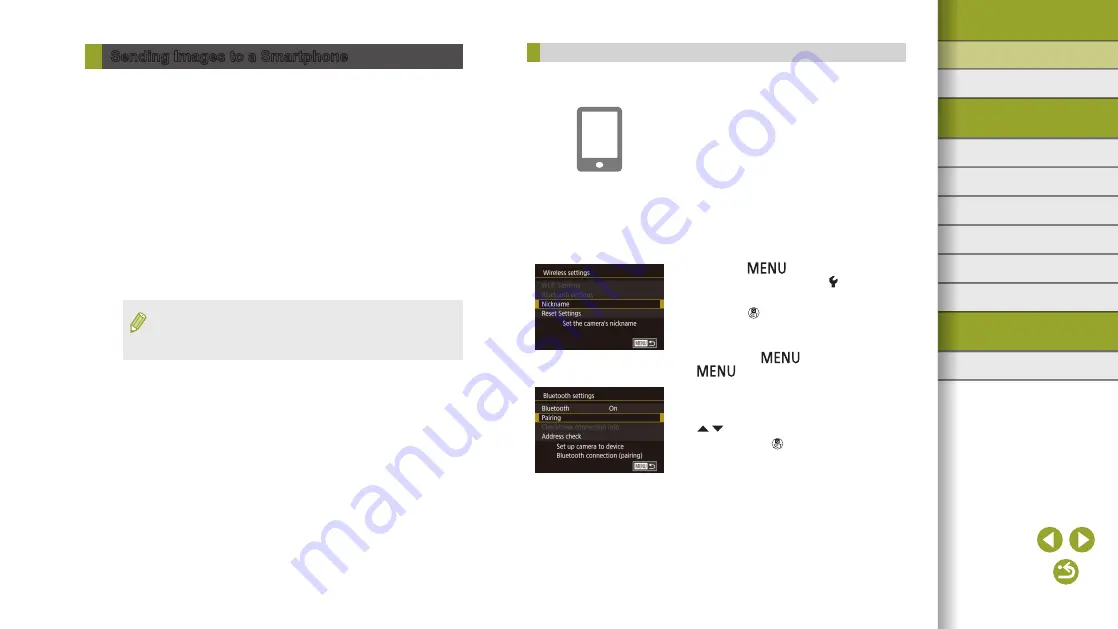
Register a nickname.


Press the ON/OFF button.


Press the 

 button, choose 

[Wireless settings] on the [ 4] tab, and 

then choose [Nickname].


Press the   button to access the 

keyboard, and then enter a nickname.


To return to [Wireless settings] after 

pressing the 

 button, press the 

 button again.

Prepare for pairing.


Choose [Bluetooth settings], press the 

/  buttons to choose [Pairing], and 

then press the   button.

Sending Images to a Smartphone

Send images to a smartphone as follows.


Connect via Bluetooth (

=

 8)

You can easily connect the camera to a Bluetooth enabled smartphone 

by pairing them. This simplifies transferring images to a smartphone.


Connect via NFC (

=

 10)

Simply touch an NFC-compatible Android smartphone against the 

camera to connect the devices.


Connect via the Wi-Fi menu (

=

 12)

You can connect the camera to a smartphone as you would connect it 

to a computer or other device. Multiple smartphones can be added.

Before connecting to the camera, you must install the free dedicated 

Camera Connect app on the smartphone. For details on this application 

(supported smartphones and included functions), refer to the Canon 

website.


Canon Wi-Fi-compatible camera owners who use EOS Remote to 
connect their camera via Wi-Fi to a smartphone should consider 
switching to the Camera Connect mobile app.

Summary of Contents for EOS M100

Page 1: ...x Errors and Warnings Troubleshooting Settings Playback Shooting Setup and Basics Learning About the Camera Accessories Wireless Features Wireless Features Accessories ENGLISH Help Guide CANON INC 201...

Page 2: ...on Take and review some test shots initially to make sure the images were recorded correctly Please note that Canon Inc its subsidiaries and affiliates and its distributors are not liable for any cons...

Page 3: ...tions 23 Sending Multiple Images 23 Notes on Sending Images 25 Choosing the Number of Recording Pixels Image Size 25 Adding Comments 25 Sending Images Automatically Image Sync 26 Initial Preparations...

Page 4: ...tings Creative Assist 56 Specific Scenes 58 Shooting with a Skin Smoothing Effect Smooth Skin 58 Shooting Close ups Close up 58 Moving Subjects Sports 58 Shooting Evening Scenes without Using a Tripod...

Page 5: ...ating Images Rating 82 Erasing Images 82 Erasing Multiple Images 82 Erasing a Range of Images 82 Editing Still Images 82 Rotating Images 82 Resizing Images 83 Cropping 83 Applying Filter Effects 83 Co...

Page 6: ...een Information 97 When Shooting 97 During Playback 98 Functions and Menu Tables 101 Functions Available in Each Shooting Mode 101 Quick Control 103 Shooting Tab 105 C Fn Tab 112 INFO Quick Control 11...

Page 7: ...dd your account information to the camera for CANON iMAGE GATEWAY online photo service or other Web services to send camera images to the services Unsent images on the camera can also be sent to a com...

Page 8: ...ess the button again 3 Prepare for pairing Choose Bluetooth settings press the buttons to choose Pairing and then press the button Sending Images to a Smartphone Send images to a smartphone as follows...

Page 9: ...tion even when it is off Bluetooth connection status is indicated by one of the following icons Connected Disconnected You can also use the camera to disable Wi Fi connection described in step 7 To di...

Page 10: ...een is displayed again Sending Images to an NFC Compatible Smartphone Use an Android smartphone s NFC to simplify the process of installing Camera Connect and connecting to the camera Operation when d...

Page 11: ...de To end the connection press the button press the buttons on the confirmation screen to choose OK and then press the button You can also use the smartphone to end the connection When using NFC keep...

Page 12: ...ct Start Camera Connect on the smartphone 7 Choose the camera to connect to On the camera selection screen displayed on the smartphone choose the camera to begin pairing Connecting to a Smartphone via...

Page 13: ...ual Confirming Access Point Compatibility Confirm that the Wi Fi router or base station conforms to the Wi Fi standards in Interface 120 Connection methods vary depending on whether the access point s...

Page 14: ...wireless transmission Check which security setting is used WPA2 PSK AES WPA2 PSK TKIP WPA PSK AES WPA PSK TKIP WEP open system authentication or no security Password encryption key network key The key...

Page 15: ...Next and then press the button 4 Choose Auto Press the buttons to choose Auto and then press the button 5 Send images Follow steps 6 9 in Connecting to a Smartphone via the Wi Fi Menu 12 to choose th...

Page 16: ...egister Separate ISP connection and access point fees may apply CANON iMAGE GATEWAY also provides user guides for downloading To determine the access point password check on the access point itself or...

Page 17: ...r Enter a four digit number of your choice press the buttons to choose Next and then press the button You will need this four digit number later when setting up linkage with CANON iMAGE GATEWAY in ste...

Page 18: ...omputer or smartphone access http www canon com cig to visit CANON iMAGE GATEWAY 2 Configure the Web service you want to use Follow the instructions displayed on the smartphone or computer to set up t...

Page 19: ...ing 23 To view images uploaded to CANON iMAGE GATEWAY on a smartphone try the dedicated Canon Online Photo Album app Download and install the Canon Online Photo Album app for iPhones or iPads from the...

Page 20: ...e TV For details refer to the media player s user manual When finished press the button on the camera to end the connection If the screen is dimmed press any button Once the second screen in step 3 is...

Page 21: ...me displayed on the camera to establish a connection Connections require that a memory card with saved images be in the camera Once you have connected to devices via the Wi Fi menu recent destinations...

Page 22: ...the printer Press the buttons to choose the printer name and then press the button 6 Choose an image to print Press the buttons to choose an image Press the button choose and press the button again Pr...

Page 23: ...end an image Choose an image to send press the buttons to choose Send this image and then press the button Transfer completed is displayed after the image is sent and the image transfer screen is disp...

Page 24: ...tton to choose Last image and then press the button Press the buttons to choose an image and then press the button Images before the first image cannot be selected as the last image To include movies...

Page 25: ...of the network you are using it may take a long time to send movies Be sure to keep an eye on the camera battery level Web services may limit the number of images or length of movies you can send Whe...

Page 26: ...icon changes to Sending Images Automatically Image Sync Images on the memory card that have not been transferred already can be sent to a computer or Web services via CANON iMAGE GATEWAY Note that im...

Page 27: ...be accessed this way For Canon Online Photo Album instructions refer to Canon Online Photo Album Help Sending Images Images sent from the camera are automatically saved to the computer If the computer...

Page 28: ...ect via NFC or Bluetooth when the camera is off Others may be able to locate or identify you by using location data in your geotagged still images or movies Be careful when sharing these images with o...

Page 29: ...camera still by mounting it on a tripod or taking other measures when shooting 2 Connect the camera and smartphone 8 Make sure that the Bluetooth connection has been established To check the GPS infor...

Page 30: ...choose Edit a Device and then press the button 3 Choose the device to edit Press the buttons to choose the device to edit and then press the button 4 Choose the item to edit Press the buttons to choo...

Page 31: ...a connection with a smartphone 1 Access the setting screen Following step 4 in Editing Connection Information 30 choose View Settings and press the button Configurable Items Connection Web Services C...

Page 32: ...and enter a different nickname You can also change the nickname from the Device Nickname screen displayed when you first use Wi Fi In this case select the text box press the button to access the keyb...

Page 33: ...ayed press the buttons to choose OK and then press the button 4 Clear the camera information In the Bluetooth setting menu on the smartphone clear the camera information registered on the smartphone R...

Page 34: ...nce when used with genuine Canon accessories Canon shall not be liable for any damage to this product and or accidents such as fire etc caused by the malfunction of non genuine Canon accessories e g a...

Page 35: ...1 Battery Pack LP E12 1 Face Jacket EH31 FJ Neck Strap EM E2 Neck Strap EM 200DB 1 USB Port Card Slot TV Video System Computer PictBridge Compatible Printers Card Reader SD SDHC SDXC Memory Card Conne...

Page 36: ...a DC Coupler DR E12 Used with a compact power adapter The battery charger and compact power adapter can be used in areas with 100 240 V AC power 50 60 Hz For power outlets in a different format use a...

Page 37: ...For details visit your nearest Canon retailer Photo and Movie Storage Connect Station CS100 A media hub for storing camera images viewing on a connected TV printing wirelessly on a Wi Fi compatible p...

Page 38: ...PS700 and DC Coupler DR E12 both sold separately eliminates the need to monitor the remaining battery level 1 Make sure the camera is off 2 Insert the coupler With the cover open and the coupler termi...

Page 39: ...tility Use a map to view GPS information that has been added to images To view and edit movies on a computer use preinstalled or commonly available software compatible with movies recorded by the came...

Page 40: ...the computer refer to the computer user manual 2 Turn on the camera and display EOS Utility Press the button Windows Double click the EOS Utility icon on the desktop Mac OS Click the EOS Utility icon...

Page 41: ...the computer Click Download images to computer Start automatic download Once images are saved to the Pictures folder on the computer in separate folders named by date Digital Photo Professional start...

Page 42: ...printer settings Default Matches current printer settings Off On Uses information from the time of shooting to print under optimal settings Red Eye 1 Corrects red eye No of Copies Choose the number of...

Page 43: ...the button When choosing N up press the button On the next screen press the buttons to choose the number of images per sheet and then press the button 5 Print the image Cropping Images before Printing...

Page 44: ...cess the screen in step 1 by pausing on a scene to print pressing the buttons to choose in the movie control panel and then pressing the button Available Layout Options Default Matches current printer...

Page 45: ...the button You can now specify the number of prints Images you specify for index printing are labeled with a icon To cancel index printing for the image press the button again is no longer displayed A...

Page 46: ...d in their own folder This is convenient when ordering printed photobooks online or printing photobooks with your own printer 3 Specify the number of prints Press the buttons to specify the number of...

Page 47: ...ress the button Choosing a Selection Method Press the button choose Photobook Set up on the 3 tab and then choose how you will select images may be displayed on the camera to warn you that the memory...

Page 48: ...ain battery performance if you will not use the battery pack for some time about once a year charge it and then use the camera until it runs out of power before storing the battery pack Do not touch t...

Page 49: ...by touching the desired item on the date time screen and then touching followed by Similarly you can also set your home time zone by touching on the time zone screen followed by Date time settings ca...

Page 50: ...ount included with the adapter Do not use the camera s tripod socket With EF lenses that incorporate a tripod mount such as super telephoto lenses attach the tripod to the tripod mount on the lens The...

Page 51: ...ch the desired subject on the screen is displayed and the camera enters Touch AF mode Using Lens Image Stabilization Correct camera shake by using a lens with built in image stabilization Lenses with...

Page 52: ...turning the dial To return to the previous screen press the button Indicator Display When the indicator blinks green never turn the camera off open the memory card or battery cover or shake or hit the...

Page 53: ...om ring on the lens The camera beeps twice after focusing when you press the shutter button halfway and AF frames are displayed to indicate image areas in focus If Raise the flash is displayed move th...

Page 54: ...s A blinking icon warns that images are more likely to be blurred by camera shake In this case mount the camera on a tripod or take other measures to keep it still If your shots are dark despite the f...

Page 55: ...corded To adjust settings or perform other operations during recording use the touch screen panel if possible Mechanical sounds from the lens and camera are also recorded Once movie recording begins t...

Page 56: ...rast Choose higher values to increase the contrast Saturation Adjust the vividness of colors Choose higher values to make colors more vivid or lower values to make them subdued Color tone 1 Adjust col...

Page 57: ...when the flash is used To prevent your settings from being reset when the camera is turned off choose MENU 6 tab Keep setting Enable You can also access the setting screen by touching in the upper ri...

Page 58: ...ing with a Skin Smoothing Effect Smooth Skin Areas other than people s skin may be modified depending on the shooting conditions Try taking some test shots first to make sure you obtain the desired re...

Page 59: ...bold edges Art Embossed Images resemble old photos with bold edges and dark ambiance Shots Resembling Miniature Models Miniature Effect To make people and objects in the scene move quickly during play...

Page 60: ...configured by pressing the button Press the button to return to the INFO Quick Control screen You can also access setting screens by touching a setting on the INFO Quick Control screen and then touch...

Page 61: ...re compensation or flash exposure compensation For shots at your specified brightness set this feature to Disable You can also configure auto correction of brightness and contrast by choosing MENU 5 t...

Page 62: ...touching on the correction screen Manually Setting White Balance Color Temperature Color temperature can be set at 100 K increments in a range of 2 500 10 000 K Shooting Bright Subjects Highlight Ton...

Page 63: ...s Customizing Colors Picture Style The following Picture Style items are available Auto The color tone is adjusted automatically to suit the scene The colors look vivid especially for blue skies green...

Page 64: ...king Colors displayed for MF peaking are not recorded in your shots Filter effect 2 Emphasize white clouds the green of trees or other colors in monochrome images N Normal black and white image with n...

Page 65: ...k contrast in very bright conditions or with some EF or EF S lenses For lens details check the Canon website You can also change the method of auto focus AF used by choosing MENU 3 tab AF method 1 poi...

Page 66: ...when there is inadequate contrast between subjects and the background To keep the frame in the same position where you touched after shooting set Touch Shutter to Enable Choose MENU 2 tab Touch Shutte...

Page 67: ...h Enable FE lock by pressing the button when subjects are within flash range Changing the Flash Timing The timing of flash firing relative to shutter release can be set as follows 1st curtain The flas...

Page 68: ...ome shooting conditions The higher the ISO speed the lower the amount of correction will be Correction is not applied to movies Diffraction corrects loss of sharpness not only from diffraction but als...

Page 69: ...available is displayed on the setting screen correction data has not been added to the camera Note the following about adding correction data Lens correction data for lenses compatible with this featu...

Page 70: ...posure level may change if you adjust the zoom or recompose the shot When the ISO speed is fixed screen brightness may change depending on your specified shutter speed and aperture value However scree...

Page 71: ...exposure level mark is shown as or when the difference from standard exposure exceeds 3 stops You can also set the shutter speed and aperture value by touching a setting item on the bottom of the scr...

Page 72: ...e shutter button halfway and focusing by pressing the button AF AF lock no AE lock Enable focus lock by pressing the button AE AF no AE lock Enable exposure compensation by pressing the shutter button...

Page 73: ...r choose MENU 8 tab Auto slow shutter and then choose A SLOW ON Auto slow shutter is available when Movie Quality is set to or To cancel all changes on the 1 tab and restore defaults choose MENU 1 tab...

Page 74: ...hots Shooting will stop automatically when the memory card becomes full When a delay longer than two seconds is specified two seconds before the shot the lamp blinking and self timer sound will speed...

Page 75: ...hat the camera could not focus on subjects No shot will be taken Even while the shot is displayed you can prepare for the next shot by touching Continuous Shooting During continuous shooting focus is...

Page 76: ...m the camera s image processing The data cannot be used in this state for viewing on a computer or printing You must first process it on this camera or use the Digital Photo Professional application t...

Page 77: ...owing items are available Image Quality Number of Recording Pixels Frame Rate Details 1920 x 1080 50 00 fps For shooting in full HD 1920 x 1080 25 00 fps 1280 x 720 50 00 fps For shooting in HD 640 x...

Page 78: ...y mode To pause or resume movies press the button After movie playback ends is displayed To switch to Shooting mode from Playback mode press the shutter button halfway press the button or movie button...

Page 79: ...olume Touch the screen during movie playback to display the movie control panel To switch frames touch the scrollbar or drag left or right To return to the screen shown before playback touch During in...

Page 80: ...image display according to your specified conditions You can also protect or delete these images all at once The following conditions can be specified Rating Displays images you have rated Shot Date D...

Page 81: ...no longer displayed Protected images on a memory card will be erased if you format the card Protected images cannot be erased using the camera s erasure function To erase them this way first cancel p...

Page 82: ...an choose multiple images to erase at once Protected images cannot be erased During display of images captured in both RAW and JPEG format pressing the button displays Erase Erase JPEG and Erase JPEG...

Page 83: ...ing MENU 3 tab Cropping pressing the button choosing an image and pressing the button again You can also move the cropping frame by dragging it Operations are also possible by touching and on the top...

Page 84: ...g the button To return to the setting screen press the button To restore original settings on the processing conditions screen choose press the buttons to choose OK and then press the button You can c...

Page 85: ...sion After Compression and movies cannot be compressed Edited movies cannot be saved in compressed format when you choose Overwrite Editing Digest Movies Selected clips are played back repeatedly when...

Page 86: ...ng the button while an image is displayed after shooting you can switch the display information File Numbering Your shots are automatically numbered in sequential order 0001 9999 and saved in folders...

Page 87: ...n display This setting information followed by Info display 2 will be displayed when you press the button Formatting Memory Cards Formatting erases all data on a memory card Before formatting copy ima...

Page 88: ...the shutter curtains Never use canned air or gas to clean the sensor The force of the air may damage the sensor and any gas that adheres and freezes on the sensor may also damage it If a smudge that...

Page 89: ...check the information entered choose MENU 4 tab Copyright Info Display Copyright Info and then press the button You can also use EOS Utility to enter change or delete copyright information on the came...

Page 90: ...of power quickly Battery performance decreases at low temperatures Try warming the battery pack a little by putting it in your pocket for example ensuring that the terminals do not touch any metal obj...

Page 91: ...les Shooting Cannot shoot The camera cannot shoot unless subjects are in focus Wait until the frame turns green as you press the shutter button halfway and allow the camera to focus before attempting...

Page 92: ...appen under the following conditions Subjects have fine horizontal stripes or checkered patterns The sun lights or other sources of bright light are visible on the shooting screen or are nearby In thi...

Page 93: ...ices No notification message is received on a computer or smartphone after adding CANON iMAGE GATEWAY to the camera Make sure the email address you entered is correct and try adding the destination ag...

Page 94: ...in the camera To shoot insert a memory card facing the correct way Memory card error If the same error message is displayed even after you have formatted a supported memory card and have inserted it...

Page 95: ...correct SSID Unidentified Image Incompatible JPEG Image too large Cannot play back MOV Cannot play back MP4 Unsupported or corrupt images cannot be displayed It may not be possible to display images t...

Page 96: ...d other devices that operate on the 2 4 GHz band Bring the camera closer to the other device you are trying to connect to such as the access point and make sure there are no objects between the device...

Page 97: ...15 16 18 17 19 20 21 22 23 24 25 26 27 28 29 30 31 32 33 34 35 45 12 13 1 Shooting mode Scene icon 2 Flash mode 3 Flash exposure compensation Flash output level 4 Metering mode 5 Picture Style 6 Conti...

Page 98: ...Recordable shots 16 Maximum continuous shots 17 Bluetooth smartphone connection GPS acquisition status 18 Movie quality recording pixel frame rate 19 Remaining time 20 Histogram 21 Quick Control scre...

Page 99: ...ay 2 1 Shooting date time 2 Histogram 3 Shooting mode 4 Shutter speed 5 Aperture value 6 Exposure compensation level 7 ISO speed 8 Highlight tone priority 9 White balance 10 White balance correction 1...

Page 100: ...ack speed No sound is played Skip Backward or Previous Clip To continue skipping backward keep holding down the button Previous Frame For fast rewind keep holding down the button Next Frame For fast f...

Page 101: ...0 O O O O Flash Auto O O O O O O O O O O O O O O O On O O O O O O O O O O O O O O O O O O Slow Synchro 2 O O 2 O 2 Off O O O O O O O O O O O O O O O O O O O O O O O O O O O Flash Exposure Compensation...

Page 102: ...O O O O O O O O O O O O O O O O Touch AF O O O O O O O O O O O O O O O O O O O O O O O Magnified Display O O O O O O O O O O Touch Shutter O O O O O O O O O O O O O O O O O 4 4 O O 4 O Change Display...

Page 103: ...O 2 O O O O O O O O O O O O O O O O O O O O O O O O 2 O O O O O O O O O O O O O O O 4 O O O PAL O O O O O O 2 O O O O O O O O O O O O O O O O O O O O O O O O O 2 O O O O O O O O O O O O O O O 4 O O O...

Page 104: ...O O O O O O O O O O O O O O O O O O O O O Metering mode O O O O O O O O O O O O O O O O O O O O O O O O O O O O O O O Auto Lighting Optimizer O O O O O O O O O O O O O O O O O O O O O O O O O O O O O...

Page 105: ...O O O O O O O O O O O O O O O O O O O O O O O O O O O O O O O O O O O O Still Image Aspect Ratio See Quick Control 103 Shooting information display Grid display Off 3x3 6x4 O O O O O O O O O O O O O O...

Page 106: ...O O O O O O O O O O O O O Quick setting menu layout O O O O O O O O O O O O O O O O O O O O O O O O O O 3 AF operation See Quick Control 103 AF method See Quick Control 103 AF Frame Size 2 Normal O O...

Page 107: ...O O O O O O O O O O O Continuous O O O O O O O O O O O O O O O O O O O O O O O O O O Digital IS Disable O O O O O O O O O O O O O O O O O O O O O O O O O O O Enable O O O O O O O O O O O O O O O O O O...

Page 108: ...Each Shooting Mode 101 E TTL II meter Evaluative O O O O O O O O O O O O O O O O O O O O Average O O O O Red eye reduc On Off O O O O O O O O O O O O O O O O O O O O Safety FE Enable O O O O O O O O O...

Page 109: ...ection See Quick Control 103 Picture Style See Quick Control 103 Long exp noise reduction Disable O O O O O O O O O O O O O O O O O O O O O O O O O O O Auto Enable O O O O High ISO speed NR Standard O...

Page 110: ...e Stills No Stills O AF auto switch Enable O Disable O O O O O O O O O O O O O O O O O O O O O O O O O O O Keep setting Disable Enable O Time lapse movie settings Shooting scene Scene 1 Scene 2 Scene...

Page 111: ...r Attenuator Wind Filter Auto O O O O O O O O O O O O O O O O O O O O O O O O O Off O O O O O O O O Attenuator Auto O O O O O O O O O O O O O O O O O O O O O O O O O O O Off On O O O O O O Movie Servo...

Page 112: ...O O C Fn II Others Release shutter w o lens Disable O O O O O O O O O O O O O O O O O O O O O O O O O O O Enable O O O O O O O Retract lens on power off Enable O O O O O O O O O O O O O O O O O O O O...

Page 113: ...erture value O O O ISO speed O O O O O Exposure comp O O O O O O O Flash exposure compensation O O O O Flash firing O O O O Time lapse movie settings O Rec level O O Picture Style O O O O O O O White...

Page 114: ...lder File Numbering Format Video system 2 Eco Mode Power Saving Disp Brightness Time Zone Date Time Language 3 Beep Operation Vol 1 Hints Tips Mode icon size info Touch Operation Screen auto lock sett...

Page 115: ...h Play Movie Play Linked Digest Movie Print Resize Cropping Creative filters RAW img processing Apply settings In shooting modes other than Apply settings to Playback Tab Tab Item 1 Protect Rotate Era...

Page 116: ...rol Still image Exposure compensation 3 stops in 1 3 stop increments Program Shift Provided AE lock Manual Auto Movie Exposure compensation 3 stops in 1 3 stop increments AE lock Manual Auto Specifica...

Page 117: ...uto settings Min speed ISO 100 Max speed ISO 6400 Manual settings Min speed ISO 100 Max speed ISO 6400 Expanded ISO 12800 HD 1280 x 720 Auto settings Min speed ISO 100 Max speed ISO 6400 Manual settin...

Page 118: ...ovided Highlight tone priority Provided Lens correction EF M lens has in lens correction data Peripheral illumination correction Chromatic aberration correction Diffraction correction Picture Style Au...

Page 119: ...Shots Approx 1833 shots 2760 shots 3114 shots 4671 shots 4717 shots 6656 shots 8098 shots 450 shots RAW JPEG 361 shots Movies Using a 16 GB UHS I memory card Image Quality Recording File Size Approx...

Page 120: ...on Customizing Registration of Custom Functions Shutter button Movie button Copyright Info Provided Power Battery pack LP E12 Number of still image shots CIPA compliant room temperature 23 C 73 F Moni...

Page 121: ...Including battery pack memory card Approx 302 g 10 7 oz Camera body only Approx 266 g 9 4 oz Battery Pack LP E12 Type Rechargeable lithium ion battery Rated voltage 7 2 V DC Battery capacity 875 mAh W...

Page 122: ...e time Date time battery 49 50 Settings 49 World clock 88 DC coupler 36 38 Defaults Resetting Display language 50 Display period 86 DLNA 20 DPOF 45 E Eco mode 87 Editing Cropping 83 Red eye correction...

Page 123: ...88 Troubleshooting 90 TV display 38 Tv shooting mode 70 V Viewing 78 Image search 80 Index display 80 Jump display 81 Magnified display 79 Single image display 78 Slideshow 79 TV display 38 W White b...

Page 124: ...to gain access to unauthorized information or springboard attacks where someone gains unauthorized access to your network as a springboard to cover their tracks when infiltrating other systems To prev...

Page 125: ...imer in their documentation 3 the name of the copyright holder is not used to endorse products built using this software without specific written permission DISCLAIMER This software is provided as is...

Reviews: