background image

19

4-B

 [Find network]

Before establishing a connection, ensure you have the following information

*

• Access point name (SSID)
• Encryption key (password) specified for the access point

* For information on the access point name (SSID) and encryption key (password), refer to the 

access point’s instruction manual.

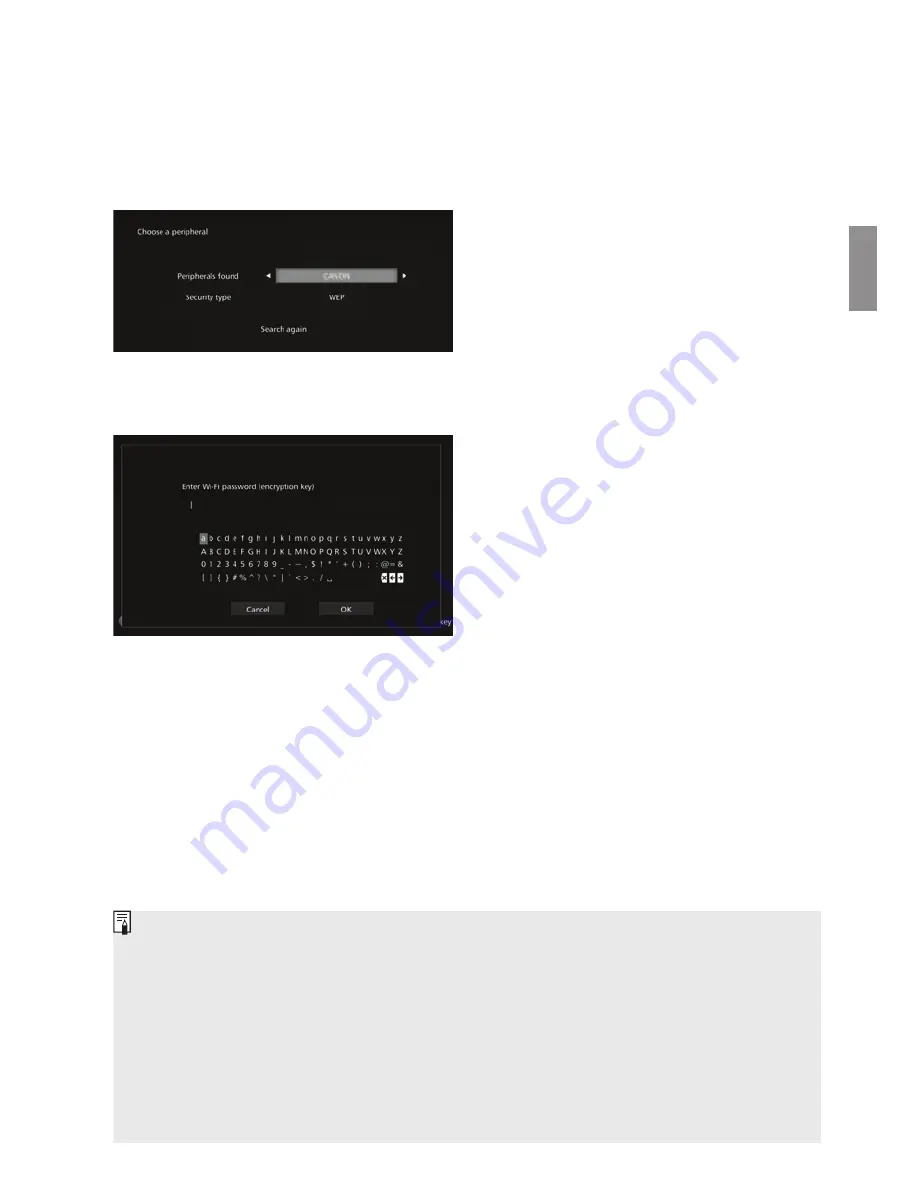
(1) Select the access point 

name (SSID) to connect to.


Press the <

h

> <

g

> keys to select 

the access point name (SSID) of 
the [

Peripherals found

], then 

press <

S

>.


When [

Enter manually

] is 

selected, enter the access point 
name (SSID) in the input screen.

(2) Enter the encryption key 

(password).


Select a character with the <

T

keys, then press <

S

> to enter 

it.


When you are finished, select 
[

OK

], then press <

S

>. Wait 

until the connection is complete.


This screen is not displayed when 
you connect to an unencrypted 
access point.

X

When the connection is complete, 
the [

Set date/time

] screen will 

appear.


If you select [

Skip Wi-Fi settings

], reconnect to another access point, or connect 

using WPS (PIN code), you can make the settings later in [

Preferences

] (p.57).


If the access point cannot be detected within two minutes after you select [

WPS Push 

button connection (PBC)

], an error message appears. In that case, check that the 

access point supports WPS and try again, or select [

Find network

] to establish the 

connection.


If the network you use filters by MAC address, register the MAC address of Connect 
Station at the access point. The MAC address is indicated on the bottom of Connect 
Station.


If the response of the remote control is slow when selecting characters or images, 
operate the remote control slowly.

Summary of Contents for CS100

Page 1: ...MANUAL DE INSTRUÇÕES MANUAL DE INSTRUCCIONES MODE D EMPLOI INSTRUCTION MANUAL Español Français English Português ...

Page 2: ...English Note on TV Set If the resolution of your TV set is other than Full HD 1920x1080 or HD 1280x720 Connect Station s screen may not appear ...

Page 3: ...c or sharing over a network and more You can perform the following operations using this device Introduction 1 Import images 2 View images 3 Share images over a network 4 Print images using a printer 5 Copy images to a card 6 Back up images to an external hard disk 1 Import 2 View 3 Share 6 Back up 5 Copy 4 Print ...

Page 4: ...e for any destruction or loss of image data Handling of This Product This product has a hard disk built in it The hard disk may malfunction or have imported image data destroyed or lost due to physical shock vibration etc To protect the hard disk follow the instructions below regardless of whether the product is in use or standing by Do not subject the product to physical shock or vibration or dro...

Page 5: ...nts on this device and remote control This manual describes the operations of cameras camcorders smartphones tablets computers printers and TV sets assuming that you have read the relevant manuals and understand how to operate these devices In this manual CF card refers to CompactFlash cards and SD card refers to SD SDHC SDXC cards Card refers to all memory cards used to record images or movies Ic...

Page 6: ...e Image List p 31 Creating and Viewing an Album p 34 Operations during Playback p 37 Printing Still Photos p 38 Setting Up a Printer p 38 Printing p 39 Operating with a Web Browser p 40 Displaying the Operation Screen p 40 Viewing an Album p 43 Uploading Still Photos from the Terminal p 44 Menu Screen of the Terminal p 45 Transferring and Sharing Images p 46 Signing Up as a Member p 46 Transferrin...

Page 7: ...e way in Do not use a cord whose wire is broken or insulation is damaged Do not twist the cord forcibly Do not put a heavy object on the power cord Do not modify the power cord Do not handle a power plug with wet hands Doing so may cause an electrical shock Do not leave any cords near a heat source Do not short circuit the plug terminal or outlet with a metal material Doing so may cause an electri...

Page 8: ... prevent a fire or an explosion Keep equipment out of the reach of children and infants including when in use and be aware of the cautions below Looping the power cord or DC cord around the neck may result in suffocation Looping the power cord or DC cord around the neck or body may cause an electrical shock or injury Swallowing any of the accessories parts or batteries may result in suffocation or...

Page 9: ...cleaners containing organic solvents To avoid rust or corrosion do not store the product where there are strong chemicals such as in chemical labs If dust has accumulated on the inlet or outlet for internal cooling of the product remove it after you turn off the power and unplug the power plug and DC plug Rise in Temperature While the product is used its main unit and or AC adapter may become hot ...

Page 10: ...data using data erasing software for computers is recommended When disposing of the card physically destroying the card is recommended Disposal and Transfer of the Product When disposing of or transferring the product take the actions below to prevent the leakage of the personal information contained in images and the wireless LAN settings Even if you perform Format system hard disk the personal i...

Page 11: ...ess lamp p 24 25 27 Remote control sensor SD card slot p 24 Front and top sides Rear and bottom sides Outlet for internal cooling Inlet for internal cooling Serial number E Power terminal p 15 D HDMI terminal p 14 F LAN terminal p 16 G USB terminal p 25 CF card slot p 24 Speaker The USB terminal cannot be used for charging The CF card slot is not compatible with the CFast card ...

Page 12: ...ol transmitter P Power button Turn on the power or put Connect Station into the standby state S Set button Selected item takes effect B Back button Previous screen reappears M Menu button Menu screen appears T Cross keys J AC Adapter p 15 Power cord socket Power cord DC cord DC plug AC adapter unit ...

Page 13: ... service p 46 LAN cable TV set p 14 External hard disk p 61 Canon camera camcorder p 25 AC adapter p 15 CF card p 24 Printer p 38 SD card p 24 HDMI cable USB cable Interface cable Internet Not required when Connect Station is connected to the access point via a wireless LAN USB hubs are not supported Operation cannot be guaranteed if a USB extension cable is used ...

Page 14: ...isk even when a hard disk with a capacity of more than 1 TB is used Device to be Connected When Connected You can Connection Method Connection Terminal Remarks TV set with an HDMI terminal View images Wired connection HDMI Connect with an HDMI cable commercially available 1 Canon camera camcorder 2 3 Import images Wireless LAN Canon NFC compatible model Wired connection USB Connect with an interfa...

Page 15: ...t so that you can operate it while looking at the TV screen When connecting Connect Station to a TV set prepare an HDMI cable commercially available and connect according to the procedure below 1 Connect the HDMI cable to Connect Station Plug the cable connector to the HDMI terminal of Connect Station Setup Installing Batteries into the Remote Control Connecting Connect Station to a TV Set When re...

Page 16: ...ch the TV s video input to select the connected terminal 6 Turn on Connect Station Press the power button to turn on Connect Station X The connection is complete when Connect Station CS100 appears on the screen X When you turn on the power for the first time the power lamp turns from orange to green and the Initial settings screen p 17 appears It takes approx one minute before Connect Station star...

Page 17: ...otential heat source J Power Button Operation Turning on the power If you press the power button on Connect Station with its power off the power lamp will light up in orange The light will turn green when Connect Station starts It takes approx one minute before Connect Station starts Turning off the power Keep the power button on Connect Station pressed until Shutdown appears on the screen approx ...

Page 18: ...ng Initial Settings Power button Power lamp Do not lift or move Connect Station when its power is on or it is standing by Dropping Connect Station or hitting it against an object may damage its hard disk Disconnecting the power cord or DC plug when the power to Connect Station is on or Connect Station is standing by can lead to a malfunction Before disconnecting the power cord or DC plug check tha...

Page 19: ... Protected Setup Press the access point s WPS button while the screen shown on the left is displayed For details about where the button is located and how long to press it refer to the access point s instruction manual X When the connection is complete the Set date time screen will appear 5 Set the date and time Press the h g keys to select the item you want to change and press the d f keys to cha...

Page 20: ... until the connection is complete This screen is not displayed when you connect to an unencrypted access point X When the connection is complete the Set date time screen will appear If you select Skip Wi Fi settings reconnect to another access point or connect using WPS PIN code you can make the settings later in Preferences p 57 If the access point cannot be detected within two minutes after you ...

Page 21: ...amera camcorder You can also delete multiple images at once or copy them to a card Albums p 34 You can view create and edit albums New images received p 29 You can check newly imported images Print p 38 You can print still photos Send receive images p 46 You can transfer images with another Connect Station Preferences p 55 You can change the Connect Station settings You can also back up images to ...

Page 22: ...he formats shown below Files of any other formats cannot be played back even if they are imported to Connect Station Importing Camera Camcorder Images Importing Images Importing via a wireless connection p 22 Importing from a card p 23 Importing via a wired connection p 25 Still photos JPEG RAW CR2 format only Movies MOV MP4 AVCHD Full HD HD and VGA SD recording quality If you change the folder na...

Page 23: ...ruction Manual The location of the n N Mark differs by each camera camcorder model Check the location of n in advance Importing images Carefully hold the n on the camera camcorder to be connected close to the NFC connect point on Connect Station X Connect Station gives two short beeps and the Wi Fi lamp blinks twice If message indicating the connection is displayed on the camera camcorder s LCD mo...

Page 24: ...a camcorder close to Connect Station Since the camera camcorder may not be recognized readily carefully hold the camera camcorder close to the NFC connect point on Connect Station while rotating the camera camcorder horizontally Just holding the camera camcorder close to Connect Station may not establish a connection In such a case gently touch Connect Station with the camera camcorder When connec...

Page 25: ...d slot X The access lamp will blink and the import of images will start The import is complete when the access lamp stops blinking and stays lit Remove the card Access lamp green SD card CF card Connect Station is importing copying or backing up images when its access lamp green is blinking Do not do any of the following when the access lamp is blinking doing so may destroy image data or damage Co...

Page 26: ...rder s power X The access lamp will blink and the import of images will start The import is complete when the access lamp stops blinking and stays lit Turn off the camera s camcorder s power then disconnect the cable When connecting or disconnecting the cable hold Connect Station in place When disconnecting the cable be sure to hold the plug do not pull the cable When connecting the cable to Conne...

Page 27: ... is importing images or standing by During the import the icon indicating that data is being imported is displayed on the upper right of the screen p 28 The image import time varies depending on following conditions etc Number and sizes of the images to be imported Write out speed of the card used Signal reception status when connected wirelessly Importing movies takes a considerable time Image Im...

Page 28: ... When images are being imported from a camera camcorder connected via a wireless LAN When there are new images 1 When images have been received from another Connect Station 1 When a device is held close to the NFC connect point and connection is established When the firmware is being updated 2 Access lamp green Blinks 3 When images are being imported from a card or a camera camcorder connected via...

Page 29: ...status p 57 then check the error status If there is an error y is displayed in Image importing status or Preferences and Show status Icons on the Screen Uploading images from a Web browser A Web browser is connecting to Connect Station Importing images from a camera camcorder via a wireless LAN Receiving images from a Web service Importing images from a camera camcorder via a wired connection Send...

Page 30: ... u is displayed in New images received on the Home screen and the new image notification lamp blue blinks When you select New images received and press S u and the lamp will turn off When you select a new image group and press S the images in that group will be displayed as thumbnails When you select a new image group and press M that new image group can be compiled into an album If you import ima...

Page 31: ... slide show of the new image group will be played back Rotate images The selected image will be rotated Each time you press S the image is rotated clockwise by 90 Playback settings Specify the slide show playback settings You can set the display time for each still photo and playback time for movies Delete images Images selected from new images will be deleted Select an image and press S to append...

Page 32: ...images or copying multiple images to a card at once sort the images to be displayed according to the shooting month J Viewing Images by Shooting Month or Camera Camcorder Search for images by selecting the shooting month or the camera camcorder used for shooting When you select the shooting month or the camera camcorder used for shooting in the left side area the corresponding images will be displ...

Page 33: ...An album will be created from selected images For information on how to create an album see Creating an Album p 34 Add images to album 1 Images will be added to a created album When you select an album from the list and press S images will be added to the selected album Print images 2 3 Selected images are printed For information on how to print see Printing Still Photos p 38 Share images online S...

Page 34: ...ra camcorder cannot display those images When copying images follow the instructions below Use an SDXC card or CF card An SD card or SDHC card cannot be used for copying images with Connect Station The card may be formatted Do not use a card storing images or data that you do not want to delete When you select Copy multiple images the card selection screen will appear first Press the d f keys to s...

Page 35: ...s imported to Connect Station and create an album Selecting New album displays the image selection screen Select images and press S to append z for the images to be compiled into an album Pressing M creates an album J Creating an Album Automatically Connect Station automatically selects images and creates an auto album Selecting New auto album displays the auto album setting screen When you set Au...

Page 36: ...lbum The selected album will be deleted Playback settings Specify the slide show playback settings You can set the display time for each still photo and playback time for movies Menu Items Settings Play from first image A slide show of the album will be played back Send album An album will be sent to another Connect Station via the Internet For information on the settings and how to send an album ...

Page 37: ...ress the f key to display the image selection screen Select an image and press S to append z for the image to be added When you press M the images to be added will be accepted and the editing screen will reappear Saving the edited data When you press M the edited data will be saved and the album selection screen will reappear Setting the submenu When you press M while an album is selected the menu...

Page 38: ...s being played back 2 Not displayed when a movie is selected 3 Not available when a printer is not set 4 Displayed only when an album is being played back Operations during Playback Menu Items Settings Slide show Start stop slide show Shooting information Switch display settings of shooting information Rating 1 Rate images with one of five levels p 32 Rotate images 2 Rotate an image clockwise by 9...

Page 39: ... Connect Station 1 Operate the printer to connect to the access point router etc 2 Select Preferences Select Preferences on the Home screen 3 Select Printer selection Under the b tab select Printer selection X The printers that can be connected will be listed 4 Select a printer Press the d f keys to select the printer then press S to append z for the printer to be connected If only one printer has...

Page 40: ...rdered Borderless Date printing settings With date Without date Movies cannot be printed Depending on the printer model the Connect Station s Print Setting screen may not be displayed or printing dates is not possible Depending on the printer model and settings the Layout setting may be inconsistent with the print result You cannot print even if you connect Connect Station and a printer with a USB...

Page 41: ...rsion 4 2 Chrome version 28 Operation on the above operating systems and Web browsers cannot be guaranteed for all the terminals If JavaScript is disabled by the Web browser setting images will not be displayed properly J Displaying by Using the NFC Function An NFC compatible Android smartphone or tablet OS version 4 2 or later supporting Android Beam allows you to display the operation screen by ...

Page 42: ...ill appear p 43 NFC connect point When holding the terminal close to Connect Station do not drop the terminal on it or push the terminal hard against it Doing so may damage the built in hard disk If a case etc is attached to the terminal connection may not be possible In such a case detach the case etc and hold the terminal close to Connect Station Since the terminal may not be recognized readily ...

Page 43: ...right of the Preferences screen is the IP address 3 Operate the terminal to connect to the access point router etc to which Connect Station is connected 4 Start the Web browser on the terminal 5 Enter the IP address into the terminal Enter the IP address you checked in step 2 in the address field of the Web browser 6 Operate the terminal to log in to Connect Station On the terminal screen select O...

Page 44: ...on the outer side of an image Viewing an Album Menu Single image display of a still photo Slide show Back Albums Thumbnail display If you delete or edit an album using Connect Station while viewing it in the Web browser images may not be displayed properly on the terminal Images that are not managed as albums in Connect Station cannot be viewed Although movies are displayed in the list they cannot...

Page 45: ...K To send other images select Select images again 5 Exit the upload screen By selecting L on the upper left of the screen you can return to the previous screen Uploading Still Photos from the Terminal Movies cannot be uploaded A transmission error may occur if a power saving feature of the terminal is activated during the upload If the power saving feature of the terminal is activated the communic...

Page 46: ...he operation procedure see Uploading Still Photos from the Terminal p 44 J Status Check the operation status of Connect Station such as the remaining capacity of the hard disk and the image importing status J Settings Specify the slide show playback settings J Log out Return to the login screen after disconnecting the connection between Connect Station and the terminal Menu Screen of the Terminal ...

Page 47: ...ces For details consult each individual Web service s site If you add a CANON iMAGE GATEWAY account to Connect Station a message about device information collection appears when a new device is detected p 58 Transferring and Sharing Images Signing Up as a Member Transferring images CANON iMAGE GATEWAY services are not supported in certain countries and areas For information on countries and areas ...

Page 48: ...ccount with Connect Station select Preferences 9 c tab 9 Online service account settings 2 Press the g key Press the g key then select Create new account 3 Press S X A keyboard screen will appear 4 Enter the Email address Enter the Email address for your computer smartphone etc Select a character with the T keys then press S to enter it When you are finished select OK 5 Press M X An Email will be ...

Page 49: ...ou can set that registered account on Connect Station In step 2 press S and select Register existing account In steps 3 to 5 enter the Email address and password registered with CANON iMAGE GATEWAY When setting a registered account you do not need to register with the CANON iMAGE GATEWAY site When the screen shown in step 7 appears the setup is complete J Canceling a Registered Account Setting Can...

Page 50: ...nect Station units you need to register the contact in your Connect Station in advance When registering a contact one Connect Station sends an approval request If the other Connect Station receiving the request approves it the registration of transfer between the two units will be completed Transferring Images Signing up as a CANON iMAGE GATEWAY member Sending an approval request The registration ...

Page 51: ...elect Contact Email address press S then enter the recipient s Email address If necessary you can also enter your nickname and the recipient s nickname the names to be displayed 4 Press M X An approval request will be sent Note that just sending an approval request does not register the contact Up to ten approval requests you sent or received can be saved Registered contacts and approval requests ...

Page 52: ...of transfer will be completed If necessary you can also change the nickname When the registration of the contact is complete albums can be transferred with the registered contact The registered Email addresses are added to Contacts on both Connect Station units and can be selected when sending images J Inbox Outbox A list of received or sent albums is displayed When you select an album using the T...

Page 53: ...nts and send the album to them simultaneously 4 Press M When you are finished selecting the recipient press M to send the album Receiving an album When Connect Station is in use or standing by it checks the CANON iMAGE GATEWAY site periodically and receives images automatically When an album is received the new image notification lamp blue blinks You can check the received album by selecting eithe...

Page 54: ...egistered The number of contacts which can be registered may be altered due to the specification change of CANON iMAGE GATEWAY J Checking New Images Check CANON iMAGE GATEWAY to see whether there are images sent from another Connect Station When Connect Station is in use or standing by it receives images automatically Perform this operation when you want to check received images right away or the ...

Page 55: ...b service you use 1 Select Share images online Display the submenu of Images p 32 then select Share images online 2 Select a Web service The Web services registered with CANON iMAGE GATEWAY will be listed Select a Web service then press S 3 Select images Select images and press S to append z for the images to be shared 4 Press M When you are finished with selecting images press M to share the imag...

Page 56: ...lbum repetition Disable Enable Language Select the language to be used Country or region of use Select the target country or region b tab Border settings Borderless Bordered Date printing settings Without date With date Printer selection Set the printer to be connected Background music settings Off On Background music Select background music Audio settings Movie audio Background music Movie audio ...

Page 57: ...time set on Connect Station Turn off Turn off Connect Station e tab LED brightness Bright Dark Control via HDMI On Off 59 Update firmware Select to update the firmware 59 Initialize settings Reset Connect Station to its initial settings 59 Delete all images on system Delete all images on Connect Station 60 Format system hard disk Delete all the settings and images on Connect Station 60 f tab Backu...

Page 58: ... the processing and cancel it An item for which x is displayed has an error Cancel the processed item and try again J c Tab Wi Fi settings Change the settings of the connection with the access point If you do not make the Wi Fi settings during the initial setting use this menu to make the settings Select the connection method from the following three options Find network WPS Push button connection...

Page 59: ...net Please note that you may still use this product even if you do not agree to the above And even after you agree you may choose to discontinue transmission of your information at any time by changing the setting of this product For details on how transmitted information is treated please refer to the CANON iMAGE GATEWAY Privacy Statement This is available when your CANON iMAGE GATEWAY account is...

Page 60: ...e of Connect Station When Connect Station is connected to the Internet if there is any firmware to be updated the update will be detected automatically and y will be displayed in Preferences and Update firmware When you press M the download and update of the firmware will start Initialize settings Delete the settings on Connect Station and restore the settings it had at the time of purchase When y...

Page 61: ...When the formatting is complete Connect Station will restart The standard time it takes for formatting is as follows Normal formatting Approx 1 minute Low level formatting Approx 10 hours When you perform Format system hard disk all the images imported to Connect Station will be deleted Even protected images will be deleted so make sure there is nothing you need to keep Back up the necessary recor...

Page 62: ...to an external hard disk that is connected for the first time a screen for initializing the external hard disk appears Backing Up and Restoring Data Notes on Backup Using new external hard disk is recommended for backup The backup formats the external hard disk replacing its content with the data of Connect Station Do not use an external hard disk storing any data you do not want to delete After t...

Page 63: ...u press M the formatting of the external hard disk will start The normal formatting cannot delete all the data on the external hard disk To delete the data completely press S to append z for Low level format then execute formatting The standard time it takes for formatting is as follows Normal formatting Approx 4 minutes Low level formatting Approx 11 hours and 30 minutes When using a hard disk wi...

Page 64: ...ew images are not imported remove the card or disconnect the camera camcorder connected to the USB terminal then restart Connect Station After Connect Station is started import images again In the case of the NFC function or Wi Fi function check that the function is set properly p 22 Check whether the file format of the image you want to import is compatible with Connect Station p 21 If the same i...

Page 65: ...ree short beeps and the power lamp blinks in red make sure the NFC function and Wi Fi function are correctly set on Connect Station the camera camcorder smartphone etc p 22 40 Make sure the smartphone or tablet is compatible with NFC function To find out whether the camera camcorder is compatible with Connect Station s NFC function contact the nearest Canon Service Center Make sure the power to th...

Page 66: ...ore data images that are not backed up are deleted The firmware is being updated p 59 The lamps stop blinking when the update is complete Do as instructed in the error message If you are unsure how to handle the problem write down the error message and contact the nearest Canon Service Center Under the Preferences e tab select Update firmware to update the firmware again p 59 If error message rema...

Page 67: ...4 MOV AVCHD Full HD HD and VGA SD recording quality Dimensions and Weight Dimensions W x H x D Approx 155 6 x 51 1 x 155 6 mm 6 13 x 2 01 x 6 13 in including projecting portions Weight Approx 570 g 20 11 oz body only excluding the card slot cover Operation Environment Working temperature range and humidity 0 C 35 C 32 F 95 F 20 85 RH no dew condensation allowed Power Consumption Power on standby p...

Page 68: ...rk Melville NY 11747 U S A Tel No 1 800 OK CANON 1 800 652 2666 CAN ICES 3 B NMB 3 B Countries and Regions Permitting wireless LAN NFC Use Use of wireless LAN NFC is restricted in some countries and regions and illegal use may be punishable under national or local regulations To avoid violating wireless LAN NFC regulations contact the nearest Canon Service Center Note that Canon cannot be held lia...

Page 69: ... the wireless LAN turn off Connect Station Security Precautions Because a wireless LAN uses radio waves to transmit signals security precautions more stringent than when using a LAN cable are required Keep the following points in mind when using a wireless LAN Only use networks you are authorized to use This product searches for wireless LAN networks in the vicinity and displays the results on the...

Page 70: ...ted with EEE Your cooperation in the correct disposal of this product will contribute to the effective usage of natural resources For more information about the recycling of this product please contact your local city office waste authority approved scheme or your household waste disposal service or visit www canon europe com weee or www canon europe com battery For CA USA only Included lithium ba...

Page 71: ...ng 24 Slot 10 Classify images 9Rating Comment 45 Computer 12 13 40 Connection diagram 12 Contacts 49 53 Copy all images 33 D Data restoring 9Restoring Date Time 18 56 Delete all images 33 E Encryption key 19 Erase 30 32 33 37 60 Error 17 28 65 External hard disk 12 13 61 Formatting 62 F Find network 19 57 Firmware 59 Flick 43 Format system hard disk 60 H HDMI 13 14 Cable 12 13 Device control HDMI ...

Page 72: ...Shooting information 37 Shooting month 31 Slide show 30 32 35 37 43 45 Smartphone 12 13 40 SSID 9Access point name Standby state 16 Status 45 T Tablet 12 13 40 Tap 43 Thumbnail 29 31 35 43 Transferring images 46 Transition effect 45 55 U Upload 44 45 USB 13 Cable 12 13 Terminal 10 25 V Viewing images by camera camcorder model used 31 W Web browser 40 Web service 12 46 54 Wi Fi lamp 10 22 27 Wired ...

Page 73: ...t any Canon Service Center Interface or functions of this product are subject to change for product improvement or firmware update In such a case sample screens or operation instructions in this manual may differ from the screens or operations on the actual product For the Instruction Manual reflecting the improvement or firmware update refer to Canon Web site ...

Page 74: ...CPA U137 001 CANON INC 2015 ...

Page 75: ...Y AND TO OTHERS AND THEIR PROf ERTY ARISING OUT OF USE OR MISUSE OF OR INABiliTY TO USE THE PRODUCT NOT CAUSED DIRECTLY BY THE NEGLIGENCE OF CANON U S A OR CANON CANADA SOME STATES AND PROVINCES DO NOT ALLOW THE EXCLUSION OR LIMITATION OF INCIDENTAL OR CONSEQUENTIAL DAMAGES SO THE ABOVE EXCLUSION OR LIMITATION MAY NOT APPLY TO YOU THIS liMITED WARRANTY SHALL NOT EXTEND TO ANYONE OTHER THAN THE ORI...

Page 76: ...autreauCanada Canon U S A Inc Canon Canada Inc C Canon U S_ A_ Inc 201 Canon est une marQue dE posBe et Connect Station est une marque de commerce de Canon Inc Tousles autres noms de marQues ou de produits sont des marques dliposees ou des marques de commerce de leurs propril laires respecllfs AUSTRALIA AND NEW ZEALAND WARRANTY CARD For Canon products distributed by Canon Australia Pty Ltd or Cano...

Reviews: