background image

55

Printing on Paper and Other Media

Using Transparencies

3

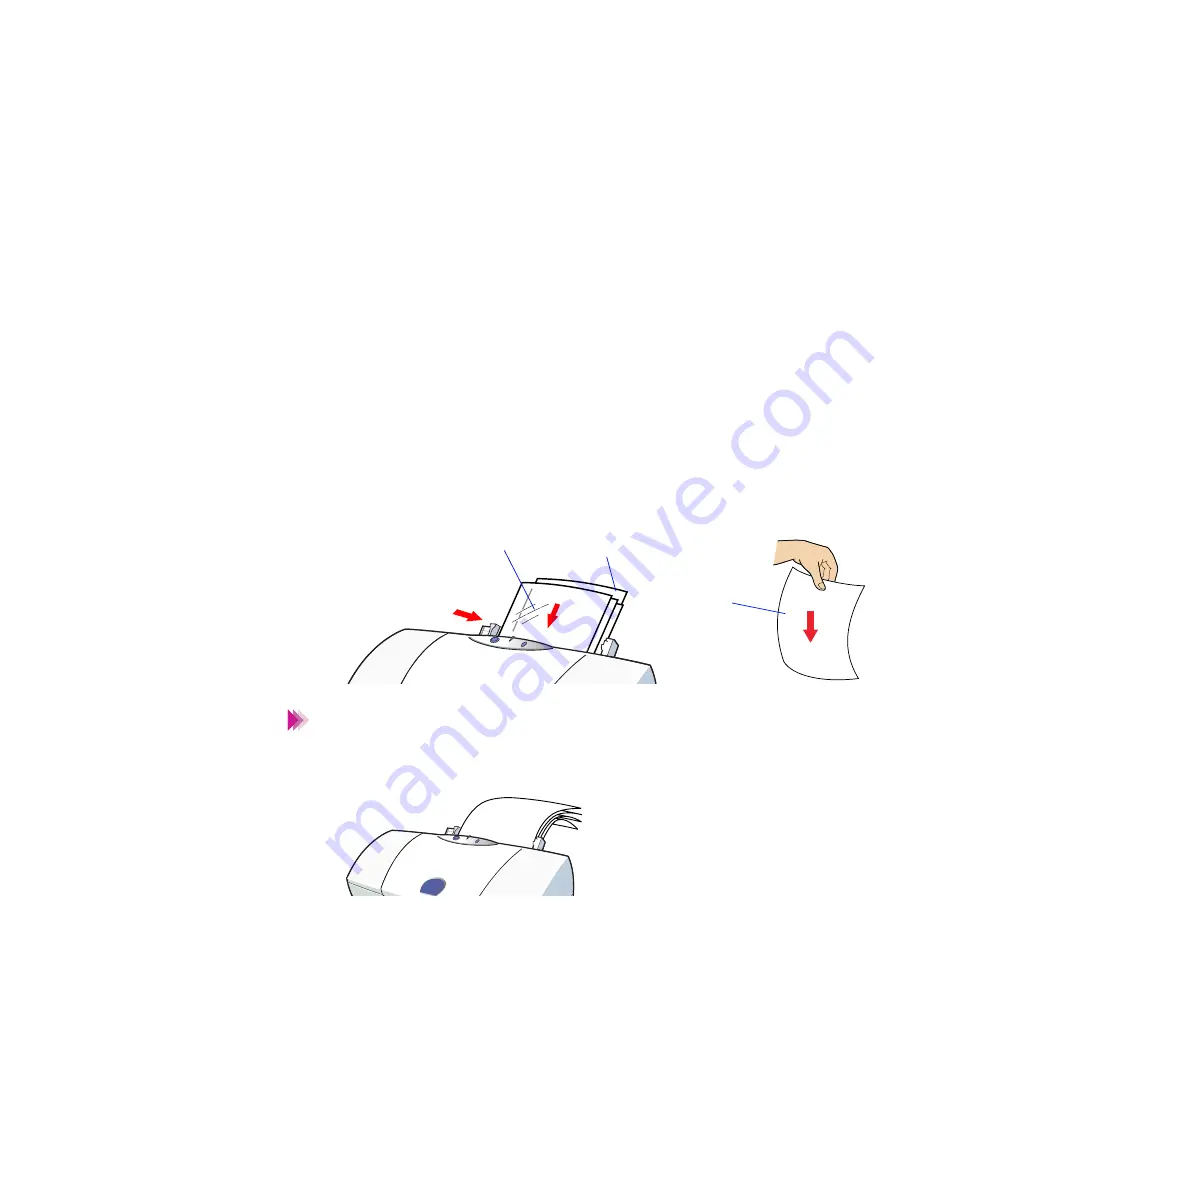
Load the transparencies as follows.

(a) With the print side facing up, place, one sheet of A4 or Letter size paper 

under the stack.  Load the stack with the edges aligned against the right 

side of the auto sheet feeder.

(b) Slide the paper guide to the left side of the stack until it is snug.  You 

can print on either side of transparencies, but using a slightly curled 

surface as a print side is recommended.

• You can load up to 30 transparencies in the auto sheet feeder.
• When the auto sheet feeder feeds two or more transparencies at a time, 

lower the paper rest as shown in the figure.

Print side

(a)

(b)

Plain paper

Print side

Note

Summary of Contents for BJC-3000 Series

Page 1: ......

Page 2: ...ecting and Switching On the Printer About the Printer Cable Notes on Handling the USB Interface Connecting the Power Cord Switching the Printer On Switching the Printer Off Printing on Paper and Other...

Page 3: ...Photo Cards Using Banner Paper Using T Shirt Transfers Using the BJ Cartridges BJ Cartridges You Can Use with the Printer Notes on Handling the BJ Cartridges Switching and Storing the BJ Cartridges Se...

Page 4: ...anning Holder About the Scanning Area Launching IS Scan Changing the Scanning Mode Saving the Image Using On line Help for IS Scan Software Routine Maintenance Prolonging the Service Life of the Print...

Page 5: ...Stops in Mid job Paper Jams or Does Not Feed The POWER Lamp Flashes Orange An Error Message Appears Scanner Problems Other Problems Avoiding Problems Before you Call for Help Specifications Index App...

Page 6: ...em you are using Always observe the instructions indicated by these symbols Indicates information for Windows 98 and Windows 95 users only Indicates information for iMac and Power Macintosh G3 users o...

Page 7: ...ge of the Reference Guide Returns to the page you were viewing previously Use this button when you wish to move back from another refer ence page Indicates a link to jump to a page about the topic sha...

Page 8: ...the desired item to jump to the topic Click the symbol when you wish to see detailed head ings for each chapter Click the symbol when you wish to return to the original display Runs a video clip abou...

Page 9: ...before print jobs When one ink tank runs out of ink just replace it without disturbing the other ink tanks Variety of Print Media Allows use of a wide variety of print media for many application prog...

Page 10: ...10 Parts and Functions of the Printer Parts and Functions of the Printer Front View Rear View Inside the Printer Operation Panel...

Page 11: ...Raise to support the paper especially a larger paper size Auto Sheet Feeder Holds sheets of paper or other media for printing The auto sheet feeder holds multiple sheets which are automatically fed i...

Page 12: ...erface cable to the printer Printer Cable Connector USB Interface Provides a connection point for connecting a USB interface cable to the printer Power Connector Provides a connection point for connec...

Page 13: ...Parts and Functions of the Printer Inside the Printer Cartridge Holder Set the BJ Cartridge colour photo black or scanner cartridge Cartridge Lock Lever Locks the BJ Cartridges onto the cartridge hold...

Page 14: ...ror press the RESUME button to resume printing POWER lamp Lights to indicate the status of the printer Off Printer power off On green Ready for operation Flashing green Standby status or print job in...

Page 15: ...you let the lamp flash If you release the button after the lamp flashes once Print head cleaning is performed If you release the button after the lamp flashes twice A nozzle check pattern is printed...

Page 16: ...ing and Switching On the Printer Connecting and Switching On the Printer About the Printer Cable Notes on Handling the USB Interface Connecting the Power Cord Switching the Printer On Switching the Pr...

Page 17: ...te Check the interface connector of your computer read a brief description about the interface below and follow the instructions in the Getting Started manual to set up the printer Recommended printer...

Page 18: ...scribed in the Getting Started manual If you fail to follow the correct order the printer driver may not be installed properly Do not connect or disconnect the USB interface cable in the following cir...

Page 19: ...ace use the external USB hub When you connect multiple printers using the USB interface use the external USB hub and then install the printer driver each time you connect the printer For more details...

Page 20: ...V 50Hz For pluggable equipment the power outlet should be near the printer and should be easily accessible Never move the printer with the power cord still plugged into the power outlet Do not connect...

Page 21: ...button to switch the printer on The POWER lamp flashes for one to two minutes while the printer warms up When the printer is ready to print the POWER lamp stops flashing and remains lit green If you d...

Page 22: ...lug out of the power outlet by pulling on the cord itself Never unplug the cord from the power outlet while the POWER lamp is lit or flashing If the printer is still switched on when you unplug it the...

Page 23: ...Loading Paper and Other Media Setting the Paper Thickness Lever Printing Area Notes on Handling Media Using Plain Paper or High Resolu tion Paper Using Envelopes Using Transparencies Using Back Print...

Page 24: ...Width x Height A5 vertical 148 0mm x 210 0mm A5 horizontal 210 0mm x 148 0mm B5 182 0mm x 257 0mm A4 210 0mm x 297 0mm Letter 8 5 x 11 0 215 9mm x 279 4mm Legal 8 5 x 14 0 215 9 x 355 6mm Envelope Eu...

Page 25: ...h the Printer You can also use custom paper sizes within the following ranges Width 100 0mm to 241 3mm 3 94 to 9 50 Height 100 0mm to 355 6mm 3 94 to 14 00 Media of the following weight can be loaded...

Page 26: ...ctions provided with special media for details about handling and printing Ordinary Paper Plain Paper Provides the standard print quality Standard photocopier paper can be used if its weight is within...

Page 27: ...Provides more vivid colours than plain paper Ideal for printing photographs or business documents that include large numbers of colour illustrations and graphs Using Plain Paper or High Resolution Pa...

Page 28: ...be used to prepare materials for use with an overhead projec tor To avoid paper jams and other problems never use transparencies intended for use with other Canon BJ printers e g CF 101 laser beam pri...

Page 29: ...ansfer TR 201 This is a media for creating iron on prints for T shirts You can make an original T shirt simply by printing your favourite photograph or illustration onto this media Please note that th...

Page 30: ...paper Excessively thin media weight less than 64g m2 Excessively thick or extremely heavy paper exceeding 105g m2 Continuous feed paper tractor feed Punched paper loose leaf folder inserts etc Reply p...

Page 31: ...end to load When the long edge of the paper is fed into auto sheet feeder this is called Landscape orientation When the short edge of the paper is fed into the auto sheet feeder this is called Portrai...

Page 32: ...ust be printed on the matte side Glossy photo paper Must be printed on the whiter glossy side High gloss photo film Must be loaded and printed with the glossy side facing up and the cutting edge align...

Page 33: ...than the Load Limit mark on the auto sheet feeder Media type Max capacity Plain paper Approximately 100 sheets 64 g m2 Envelope Approximately 10 pieces European DL or US Com 10 High Resolution Paper A...

Page 34: ...e to switch the Paper Thickness Lever between Up and Down as listed below Media type Position Plain paper Up Envelope Down High Resolution Paper Up Glossy Photo Paper Up High Gloss Photo Film Up Gloss...

Page 35: ...e entire area where the printer can technically print The following key is provided to show you how these areas are shown in the illustrations that follow Printing area dark blue Canon recommends that...

Page 36: ...ize mm A5 vertical 141 2mm x 202 0mm A5 horizontal 203 2mm x 140 0mm B5 175 2mm x 249 0mm A4 203 2mm x 289 0mm Printing in this area can adversely affect the print quality or the paper feed precision...

Page 37: ...a width x height Size mm Letter 203 2mm x 271 4mm Legal 203 2mm x 347 6mm Printing in this area can adversely affect the print quality or the paper feed precision 32 0mm 26 0mm 6 4mm 6 3mm 5 0mm 3 0mm...

Page 38: ...and Other Media Printing Area Glossy Photo Cards Printable Area width x height Size mm Glossy Photo Cards 109 4mm x 159 9mm 4 1mm Recommended printing area The printable area is identical to each othe...

Page 39: ...aper and Other Media Printing Area European DL Envelope Printable Area width x height Size mm European DL 220mm x110mm 6 4mm 10 4mm 7 0mm 3 0mm Recommended printing area The printable area is identica...

Page 40: ...n Paper and Other Media Printing Area US Com 10 Envelope Printable Area width x height Size in US Com 10 9 5 x 4 1 8 6 4mm 31 7mm 7 0mm 3 0mm Recommended printing area The printable area is identical...

Page 41: ...ight Size mm Banner Paper 203 2mm x 1779 0mm A4 203 2mm x 1673 4mm Letter Printing in this area can adversely affect the print quality or the paper feed precision 3 4mm 3 4mm 3 0mm 32 0mm Recommended...

Page 42: ...tures or humidity To avoid bending or wrinkling the paper store it in a level place After printing do not touch the print side until the ink gets dry If water gets on the printed media do not touch th...

Page 43: ...ness lever is set to the Up position Raise the paper rest as shown in the figure When you are using plain paper for printing the print side of the paper may be scratched and stained if the paper is th...

Page 44: ...c cling and align the edges of the stack by tap ping them on a flat surface Loading the paper without first fanning and aligning the edges could cause paper jams To avoid touching the print surface al...

Page 45: ...Plain paper You can print on either side of paper High Resolution Paper Load the paper with the whiter side facing up b Slide the paper guide to the left side of the stack until it is snug Make sure...

Page 46: ...Paper when print ing on High Resolution Paper in the Media Type box Also make sure that the BJ Cartridge Type setting matches the BJ Car tridge you are using Change the settings if necessary 4 Select...

Page 47: ...e printer remove each sheet immediately to prevent curled sheets from blocking other sheets ejected from the printer Store unused paper and other media flat in the original package in a dry cool locat...

Page 48: ...r thickness lever is set to the Down position Switching the Printer On To avoid poor print results do not attempt to print on envelopes with embossed or treated surfaces To avoid misfeeds and jams do...

Page 49: ...r b If the envelopes are still warped hold the edges of the envelopes diag onally and bend gently Make sure that the flaps are straight c To ensure that the envelopes feed correctly use a pen or simil...

Page 50: ...ge of the address side flap sides down into the auto sheet feeder and align the stack with the right side of the auto sheet feeder b Slide the paper guide to the left side of the stack until it is sun...

Page 51: ...der the Main tab Select Enve lope in the Media Type box Also make sure that the BJ Cartridge Type setting matches the BJ Cartridge you are using Change the settings if necessary 4 Select the most appr...

Page 52: ...ope size with the application program How ever if the setting on the Page Layout tab does not match the setting in the application program change the setting here 5 Select DL Env 220 0 x 110mm or 10 E...

Page 53: ...ing Transparencies 1 Make sure that the printer is switched on and the paper thickness lever is set to the Up position Raise the paper rest as shown in the figure Switching the Printer On Paper output...

Page 54: ...neatly Fanning and aligning the sheets prevents misfeeds and paper jams To avoid touching the print surface always handle the sheets by the edges Unclean or scratched print surfaces can adversely affe...

Page 55: ...ght side of the auto sheet feeder b Slide the paper guide to the left side of the stack until it is snug You can print on either side of transparencies but using a slightly curled surface as a print s...

Page 56: ...fy the media type Transparency and the BJ Cartridge you are using 5 Start the print job 6 Remove each printed transparency as it is ejected from the printer Do not touch the printed side until the ink...

Page 57: ...ing Back Print Film 1 Make sure that the printer is switched on and the paper thickness lever is set to the Up position Raise the paper rest as shown in the figure Switching the Printer On Paper outpu...

Page 58: ...d aligning the sheets prevents misfeeds and paper jams If the film is curled bend it slightly in the opposite direction of the curl to straighten it The matte side of the film is the print side which...

Page 59: ...lide the paper guide to the left side of the stack until it is snug You can load up to 10 sheets of films in the auto sheet feeder 4 Open the Printer Properties dialogue box then select the most appro...

Page 60: ...until the ink is completely dry About 15 min utes is required for drying An image is reversed when printed on back print film in order to display correctly when lit with a backlight After drying cover...

Page 61: ...g Glossy Photo Paper 1 Make sure that the printer is switched on and the paper thickness lever is set to the Up position Raise the paper rest as shown in the figure Switching the Printer On Paper thic...

Page 62: ...t surface to align them neatly Fanning and aligning the sheets prevents misfeeds and paper jams If the film is curled bend it slightly in the opposite direction of the curl to straighten it To avoid t...

Page 63: ...e under the stack Load the stack with the edges aligned against the right side of the auto sheet feeder For details refer to the instructions provided with the package b Slide the paper guide to the l...

Page 64: ...settings if necessary 4 Select the most appropriate icon that indicates the print mode in the Printer Properties dialogue box Specify the media type Glossy Photo Paper and the BJ Cartridge you are us...

Page 65: ...dge for printing the high gloss photo film Use the Color BJ Cartridge 1 Make sure that the printer is switched on and the paper thickness lever is set to the Up position Raise the paper rest as shown...

Page 66: ...the right side of the auto sheet feeder and insert the sheet into the auto sheet feeder b Slide the paper guide to the left side of the sheet until it is snug If the sheet is curled bend it slightly...

Page 67: ...es the print mode in the Printer Properties dialogue box Specify the media type High Gloss Photo Film and the BJ Cartridge you are using 4 Start the print job 5 Remove each printed sheet as it is ejec...

Page 68: ...g Glossy Photo Cards 1 Make sure that the printer is switched on and the paper thickness lever is set to the Up position Raise the paper rest as shown in the figure Switching the Printer On Paper thic...

Page 69: ...he edges aligned against the right side of the auto sheet feeder For details refer to the instructions provided with the Glossy Photo Cards package b Slide the paper guide to the left side of the stac...

Page 70: ...Select the most appropriate icon that indicates the print mode in the Printer Properties dialogue box Specify the media type Glossy Photo Cards and the BJ Cartridge you are using 4 Click the Page Layo...

Page 71: ...printed side until the ink is completely dry About 2 min utes is required for drying 7 Tear away the strip of the glossy photo card For more details see the instructions provided with the Glossy Phot...

Page 72: ...the Printer On 2 Before you tear off the sheets make sure that you take one more sheet than you need for printing When you wish to print three sheets tear off a length of four sheets one more than yo...

Page 73: ...t side of the auto sheet feeder and insert it into the auto sheet feeder until it stops b Slide the paper guide to the right until it is snug against the side of the sheet You can print on either side...

Page 74: ...74 Printing on Paper and Other Media Using Banner Paper 4 Gently fold over the perforations between the first and second sheet...

Page 75: ...e space in front of the printer so each sheet is sup ported as it comes out of the printer and then allowed to hang over the edge of the table as shown in the figure A dense print will require more ti...

Page 76: ...in the Layout box When a con firmation message appears click the OK button If you need detailed infor mation on banner printing click the Help button 6 Check the radio button for Banner Printing in th...

Page 77: ...rtridge Type setting matches the BJ Cartridge you are using Change the settings if necessary 7 Select the most appropriate icon that indicates the print mode in the Printer Properties dialogue box Spe...

Page 78: ...transfer sheet as follows a Remove one transfer sheet from the package and hold it with the green lines down and the print side up Align the right side of the transfer sheet with the right side of th...

Page 79: ...the Main tab Select T Shirt Transfer in the Media Type box Also make sure that the BJ Cartridge Type setting matches the BJ Cartridge you are using Change the settings if necessary 3 Select the most a...

Page 80: ...80 Using the BJ Cartridges Using the BJ Cartridges BJ Cartridges You Can Use with the Printer Notes on Handling the BJ Cartridges Switching and Storing the BJ Cartridges...

Page 81: ...s of BJ Cartridge and their use Three types of BJ Cartridge Color BJ Cartridge Photo BJ Cartridge and Black BJ Cartridge can be used with this printer Use whichever cartridge is appropriate for the wo...

Page 82: ...phics The Color BJ Cartridge BC 33 is composed of the print head and four replaceable ink tanks When a colour runs out only that colour s ink tank needs to be replaced Black Ink Tank BCI 3BK Cyan Ink...

Page 83: ...rtridge BC 34 Photo is composed of the print head and four replaceable ink tanks When a colour runs out only that colour s ink tank needs to be replaced Photo Black Ink Tank BCI 3PBK Photo Photo Cyan...

Page 84: ...ink but produces extremely sharp water resistant text and graphics This is intended for printing monochrome documents The Black BJ Cartridge BC 30 is composed of the print head and one replaceable in...

Page 85: ...sure that you specify the Color BJ Cartridge BC 34 Photo Other Photo BJ Cartridge cannot be used with the BJC 3000 printer When you handle the BJ Cartridges To avoid personal injury or damage to the p...

Page 86: ...J Cartridge can no longer be used Also after removing the seal on the ink tank always insert it into a BJ Cartridge to prevent the ink tank from drying out Always store the BJ Cartridges and ink tanks...

Page 87: ...ocation and method of disposing of them Do not leave an empty ink tank in a BJ Cartridge Remove it immediately after ink runs out If a used ink tank which is still usable must be removed for some reas...

Page 88: ...nk tank in a BJ Cartridge Remove it immediately after ink runs out If a used ink tank which is still usable must be removed for some reason keep the ink tank installed in the BJ Cartridge Otherwise th...

Page 89: ...artridges Switching and Storing the BJ Cartridges When you replace an ink tank note the name and number and replace it only with an identical ink tank If the print head is worn out replace the entire...

Page 90: ...the Printer Driver Printer Driver Basics Preparing and Executing a Print job Selecting the Print Mode Selecting the BJ Cartridge Selecting the Media Type and Paper Size About Detailed Print Settings...

Page 91: ...eated with an application program and then sends the converted data to the printer The printer driver works on processing the data so the printer can use it After you connect the printer to your compu...

Page 92: ...command used for printing e g Print or Print Setup in the File menu in the application program 3 Click the Properties button to open the Printer Properties dialogue box then select the desired icon i...

Page 93: ...Printing begins 1 Set the paper size you use from within the application program before print ing 2 Select the command used for printing e g Print in the File menu in the application program 3 Select...

Page 94: ...ropriate print settings are pre registered in each icon for a particular type of print job and the BJ Cartridge and Media Type settings are selected automatically Standard For printing documents that...

Page 95: ...idge Colour Media Type Plain Paper Photo Produces high print quality for printing photographs and other graphics with fine gradations of tone BJ Cartridge Colour Media Type High Resolution Paper Super...

Page 96: ...print media you use for printing Text For printing documents that consist mostly of text e g word processor files at the standard print quality Graphic Produces high print quality for printing graphs...

Page 97: ...J Cartridge setting is correct Change the setting as needed There are three different ways to set the BJ Cartridges Black Used when the Black BJ Cartridge is installed in the car tridge holder Colour...

Page 98: ...he BJ Cartridge Printer Properties dialogue box Main tab for Windows When Grayscale Print is enabled a colour document can be printed in monochrome When Black is selected for BJ Cartridge Grayscale Pr...

Page 99: ...application program and make sure that the paper size setting in the Page Layout tab matches the paper size setting in the application program before printing When you create a document using the appl...

Page 100: ...ng the Printer Driver Selecting the Media Type and Paper Size Media Type Make sure that the Media Type setting matches the print media you use for printing Printer Properties dialogue box Main tab for...

Page 101: ...adjustment scaled printing stamp background and even special effects For details on the print settings of the printer driver refer to the following instructions depending on the system you are using D...

Page 102: ...he button on the upper right corner of the Printer Prop erties dialogue box the shape of the mouse pointer changes to 2 Click the desired item to learn more about the item A detailed explanation appea...

Page 103: ...Using On line Help for Printer Driver 1 Select Balloon Help from the Help menu 2 Move the mouse pointer to the item to learn more about the item 3 To close the Help instructions select Hide Balloon He...

Page 104: ...104 Printing Photographs Printing Photographs Tips for Printing Photographic Images I Tips for Printing Photographic Images II About Photo Optimizer...

Page 105: ...for printing photographic images from a digital camera or scanner or photographic images downloaded from a home page on the Internet take care over the following three points Use the Photo BJ Cartrid...

Page 106: ...media in the auto sheet feeder of the printer Excellent prints of photographs can be obtained with plain paper but for superior colour reproduction use of one of the following special media is recomm...

Page 107: ...the Photo BJ Cartridge 4 Click the OK button to close the Printer Properties dialogue box 5 Start the print job 3 Select the command used for printing e g Print from the File menu to open the Printer...

Page 108: ...then click the Main tab 2 Click the Advanced button 3 Select Photo Optimizer in the Quality tab 4 Check the Whole Page checkbox if necessary Enabled When the Whole Page setting is enabled the Photo O...

Page 109: ...t Photo Optimizer 1 Select Photo Optimiser in the Quality panel The Photo Optimiser feature works on the image that is edited using the edit menu such as Cut and Rotate in a graphics application progr...

Page 110: ...Scanner Driver Basics Installing the Scanner Cartridge Using the White Calibration Sheet Using the Scanning Holder About the Scanning Area Launching IS Scan Changing the Scanning Mode Saving the Image...

Page 111: ...s Installing the Color Image Scanner Cartridge IS 32 in the printer makes it possible to scan and save images such as your favourite photographs and greeting cards Photograph As a wall paper for your...

Page 112: ...djustments to improve the quality of the original image or enhance the image for artistic effect If you are using a TWAIN compliant graphics application program you need the IS Scan scanner driver You...

Page 113: ...ing the Scanner Scanner Driver Basics TWAIN is the name of the group that defined the standards for passing data from digital devices like scanners to software applications running on 32 bit platforms...

Page 114: ...d of precision components Do not touch the electrical contacts and optical components such as lenses to avoid poor scanning results poor contact and static electricity Keep the scanner cartridge in it...

Page 115: ...with the ink tanks in place To avoid staining your hands clothing or areas in the work site handle the BJ Cartridge carefully Avoid dropping or shaking the BJ Cartridge If you are removing a partially...

Page 116: ...il it locks in place 5 Make sure that the paper thickness lever is set to the Up position and close the front cover Before closing the front cover of the printer make sure that the paper thick ness le...

Page 117: ...er purchase or when the system needs to update the white level calibration data Place the white calibration sheet in the scanning holder and then load it in the auto sheet feeder of the printer as sho...

Page 118: ...s tom Settings dialogue box When using IS Scan directly as a stand alone application program Select Settings from the Main menu screen then select White Level in the dialogue box When using IS Scan fr...

Page 119: ...ergent solution and then wipe its wet surface off with a dry soft cloth White level calibration is required in the following circumstances When you use the scanner cartridge for the first time after p...

Page 120: ...oint It is in dicated in the next page To prevent paper jam always insert the image you wish to scan or the white calibration sheet into the scanning holder and then start scanning Do not spread out t...

Page 121: ...rrectly as shown in the figure The defining point is set 3 4mm away from the left margin and 6mm away from the top margin Scanning results may be blurred or distorted within the area of 32mm away from...

Page 122: ...nning holders for other paper sizes may be optionally available depending on the country of purchase The maximum thickness of the image must be within 0 45mm including the scanning holder The scanning...

Page 123: ...IS Scan directly as a stand alone application program for Macintosh refer to the User s Guide 1 Start up the TWAIN compatible graphics application program If multiple TWAIN compatible device drivers...

Page 124: ...mmand is selected from the File menu Please note that the dialogue box to select the device driver varies according to the graphics application program you use Select Canon IS Scan2 then click the but...

Page 125: ...er Launching IS Scan 3 Launch IS Scan from within the graphics application program An image which is being scanned is displayed in the preview area and the Scan button changes to the Transfer button W...

Page 126: ...6 Using the Scanner Launching IS Scan An image which is being scanned is displayed in the preview area For more details on the operation procedures refer to the on line Help Macintosh Note Preview are...

Page 127: ...r button IS Scan is closed automatically and then the scanned image is displayed in the TWAIN compatible graphics application program For more details on how to adjust and enhance the image refer to t...

Page 128: ...ou to adjust all the scanning settings for special scan ning jobs For more details refer to the on line Help for IS Scan Plus Note Select the desired button under Scanning Mode The optimum settings ar...

Page 129: ...ls refer to the on line Help for IS Scan Windows Note Select the paper size in the Paper Size box Select the desired button under Scanning Mode The optimum set tings are pre registered based on the co...

Page 130: ...n you select User Setting in the Scanning mode you can adjust all the scanning settings for special scanning jobs For more details refer to the on line Help for IS Scan Macintosh Select the paper size...

Page 131: ...n the Save As dialogue box is displayed enter a file name drive or folder name and file format type 3 Click the Save button in the Save As dialogue box When using IS Scan directly as a stand alone app...

Page 132: ...ication program 2 Click the Scan button After scanning is completed the Scan button changes to the Transfer button 3 Click the Transfer button The scanned image is displayed in the TWAIN compatible gr...

Page 133: ...1 Click the Help button on the screen 2 Click the desired item to learn more about the item A detailed explanation appears Click the Contents tab when you wish to search for a particular topic Click t...

Page 134: ...n the Custom Settings dialogue box When using IS Scan from within a TWAIN compatible graphics application program Click the button in the Main dialogue box Select Contents or Index from the menu Click...

Page 135: ...e Printer BJ Cartridge Maintenance When to Replace the BJ Cartridge Printing a Nozzle Check Pattern Cleaning the Print Head Replacing the Ink Tanks Replacing the BJ Cartridge Aligning the Print Head C...

Page 136: ...when required Before you move the printer to a new loca tion pack it in its original box and packing material to prevent damage during shipping Guidelines for replacement of consumable items BJ Cartr...

Page 137: ...ire replacement after the print heads wear out The following topics regarding BJ Car tridge maintenance describe how to check the status of the BJ Cartridges and take the appropriate actions to correc...

Page 138: ...nk is low or has run out replace it Replacing the Ink Tanks If an ink tank runs out of ink the POWER lamp may flash orange four times and the BJ Status Monitor for Windows starts up to display a messa...

Page 139: ...ng the Print Head Deep Print Head Cleaning Replacing the BJ Cartridge Aligning the Print Head Nozzle check pattern poor quality Nozzle check pattern poor quality Nozzle check pattern poor quality Prin...

Page 140: ...ozzle check pattern when your printouts are streaked or the colour tones are not correct or after print head cleaning was performed 1 Open the Printer Properties dialogue box 2 Click the Maintenance t...

Page 141: ...with the RESUME button on the printer To print the nozzle check pattern with the button press and hold down the RESUME button until the POWER lamp flashes twice and release it 4 When a confirmation me...

Page 142: ...rint head cleaning is required Cleaning the Print Head If patterns 2 are not overlapped perfectly print head alignment is required Aligning the Print Head Each pattern indicates the status of the nozz...

Page 143: ...wo ways to clean the print head nor mal print head cleaning and deep print head cleaning Always execute normal print head cleaning first If this does not correct the problem then execute deep print he...

Page 144: ...normal print head cleaning icon in the Print Head Cleaning box 1 Select Page Setup from the File menu 2 Click the Utilities button 3 Select the Print head cleaning icon You can also start print head...

Page 145: ...t the printer is switched on and then click the OK button Print head cleaning begins It takes about 40 seconds until print head cleaning is completed and the POWER lamp stops flashing 5 Print a nozzle...

Page 146: ...d cleaning does not correct the problem perform deep print head cleaning 1 Open the Printer Properties dialogue box 2 Click the Maintenance tab 3 Click the deep print head cleaning icon in the Print H...

Page 147: ...leted and the POWER lamp stops flashing 5 Print a nozzle check pattern to confirm the success of deep print head cleaning Printing a Nozzle Check Pattern If the cleaning had no effect perform normal p...

Page 148: ...tanks for each BJ Cartridge For Color BJ Cartridge BC 33 Ink Tank BCI 3BK Ink Tank BCI 3C Ink Tank BCI 3M Ink Tank BCI 3Y Color BJ Cartridge BC 33 For Color BJ Cartridge BC 34 Photo Ink Tank BCI 3PBK...

Page 149: ...ou need to replace more than one ink tank do not remove the ink tanks together Remove and replace each ink tank one by one to ensure that each new ink tank is inserted in the correct slot If you inser...

Page 150: ...not remove the BJ Cartridge Leave the BJ Cartridge installed in the printer and remove only the ink tank s Discard empty ink tanks according to the local laws and regulations regard ing disposal of c...

Page 151: ...the perforations to open the packing film Remove the film carefully so you do not remove the label from the ink tank The label is needed to match the ink tank with the correct slot of the BJ Cartridg...

Page 152: ...wist off the orange protective cap in the direction of the arrow Never attempt to reattach a protective cap to an ink tank Discard the protective cap according to the local laws and regulations regard...

Page 153: ...ink tank until it locks in place Make sure that you insert the ink tank in the correct slot of the cartridge holder The correct array of ink tanks in the BJ Cartridges is shown below Note BJC 3BK BJC...

Page 154: ...wn until the ink tank locks in place with a click 7 Close the front cover The cartridge holder returns to the home position and print head cleaning begins automatically The POWER lamp flashes during p...

Page 155: ...rint head is worn out and you must replace the BJ Cartridge Canon recommends that you use the following BJ Cartridges for with the BJC 3000 printer Black BJ Cartridge BC 30 Color BJ Cartridge BC 33 Co...

Page 156: ...tridge lock lever to unlock the BJ Cartridge Make sure that you raise the lever all the way up To avoid staining your hands clothing or areas in the work site handle the BJ Cartridge carefully Avoid d...

Page 157: ...ace If you are removing a partially used BJ Cartridge store it in the BJ Cartridge container Switching and Storing the BJ Cartridges Always hold the BJ Cartridge by the circles embossed on the left an...

Page 158: ...slowly remove the orange protective tape Never attempt to reattach the tape or cap to the BJ Cartridge Discard the protective cap and tape according to the local laws and regulations regarding dispos...

Page 159: ...ng the BJ Cartridge 5 Insert the BJ Cartridge into the cartridge holder then lower the cartridge lock lever until it locks in place When you install the Black BJ Cartridge insert it into the right sid...

Page 160: ...160 Routine Maintenance Replacing the BJ Cartridge 6 Press in the tab of the plastic insert and remove them Fix tab...

Page 161: ...nk tank immediately after removing it from the worn BJ Cartridge or its package If an ink tank remains exposed for a long period it may run out of ink quickly after it is installed 8 Close the front c...

Page 162: ...head to ensure optimum results in printing 1 Open the Printer Properties dialogue box 2 Click the Maintenance tab 3 Click the print head alignment icon in the Test Prints box 1 Select Page Setup from...

Page 163: ...paper is loaded and then click the OK button The printer starts to print the standard head align ment pattern During print head alignment do not open the front cover 5 When the pattern is printed cli...

Page 164: ...rs Click the OK button to save the settings Save the settings 8 Make sure that the printer is switched on and one sheet of A4 or Letter size plain paper is loaded and then click the OK button The prin...

Page 165: ...all the patterns in lines of B1 and B2 For each line enter the appropriate number where you see the lines per fectly aligned 10 When you finish entering numbers Click the OK button to save the setting...

Page 166: ...etes the print head alignment procedure When you wish to switch the printer off after head alignment always press the POWER button to switch the printer off If you do not switch the printer off correc...

Page 167: ...such as thinner benzene or alcohol 1 Press the POWER button to switch the printer off Check the POWER lamp and make sure that it is not on or blinking To prevent failure of the printer to operate neve...

Page 168: ...168 Routine Maintenance Cleaning the Printer 3 Remove the paper output tray and wipe the paper outlet with a soft cloth...

Page 169: ...the paper feed rollers and may cause misfeeds and paper jams If this occurs use a special cleaning plate to clean the paper feed rollers inside the printer When you clean the paper feed rollers Canon...

Page 170: ...170 Routine Maintenance Cleaning the Paper Feed Rollers 3 Set the paper guide to the A4 position 4 Slide the cleaning sheet into the auto sheet feeder until its tip stops...

Page 171: ...lers of the printer start rotat ing and then stops Wait for approximately 15 to 30 seconds 6 The cleaning sheet feeds into the auto sheet feeder and paper dust will cling to the cleaning sheet as it r...

Page 172: ...side Switching the Printer On 2 Raise the cartridge lock lever to unlock the BJ Cartridge 3 Remove the entire BJ Cartridge with the ink tanks in place Always hold the BJ Cartridge by the circles embo...

Page 173: ...n while leaving the front cover open The POWER lamp turns off and the cartridge holder remains in the same posi tion and then unplug the power cord from the power outlet 6 Fix the cartridge holder wit...

Page 174: ...the paper output tray Check the POWER lamp and make sure that the printer is off To prevent failure of the printer to operate never remove the power plug from the power outlet when the POWER lamp is o...

Page 175: ...175 Routine Maintenance Transporting the Printer 10 Disconnect the printer cable from your computer and printer and discon nect the power cord from the printer When using a parallel printer cable...

Page 176: ...he Printer 11 Reattach the tape and packing material to the printer and insert the printer into its plastic bag As shown in the figure attach the tapes to the printer where you see the dark rectangles...

Page 177: ...sporting the Printer 12 Fit the packing material on either end of the printer and pack the printer into the original box If you are shipping the printer through a shipping agent mark the box with FRAG...

Page 178: ...ion of the printer refer to the following topics Printout is Unsatisfactory Printer Does Not Start or Stops in Mid job Paper Jams or Does Not Feed The POWER Lamp Flashes Orange An Error Message Appear...

Page 179: ...cut off at bottom right corner right edge or bottom edge Text or image reversed mirrored Enlarged reduced printing not correct Single file page prints over two or more pages Colours streaked or wrong...

Page 180: ...actory Colour document printed in monochrome A document created in colour is printed in monochrome Check 1 Grayscale Print selected Check 2 Monochrome printing selected in application program Check 3...

Page 181: ...Disable Print Grayscale on the left bottom corner of the Print dialogue box Check 2 Monochrome printing selected in application program Some application programs have a setting in its print dialogue...

Page 182: ...is selected all the documents are printed in monochrome Start the print job again and check that Canon BJC 3000 is displayed in the Name entry box of the Print dialogue box If the name of another prin...

Page 183: ...The colours in printed photographs and illustrations are not as clear as you expected Check 1 BJ Cartridge and media correct for the print job Check 2 Printer driver settings correct for media and pr...

Page 184: ...ilm is recommended These media provide better colour reproduction and brighter colours than plain paper For best results use the Color BJ Cartridge BC 34 Photo For printing colour graphs charts with t...

Page 185: ...ridges Setting the Printer Driver Printing Photographs You may also want to click the Advanced button in the Main tab Click the Colour tab check that Colour Adjustment is enabled and then adjust the c...

Page 186: ...n are printed dark green A colour display and printer do not reproduce colour in the same way The printed colour tones may not perfectly match the colours you see on the screen because screen colour v...

Page 187: ...colours and printed colours one of the ink tanks may have run out of ink or some of the print head nozzles may be clogged Print a nozzle check pattern and check the results Printing a Nozzle Check Pat...

Page 188: ...d media currently set in the printer Printing on Paper and Other Media Using the BJ Cartridges Setting the Printer Driver Printing Photographs If Monochrome Effects is selected for Special Effects the...

Page 189: ...on the screen but meaningless text and symbols are printed Check 1 Did you cancel a print job before it is completed Check 2 Are you using the correct printer driver Check 3 Are the printer and compu...

Page 190: ...e or more print jobs queued for printing and select Purge Print Doc uments from the Printer menu For details see your Windows documentation or on line Help Check 2 Are you using the correct printer dr...

Page 191: ...puter to the ECP mode the printer may not perform a print job properly Cancel the ECP mode and print again If the problem is not solved contact a hardware manufacturer Check 5 Is the problem in the or...

Page 192: ...isfactory Printed text rotated 90 degrees The document text orientation is not correct and it is printed rotated 90 degrees Check 1 Is the Orientation setting correct Check 2 Is Landscape orientation...

Page 193: ...he correct printing direc tion Check the radio button for Orientation in the Page Layout tab Select Page Setup from the File menu and check Orientation Check 2 Is Landscape orientation specified in th...

Page 194: ...ng Printout is Unsatisfactory Printing in top left corner Check 1 Is the page in the printer larger than the page size specified in the printer driver Check 2 Is Scaled Printing set for reduction in t...

Page 195: ...the correct paper size from the pull down list Check 2 Is Scaled Printing set for reduction in the printer driver If Scaled Printing is set for reduction in the printer driver the document is reduced...

Page 196: ...om edge The text is printing in the bottom right corner of the page or printing beyond the right or bot tom margins and cut off from view Check 1 Is the paper in the printer smaller than the Page Size...

Page 197: ...r or click the down arrow and select the correct paper size from the pull down list Check 2 Is Scaled Printing set for enlargement in the printer driver If Scaled Printing is set for enlargement in th...

Page 198: ...red Check Is Back Print Film or T Shirt Transfer selected for Media Type Open the Printer Properties dialogue box and check the Media Type setting in the Mian tab If the setting is not correct click t...

Page 199: ...not correct A print job set up for Scaled Printing in the printer driver is not executing correctly Check 1 Does the size of the paper in the printer match the Page Size setting in the printer driver...

Page 200: ...first set the Page Size in the Page Layout tab to the size specified in the application program Next set the Printer Page Size to the size of the paper in the printer Check 2 Are you using the correct...

Page 201: ...isfactory Single file page prints over two or more pages Check 1 Does the Page Size setting in the application program and printer driver match Check 2 Is the size of the top margin specified in the a...

Page 202: ...click the Page Layout tab and select the Page Size that matches the Page Size setting in the application program Check 2 Is the size of the top margin specified in the application program too large In...

Page 203: ...treaked or wrong The text appears scratched streaked or the wrong colours are printed Check 1 Is the ink of BJ Cartridge in good condition Check 2 Have the protective tape or cap been reattached Check...

Page 204: ...moved the orange protective cap and tape should never be re attached to the BJ Cartridge Re attaching the tape or cap can cause air bubble or trap dirt or dust into the ink and clog the ink nozzles If...

Page 205: ...isfactory Straight lines are broken Check 1 Have the print head been aligned Check 2 Are the BJ Cartridges installed correctly Check 3 Is Print Quality set to Fast in the printer driver Check 4 Is the...

Page 206: ...a print head you must align the print head If you do not align the print head straight lines may appear broken or uneven Aligning the Print Head Check 2 Are the BJ Cartridges installed correctly Remov...

Page 207: ...the Advanced button in the Main tab 3 In the Quality tab drag the slide bar to right to select Fine 1 When using Manual for printing click the Details button in the Printer Properties dialogue box 2...

Page 208: ...g Printout is Unsatisfactory Printed pages curled As printed pages are ejected from the printer they are curled or wavy Check 1 Are you printing on thin paper Check 2 Is the printer driver set for hig...

Page 209: ...ions can cause printed pages to curl or warp For such a case you should use special media such as High Resolution Paper or Glossy Photo Paper When you use High Resolution Paper Glossy Photo Paper or o...

Page 210: ...e Printer Properties dialogue box and click the Advanced button in the Main tab 2 Click the Colour tab 3 Use the Intensity slide bar to change the Intensity setting 1 When using Manual for printing cl...

Page 211: ...of pages stained with ink The backs of pages are stained after they are printed and ejected from the printer Check 1 Is the paper output slot dirty Check 2 Is a page ejected before the previous page...

Page 212: ...age from the paper output tray as it is ejected from the printer This pre vents the next page from stacking on top of a printed page before it is dry You can also use the print pause feature to increa...

Page 213: ...r setting screen 1 Open the Priter Properties dialogue box and click the Advanced button in the Main tab 2 Click the Colour tab 3 Use the Black slide bar to change the print density setting If this do...

Page 214: ...print job images are not sharp and the ink has spread and run together Check 1 Are you printing a photograph or illustration that requires a large amount of ink Check 2 Are you using plain paper Check...

Page 215: ...are adjacent to coloured areas 1 Open the Printer Properties dialogue box 2 Click the Advanced button in the Main tab 3 In the Quality tab drag the slide bar to the right toward the Fine setting 1 Whe...

Page 216: ...head nozzles can cause ink spread and blurring so clean the print head 1 Open the Printer Properties dialogue box 2 Click the normal print head cleaning icon in the Print Head Cleaning box in the Mai...

Page 217: ...endency for ink to spread in colour photographs or illustrations To lower Intensity follow the procedure below 1 Open the Printer Properties dialogue box and click the Advanced button in the Main tab...

Page 218: ...paper is scratched and stained Check 1 Are you printing on thick paper Check 2 Is the paper thickness lever set correctly Check 3 Are you printing on curled plain paper Check 4 Are you executing a hi...

Page 219: ...s lever set correctly When you use thick paper such as envelopes T shirt transfers and banner paper for printing set the paper thickness lever to the Down position If the printed surface is scratched...

Page 220: ...nter Properties dialogue box and click the Advanced button in the Main tab 2 Click the Colour tab 3 Use the Intensity slide bar to change the print density setting Check 5 Are you printing outside the...

Page 221: ...print head could be clogged may not be aligned properly or the BJ Cartridge may be worn out If the nozzle check pattern prints normally there may be a problem in the application program For details re...

Page 222: ...nsatisfactory Colours streaked or uneven Patterns of uneven or streaked colouring appear on the printout Check 1 Is Print Quality in the Quality tab in the printer driver set to Fast Check 2 Is Halfto...

Page 223: ...on you may see in a document where a large amount of ink is used 1 Open the Printer Properties dialogue box 2 Click the Advanced button in the Main tab 3 In the Quality tab drag the slide bar to the r...

Page 224: ...smoothes uneven or streaked colours 1 Open the Printer Properties dialogue box 2 Click the Advanced button in the Main tab 3 In the Halftoning box under the Quality tab disable Auto if it is checked a...

Page 225: ...The last part of each page in the document is not printed Check 1 Are you using the paper size specified in the Page Size setting Check 2 Are the computer and printer securely connected Check 3 Is the...

Page 226: ...match the size of the paper you are using click the down arrow and select the correct size from the pull down list Set the same Page Size setting for the application program and the printer driver Ope...

Page 227: ...r installed You may not be able to print correctly with a WPS Windows Printing Sys tem printer driver installed in your system Confirm whether or not a WPS driver is installed in your system Change th...

Page 228: ...printer and is not a PostScript printer Therefore if you use the application program that only supports PostScript the lines of characters and figures may print with unnatural notches Always use the a...

Page 229: ...oes Not Start or Stops in Mid job Printer Does Not Start or Stops in Mid job Printer does not switch on Print job does not start Printings halts Printing starts but nothing printing Cartridge holder d...

Page 230: ...Start or Stops in Mid job Printer does not switch on The printer does not switch on after the POWER button is pressed Check 1 Have you pressed the POWER button firmly Check 2 Is the power cord plugged...

Page 231: ...ot turn on Switching the Printer On Check 2 Is the power cord plugged in Make sure that the power cord is plugged into a power outlet Check 3 Is the power outlet live Connect another electrical device...

Page 232: ...print job executed from the computer Check 1 Is the printer switched on Check 2 Are you printing a very large file Check 3 Are the printer and computer securely connected Check 4 Are you using the cor...

Page 233: ...A very large file may require some time to process before printing begins Photographs and illustrations can increase the size of a file For a very large file wait a few minutes for the print job to b...

Page 234: ...print job Check that Canon BJC 3000 is displayed in the Name entry box of the Print dialogue box If another driver is selected click the down arrow and select Canon BJC 3000 from the pull down list I...

Page 235: ...alogue box directly from the Start menu 2 Click the Details tab and select LPT1 or USBPRN in the Print to the follow ing port box LPT1 Canon BJ LPT Printer Port For more details on how to open the Pri...

Page 236: ...Not Start or Stops in Mid job Printings halts The printer stops printing before the print job is completed Check 1 Is the print job a finely detailed photograph or illustration Check 2 Has the printe...

Page 237: ...g for a long time The print head may occasionally overheat during a long print job If the print head overheats printing pauses at the end of a pass across the page to allow time for the print head to...

Page 238: ...art or Stops in Mid job Printing starts but nothing printing The printer operates but nothing is printed on the page Check 1 Is the ink of BJ Cartridge in good condition Check 2 Did you remove the ora...

Page 239: ...anks are empty replace them Next print a nozzle check pattern to check the status of the print head and clean the print head Printing a Nozzle Check Pattern Cleaning the Print Head If the problem is n...

Page 240: ...otective tape from the print head If the orange protective tape is not removed from the BJ Cartridge ink can not be ejected from the BJ Cartridge Remove the BJ Cartridge and check the print head If th...

Page 241: ...move to the left side You want to switch the BJ Cartridge replace an ink tank or replace the BJ Cartridge but the cartridge holder does not move to the left side when you open the front cover Check 1...

Page 242: ...If you have just turned on the printer and the POWER lamp flashes green the printer is warming up Wait until the POWER lamp stops flashing Check 2 Has the front cover been open longer than 10 minutes...

Page 243: ...roubleshooting Paper Jams or Does Not Feed Paper Jams or Does Not Feed Paper does not feed from auto sheet feeder Envelopes do not feed Paper skewing during feeding Multiple sheets feed together Paper...

Page 244: ...t feed from auto sheet feeder After the print job is started the paper loaded in the auto sheet feeder does not feed Check 1 Is the paper too thick Check 2 Is the sheet feeder overloaded Check 3 Did y...

Page 245: ...the sheet feeder overloaded The number of sheets you can load in the auto sheet feeder depends on the media you are using The media does not feed correctly if you exceed the prescribed number of sheet...

Page 246: ...ot feed from auto sheet feeder Check 4 Is the paper folded or curled To avoid misfeeds and paper jams never load paper in the auto sheet feeder that is folded curled or wrinkled Media Type You Can Use...

Page 247: ...g Paper Jams or Does Not Feed Envelopes do not feed Envelopes do not feed or skew during feeding Check 1 Are the envelopes curled or bent Check 2 Are too many envelopes loaded Check 3 Are the envelope...

Page 248: ...s of the stack to flatten the envelopes and expel air from inside the envelopes If the envelopes are still not perfectly flat hold the edges of the stack diago nally and bend them gently to straighten...

Page 249: ...he number of envelopes you can set in the auto sheet feeder is up to 10 Do not exceed 10 envelopes in a stack Using Envelopes Check 3 Are the envelopes loaded correctly To avoid misfeeds and jams alwa...

Page 250: ...es Not Feed Paper skewing during feeding The paper or other media does not feed straight into the paper feed slot Check 1 Is the auto sheet feeder overloaded Check 2 Is the paper folded or curled Chec...

Page 251: ...the prescribed number of sheets Check 2 Is the paper folded or curled To avoid misfeeds and paper jams never load paper in the auto sheet feeder that is folded curled or wrinkled Media Type You Cannot...

Page 252: ...feed together During a multiple feed more than one sheet feed from the stack at the same time Check 1 Did you fan the stack before loading Check 2 Is the auto sheet feeder overloaded Check 3 Is the pa...

Page 253: ...feeder overloaded The number of sheets you can load in the auto sheet feeder depends on the media you are using The media does not feed correctly if you exceed the prescribed number of sheets Check 3...

Page 254: ...llow the procedure below 1 Slowly pull the paper out of the printer from the auto sheet feeder or the paper output slot whichever is easier If the paper tears or shreds open the front cover and remove...

Page 255: ...t the paper automatically and start the print job again Paper within the range of 64 to 105g m2 can be loaded in the auto sheet feeder Media Size You Can Use with the Printer To avoid misfeeds and pap...

Page 256: ...e cause of the problem Two flashes Out of paper paper jam paper feed error Three flashes Paper jam Four flashes BJ Cartridge out of ink Five flashes Cartridge not installed correctly Six flashes BJ Ca...

Page 257: ...the paper correctly and press the RESUME button If paper has jammed in the printer remove the jam and press the RESUME button Paper Jams or Does Not Feed If paper cannot be inserted completely into th...

Page 258: ...ot installed correctly The correct cartridge is not installed When printing is to be performed install the BJ Cartridge for the BJC 3000 When scanning is to be per formed install the scanner cartridge...

Page 259: ...replace the BJ Car tridge Replacing the BJ Cartridge Eight flashes Waste ink tank almost full The printer has a built in waste ink tank to hold the ink that was consumed during print head cleaning Eig...

Page 260: ...mp flashes orange and green alternately Service error A service error means the printer requires the attention of a qualified tech nician Contact a Canon service facility Count the number of flashes Y...

Page 261: ...261 Troubleshooting An Error Message Appears An Error Message Appears Error writing to LPT1 or USBPRN Application error General protection fault Other error messages Windows Windows...

Page 262: ...inter switched on Check 2 Are the printer and computer connected properly Check 3 Is print spooling operating correctly Check 4 Is the printer port operating correctly Check 5 Is the printer driver in...

Page 263: ...ns of the printer cable at the computer and the printer Connecting and Switching On the Printer Check 3 Is print spooling operating correctly Cancel spooling and send the print job directly to the pri...

Page 264: ...rrent is enabled An error occurs if this item is disabled Read the message under Device Status and verify no problem is indicated there 5 Click the Resources tab and read the message in the list under...

Page 265: ...to the printer an error message appears To check the printer port setting open the Printer Properties dialogue box and click the Details tab If LPT1 is displayed in the Print to the following port bo...

Page 266: ...ver is installed in your computer 1 Click Start point to Settings and click Printers 2 If a WPS driver is installed right click the icon and then select Properties from the pop up menu 3 Click the Det...

Page 267: ...s 3 1 application program Check 2 Are several application programs running in the background Check 3 Does the computer have sufficient memory Check 4 Is there sufficient free space on the hard disk Ch...

Page 268: ...rams running in the background If you are running several application programs at the same time there may not be enough memory available for the print job Quit the other application programs and try a...

Page 269: ...e on the disk delete any unneeded files Before You Call for Help Checking the amount of free space on hard disk Check 5 Is there a problem in the file you are trying to print If one of these errors oc...

Page 270: ...General protection fault Check 6 Is the printer driver installed correctly There may be a problem with the printer driver Uninstall the printer driver and install it again Also refer to the Additional...

Page 271: ...Message Appears Other error messages Check 1 An error displayed in the BJ Status Monitor Check 2 An error displayed in any screens other than the BJ Status Monitor Check 3 Any error number xxxx displa...

Page 272: ...een opens The Print Status tab displays a short description of the error and other infor mation about the print job Click the Guide tab to display instructions on how to solve the problem For problems...

Page 273: ...plication programs you are running in the background Before You Call for Help Checking the Windows version and memory capacity Uninstall the printer driver and reinstall it Refer to Driver and Utility...

Page 274: ...ated to the application program If there is not enough memory installed install more memory Refer to the user s manual for your computer for information on installing additional memory Error number 20...

Page 275: ...e sure that the printer cable is securely fastened to the computer and the printer If the problem cannot be solved check the settings in Chooser Follow the procedure below 1 Select Chooser from the Ap...

Page 276: ...276 Troubleshooting Scanner Problems Scanner Problems Scanning result is unsatisfactory Cannot be used with TWAIN compatible application program Other scanner problems...

Page 277: ...ry Scanning result is unsatisfactory Scanned image blurred or distorted Scanned image is of uneven quality White portion becomes greyish Parts of an image are missing or not aligned properly Image con...

Page 278: ...oting Scanning result is unsatisfactory Scanned image blurred or distorted Check 1 Are you using a clear image for scanning Check 2 Is a scanning holder unstained and undamaged Check 3 Are you scannin...

Page 279: ...th the image you wish to scan it is bound to get dirty Clean the scanning holder using a soft cloth that is dipped in a weak neutral detergent solution and then wipe its wet surface off with a dry sof...

Page 280: ...Resolution determines the precision of the scanned image The greater the number of dots used to draw an image the greater the pre cision and the higher the quality of the scanned image For a better q...

Page 281: ...esult is unsatisfactory White portion becomes greyish Check 1 Did you perform white level calibration Check 2 Did you adjust the brightness and contrast Check 3 Did you scan a monochrome image using t...

Page 282: ...rchase or when the sys tem needs to update the white level calibration data Check 2 Did you adjust the brightness and contrast Depending on the image you scan a white portion is not recognised as whit...

Page 283: ...g mode is set to Colour or Grayscale the scanner detects and scans even the grades of the density and white may not be recognised as white When you scan the monochrome image always set Black White in...

Page 284: ...shooting Scanning result is unsatisfactory Parts of an image are missing or not aligned properly Check 1 Did you place an image within the proper scanning area Check 2 Did you specify the scanning are...

Page 285: ...ou wish to scan is placed in the proper scanning area Check 2 Did you specify the scanning area correctly If the Paper Size setting is smaller than the paper size of the image you scan parts of the im...

Page 286: ...ntains unexpected colors or is too light or too dark The appearance of the scanned image is not what you expected or the image is too light or too dark Check 1 Is the number of display colours set to...

Page 287: ...lay colours as follows 1 From the Start menu select Settings and then select Control Panel 2 Double click the Display icon then click the Settings tab 3 Check that Colors is set to High Color or True...

Page 288: ...atching attains the best match between the colours displayed on your display and the actual colours in the scanned image Color Matching can be used when the Scanning Mode is set for Color Check that C...

Page 289: ...WAIN compatible application program Cannot be used with TWAIN compatible application program Cannot launch IS Scan from within the TWAIN compatible graphics application program Cannot transfer to TWAI...

Page 290: ...TWAIN specifications or TWAIN Source Manager Version 1 5 or later When IS Scan is used as a TWAIN interface you must use the latest 32 bit TWAIN compatible graphics application program Refer to the us...

Page 291: ...rmat type and resolution of the image data Some TWAIN compatible graphics application programs support specific file format types and resolution settings only For example the resolution settings of so...

Page 292: ...roblems Other scanner problems Cannot install the scanner driver Does not launch with default settings Improper colours are displayed in the dialogue box Scanning is too slow Communication error occur...

Page 293: ...1 Did you follow the scanner driver installation instructions in the User s Guide Check 2 Are any other application programs running Check 3 Did you specify the correct CD ROM drive for installation...

Page 294: ...llation and you had to forcibly shut down the installation procedure you may not be able to install the scanner driver because Windows is no longer stable Restart Windows and then reinstall the scanne...

Page 295: ...installation procedure refer to the User s Guide The drive name E for example varies according to how your system is set up When you install the printer driver from Run in the Start menu specify the C...

Page 296: ...ication program Previ ous Settings selected in the Standard Value box under the Custom Settings dialogue box may be cleared and standard settings characteristic of the TWAIN compatible program you are...

Page 297: ...m Check the number of display colours as follows 1 From the Start menu select Settings and then select Control Panel 2 Double click the Display icon then click the Settings tab 3 Check that Colors is...

Page 298: ...ur computer must be able to receive a large amount of data Therefore the scanning speed varies according to the per formance of the computer To shorten the time required for scanning Use the appropria...

Page 299: ...problems Communication error occurs Check 1 Did you launch IS Scan or IS Scan Plus immediately after it is closed Check 2 Is the printer switched on or on line Check 3 Are you using the USB interface...

Page 300: ...the off line status refer to the on line Help of your operating system Check 3 Are you using the USB interface running under Windows 98 When using the USB interface running under Windows 98 a communic...

Page 301: ...stallation proce dures the on line Help for IS Scan Bjscan2 hlp exists in the IS Scan folder Follow the procedure below 1 Open the Program Files folder in Drive C 2 Open the Canon folder in the Progra...

Page 302: ...302 Troubleshooting Other Problems Other Problems Cannot install the printer driver BJ Status Monitor does not open Cannot execute background printing Windows...

Page 303: ...u follow the printer driver installation instructions in the Getting Started manual Check 2 Are any other application programs running Check 3 Did you specify the correct CD ROM drive for installation...

Page 304: ...he printer driver For details on how to uninstall the printer driver refer to the Driver and Util ity Guide for Windows Users or Driver and Utility Guide for Macintosh Users To use the USB interface w...

Page 305: ...l other applica tion programs If other BJ printer drivers are installed in your system uninstall them before you run the installation program again For details on how to uninstall the printer driver r...

Page 306: ...on procedure refer to the Getting Started manual The drive name E for example varies according to how your system is set up When you install the printer driver from Run in the Start menu specify the C...

Page 307: ...nitor does not open The BJ Status Monitor does not open and displays messages and guidance Check 1 Do your computer and printer cable support bi directional communication Check 2 Is the bi directional...

Page 308: ...to whether your computer or printer cable supports bi directional communication contact your hardware manufacturer Check 2 Is the bi directional option selected in the printer driver To set the bi di...

Page 309: ...ecute background printing The BJ Backgrounder is not displayed during a print job and you cannot use background printing Check 1 Is there enough free space available on the hard disk Check 2 Is backgr...

Page 310: ...re space Checking the amount of free space on hard disk If you are unable to make more space available on your hard disk by delet ing files switch background printing off Check 2 Is background printin...

Page 311: ...lems Avoiding Problems Setting Colour Adjustment Adjusting Brightness gamma curve coefficient Adjusting Output Style Checking the printer and computer connection Setting the BJC 3000 as default printe...

Page 312: ...re too strong or raise the cyan setting when the blues are too weak To adjust the colour balance follow the procedure below 1 Open the Printer Properties dialogue box and click the Advanced button in...

Page 313: ...ooting Avoiding Problems Setting Colour Adjustment 1 When using Manual for Printing click the Details button 2 Click the Colour panel 3 Move the slide bars of the individual colours to the left or rig...

Page 314: ...akes the overall image brighter with stronger contrast in the light areas and lower contrast in the dark areas To adjust the brightness follow the procedure below 1 Open the Printer Properties dialogu...

Page 315: ...ghtness gamma curve coefficient 1 When using Manual for printing click the Details button 2 Select the Colour panel 3 Specify the desired brightness setting If Brightness is greyed out and cannot be u...

Page 316: ...ream and selects the optimum matching method for the print job Accurate or Photo Emphasises intermediate tones Best suited for natu ral images skin tone sky blue foliage green etc Vivid or Graphic Emp...

Page 317: ...lect Auto Accurate or Vivid in the Output Style box If Output Style is greyed out and cannot be used check Colour Adjustment in the checkbox 1 When using Manual for printing click the Details button 2...

Page 318: ...t the printer and computer If you are using a switching device USB hub or external buffer discon nect the device and connect the printer directly to the computer again If you can print normally with t...

Page 319: ...ing the parallel interface Material AWG28 or larger Type Twisted pair shielded cable Length Up to 2 0m 6 5 ft Connectors Amphenol 30360 or equivalent When using the USB interface Material AWG28 data w...

Page 320: ...t convenient to set the BJC 3000 as the default printer To set the BJC 3000 as the default printer follow the procedure below 1 On the Windows desktop click the Start button point to Settings and clic...

Page 321: ...de setting To cancel the ECP mode follow the procedure below 1 Open the Printer Properties dialogue box and click the Maintenance tab 2 Click the Custom Setting button 3 If Set printer to ECP mode is...

Page 322: ...322 Troubleshooting Before you Call for Help Before you Call for Help Narrowing down the problem Checking the printing environment...

Page 323: ...you Call for Help Narrowing down the problem If you are experiencing difficulties try to narrow the problem down to one of these three factors Printer problem Hardware problem other than the printer A...

Page 324: ...he printer If the printer is operating normally and the settings in the application pro gram are also correct there may be a problem with a printer cable or in the computer system e g memory hard disk...

Page 325: ...sion number of your operating system the amount of memory installed hard disk capacity and amount of free space on hard disk and the printer driver version number Refer to the following items for more...

Page 326: ...ment Checking the Windows version and memory capacity 1 Right click the My Computer icon and select Properties from the pop up menu 2 On the General tab note the system name version number and memory...

Page 327: ...ws desktop double click the My Computer icon 2 Right click the icon of the hard disk and select Properties from the pop up menu 3 On the General tab check the hard disk capacity and the amount of free...

Page 328: ...desktop click the Start button point to Settings and click Printers 2 Right click the BJC 3000 icon and select Properties from the pop up menu 3 Click the Main tab and click the About button The print...

Page 329: ...Canon standard pattern Black printing using Black BJ Cartridge BC 30 Fast 9 ppm Normal 6 8 ppm Colour printing using Color BJ Cartridge BC 31 Fast 4 ppm Normal 3 0 ppm Photo colour printing using Col...

Page 330: ...USB standard Series B receptacle USB interface Recommended printer cable parallel Material AWG28 or larger Type Twisted pair shielded cable Length Up to 2 0m 6 5 ft Connectors Amphenol 30360 or equiv...

Page 331: ...Operating environment Temperature 5 to 35 C 41 to 95 F Humidity 10 to 90 RH no condensation Storage environment Temperature 0 to 35 C 32 to 95 F Humidity 5 to 90 RH no condensation Power supply Europ...

Page 332: ...ve any data for a specified length of time the printer automatically powers down to the standby mode You can set the printer to power down automatically if it does not receive a print job for 1 10 30...

Page 333: ...film Back print film Glossy photo cards T shirt transfers Sheet feeder capacity Plain paper 64 gsm 100 sheets max High resolution paper 80 sheets max Envelopes 10 pieces max Transparencies 30 sheets...

Page 334: ...3 94 to 9 50 height 100 0mm to 584 2mm 3 94 to 23 0 Weight 64 to 105 g m2 Thickness 0 6 mm max Special Canon media Bubble Jet paper LC 301 High Resolution Paper HR 101S Glossy Photo Paper GP 301 High...

Page 335: ...5 coverage per colour Based on the number of sheets per ink tank over the printable area on A4 size plain paper Color BJ Cartridge BC 34 Photo Nozzles 48 per color Ink colours Photo Black Photo Cyan P...

Page 336: ...n connecting printer and computer through USB interface use the system under the following operating environment Computer with Microsoft Windows 98 which is preinstalled by a computer manufacturer on...

Page 337: ...idge BC 30 84 148 BCI 3C ink tank for Color BJ Cartridge BC 33 82 148 BCI 3M ink tank for Color BJ Cartridge BC 33 82 148 BCI 3PBK Photo ink tank for Color BJ Cartridge BC 34 Photo 83 148 BCI 3PC Phot...

Page 338: ...Using the 80 BJ Cartridge Container 86 115 BJ Status Monitor 272 Bjscan2 hlp 301 Black BJ Cartridge BC 30 84 155 Brightness 314 Bubble Jet Paper LC 301 27 C Canon special media 27 Cartridge holder 13...

Page 339: ...d cleaning 146 Default printer Setting the BJC 3000 as the 182 190 320 Document file NT_Guide320 doc 6 Driver printer driver basics 91 scanner driver basics 111 E ECP mode 191 227 235 321 Envelopes 26...

Page 340: ...Black BJ Cartridge BC 30 84 148 Ink Tank BCI 3C For Color BJ Cartridge BC 33 82 148 Ink Tank BCI 3M For Color BJ Cartridge BC 33 82 148 Ink Tank BCI 3PBK Photo For Color BJ Cartridge BC 34 Photo 83 1...

Page 341: ...ting a Nozzle Check Pattern 140 Prolonging the Service Life of the Printer 136 Replacing the BJ Cartridge 155 Replacing the Ink Tanks 148 Transporting the Printer 172 When to Replace the BJ Cartridge...

Page 342: ...not Use with the Printer 30 Memory capacity 326 N Normal print head cleaning 144 Nozzle check pattern 140 NT_Guide320 doc 6 Number of sheets that can be loaded 33 O On line Help for the IS Scan Softwa...

Page 343: ...View 12 Photo Optimizer 108 Photographs Tips for Printing Photographic Images I 105 Tips for Printing Photographic Images II 106 Plain Paper 26 Using 43 Portrait 31 PostScript printer 228 POWER butto...

Page 344: ...er 37 US Commercial 10 Envelope 40 Printer Features 9 Printer Parts and Functions 10 Front view 11 Inside the printer 13 Opearation panel 14 Rear view 12 Printer Specifications 319 Printer Switching O...

Page 345: ...ds 38 Legal 37 Letter 37 US Commercial 10 Envelope 40 Printing environment 325 Printing on Paper and Other Media 23 Loading Paper and Other Media 31 Notes on Handling Media 42 Protective cap 87 88 158...

Page 346: ...14 Launching IS Scan 123 Saving the Image 131 Using the 110 Scanner driver 111 IS Scan 112 IS Scan Plus 112 Scanning holder 120 Using the 120 Specifications 329 T Transparencies CF 102 28 Using 53 Tro...

Page 347: ...ing the windows version and memory capacity 326 Narrowing down the problem 323 Other Problems 302 BJ Status Monitor does not open 307 Cannot execute background printing 309 Cannot install the printer...

Page 348: ...not match 186 Printed pages curled 208 Printed surface scratched 218 Printed text rotated 90 degrees 192 Printing in top left corner 194 Single file page prints over two or more pages 201 Straight li...

Page 349: ...mage blurred or distorted 278 Scanned image is of uneven quality 280 White portion becomes greyish 281 The POWER Lamp Flashes Orange 256 Two flashes Out of paper paper jam paper feed error 257 Three f...

Page 350: ...lope 40 48 USB interface 12 18 Notes on Handling the 18 USBPRN nn nn numerals 265 V Version printer driver 328 Windows 326 W Waste ink tank 256 259 White Calibration Sheet 117 Using the 117 White leve...

Reviews: