background image

Preparar o scanner

3

Po

rtuguês

Preparar o scanner

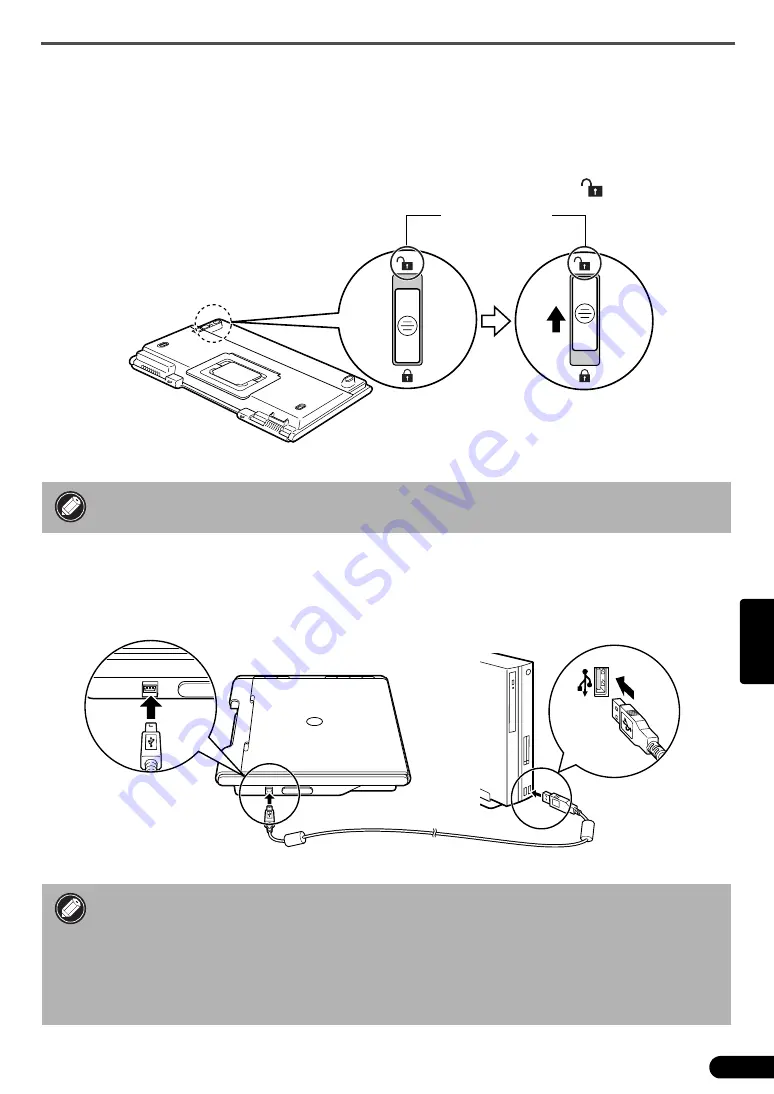
Destravar o scanner

1

Retire o selo do scanner.

2

Deslize a trava no fundo do scanner para a posição de destravado (

). 

Conectar o scanner

1

Conecte o scanner ao computador com o cabo USB fornecido.

• Carregue o scanner com as duas mãos. Cuidado para não deixá-lo cair.
• Sempre trave o scanner ao carregá-lo ou transportá-lo.

• Use somente o cabo USB fornecido com o scanner. A utilização de outros cabos poderá 

causar mau funcionamento.

• Quando o scanner estiver conectado à porta USB 1.1 no Windows XP, e for exibida uma 

mensagem avisando que um dispositivo “USB HI-SPEED está ligado a um hub que não é 
USB HI-SPEED”, ignore-a. O scanner funciona nessa condição sem problemas.

• O scanner não tem um interruptor de alimentação. A energia é ativada assim que o 

computador é ligado.

Posição de 

destravado

Summary of Contents for 600F - CanoScan LiDE

Page 1: ...TNAM IMPRIME AU VIETNAM Quick Start Guide Guide de démarrage rapide Schnellstart Referenz Guida rapida all installazione Guía de inicio rápido Guia de Início Rápido Aan de Slag gids English Deutsch Italiano Nederlands Français Español Português ...

Page 2: ...Soft OmniPage SE not supported for Windows 98 First Edition Adobe RGB 1998 Windows only On screen Manuals Scanning Guide for ScanGear CanoScan Toolbox and troubleshooting Manuals for bundled application programs In this guide Windows XP screenshots are used to illustrate explanations common to all operating systems Table of Contents Package Contents 1 Using the Scanner Buttons 5 Installing the Sof...

Page 3: ...ed on your computer 4 For the bundled applications follow the on screen instructions to perform the installation 5 When the installation is complete click Restart to restart your computer Do NOT connect the scanner to a computer before installing the software If you connect the scanner and the Found New Hardware Wizard appears click Cancel Quit all running applications before installation includin...

Page 4: ...Be careful not to drop the scanner Always lock the scanner when carrying or transporting it Only use the USB cable provided with the scanner Use of other cables may lead to a malfunction When the scanner is connected to the USB 1 1 port on Windows XP and HI SPEED USB Device Plugged into non HI SPEED USB Hub message appears ignore the message The scanner operates in this condition without problems ...

Page 5: ... one that includes WIA in the model name 4 Click the Acquire icon to start ScanGear 5 Select the type of document you are scanning in Select Source and click Preview 6 Set Destination and or Output Size as needed 7 Click Scan to start scanning 8 When prompted to close ScanGear click OK 9 Save the scanned image in ArcSoft PhotoStudio and close the window When opening the document cover support it w...

Page 6: ...ick Options and select CanoScan Toolbox in When a scanner button is pressed open Mac OS X 10 2 8 Select Other in When a scanner button is pressed open Select CanoScan Toolbox and click Open Click OK and quit Image Capture For more information see Troubleshooting in the Scanning Guide PDF Buttons PDF buttons allow you to easily create PDF files according to your needs Note that these buttons are no...

Page 7: ...of the scanner then gently close the document cover 4 Start ArcSoft PhotoStudio then start ScanGear Follow the steps 2 to 4 in Try Scanning on page 4 5 Select Negative Film Color or Positive Film Color in Select Source to match the type of film you are scanning and then click Preview Make sure the document glass is wiped clean before placing the film adapter unit on the scanner Handle the film ada...

Page 8: ...d to close ScanGear click OK 14 Save the scanned image in ArcSoft PhotoStudio and close the window Do not block the calibration slot on the film guide when scanning film Colors will not be scanned correctly if the calibration slot is obstructed The document cover does not touch the document glass Be careful not to force the document cover down Do not touch the scanner while it is operating After t...

Page 9: ...canned in this position Pull out the stand on the bottom of the scanner until it clicks and set the scanner upright on a flat stable surface Gently open the document cover as far as it goes stops at approximately 40q and slide down the document along the document cover Do not place items that weigh 2 0 kg or more on the scanner The scanner may not work or you may break the document glass if you pr...

Page 10: ...25 19200 dpi ScanGear Scanning Bit Depth Color 16 bit input 16 bit or 8 bit output for each color Grayscale 16 bit input 16 bit 2 or 8 bit output Scanning Speed 3 Photo or Document Color 34 3 msec line 2400 dpi 34 3 msec line 4800 dpi Grayscale B W 11 4 msec line 2400 dpi 11 4 msec line 4800 dpi Scanning Speed 3 Film 5 6 223 9 msec line Preview Speed 3 4 Approximately 9 sec Interface USB 2 0 Hi Sp...

Page 11: ...ized collection site for recycling waste electrical and electronic equipment EEE Improper handling of this type of waste could have a possible negative impact on the environment and human health due to potentially hazardous substances that are generally associated with EEE At the same time your cooperation in the correct disposal of this product will contribute to the effective usage of natural re...

Page 12: ... en charge par Windows 98 Première Edition Adobe RGB 1998 Windows uniquement Manuels en ligne Guide de numérisation pour ScanGear CanoScan Toolbox et le dépannage Guides des applications livrées Dans ce guide des captures d écran provenant de Windows XP sont utilisées pour illustrer les explications communes à tous les systèmes d exploitation Table des matières Contenu de l emballage 1 Utilisation...

Page 13: ...r les applications livrées suivez les instructions qui s affichent afin de procéder à leur installation 5 Une fois l installation terminée cliquez sur Redémarrer pour relancer votre ordinateur Ne connectez PAS le scanner à un ordinateur avant d installer les logiciels Si vous le raccordez et si l Assistant Ajout de nouveau matériel détecté s affiche cliquez sur Annuler Quittez toutes les applicati...

Page 14: ...ains Veillez à ne pas le laisser tomber Verrouillez toujours le scanner lorsque vous le transportez Utilisez exclusivement le câble USB fourni avec le scanner L utilisation d autres câbles peut provoquer un dysfonctionnement Si le scanner est raccordé au port USB 1 1 sous Windows XP et si le message Périphérique USB à haut débit connecté à un concentrateur USB à débit réduit s affiche ignorez le L...

Page 15: ...4 Cliquez sur l icône Acquisition pour lancer ScanGear 5 Sélectionnez le type de document que vous numérisez dans Sélectionner source et cliquez sur Aperçu 6 Définissez éventuellement les paramètres Destination et ou Format sortie 7 Cliquez sur Numériser pour lancer la numérisation 8 Si vous êtes invité à fermer ScanGear cliquez sur OK 9 Enregistrez l image numérisée dans ArcSoft PhotoStudio et fe...

Page 16: ... pressed open Quand vous appuyez sur un de ses boutons ouvrir Mac OS X 10 2 8 cliquez sur Other Autre dans When a scanner button is pressed open Quand vous appuyez sur un de ses boutons ouvrir Sélectionnez CanoScan Toolbox et cliquez sur Open Ouvrir Cliquez sur OK et quittez Capture d images Pour plus d informations reportez vous à la section Dépannage du Guide de numérisation Touches PDF Les touc...

Page 17: ...uis refermez délicatement le couvercle du scanner 4 Démarrez ArcSoft PhotoStudio puis ScanGear Conformez vous aux étapes 2 à 4 de la section Essai de numérisation page 4 5 Sélectionnez Film négatif couleur ou Film positif couleur dans l option Sélectionner source en fonction du film que vous numérisez puis cliquez sur Aperçu Assurez vous que la vitre du scanner est propre avec de poser l adaptateu...

Page 18: ...r cliquez sur OK 14 Enregistrez l image numérisée dans ArcSoft PhotoStudio et fermez la fenêtre Lors de la numérisation d un film ne bloquez pas la fente d étalonnage du guide de film En effet les couleurs ne sont pas correctement numérisées si la fente de calibrage est obstruée Le couvercle du scanner ne touche pas la vitre du scanner N abaissez pas le couvercle en forçant Ne touchez pas le scann...

Page 19: ...es documents épais dans cette position Extrayez le support du dessous du scanner jusqu à ce qu il émette un déclic puis positionnez le scanner verticalement sur une surface plane et stable Ouvrez délicatement le couvercle du scanner le plus loin possible il s arrête à un angle de 40q environ et glissez le document le long du couvercle Ne posez aucun objet de 2 0 kg ou davantage sur le scanner Le s...

Page 20: ...ppp Résolution au choix 25 19200 ppp ScanGear Nombre de bits de numérisation Couleur Entrée 16 bits sortie 16 bits ou 8 bits pour chaque couleur Niveaux de gris Entrée 16 bits sortie 16 bits 2 ou 8 bits Vitesse de numérisation 3 Photo ou Document Couleur 34 3 ms ligne 2400 ppp 34 3 ms ligne 4800 ppp Niveaux de gris N B 11 4 ms ligne 2400 ppp 11 4 ms ligne 4800 ppp Vitesse de numérisation 3 Film 5 ...

Page 21: ...torisé qui est accessible lorsque vous faites l acquisition d un nouveau produit du même type que l ancien Toute déviation par rapport à ces recommandations d élimination de ce type de déchet peut avoir des effets négatifs sur l environnement et la santé publique car ces produits EEE contiennent généralement des substances qui peuvent être dangereuses Parallèlement votre entière coopération à la b...

Page 22: ...SE keine Unterstützung für Windows 98 First Edition Adobe RGB 1998 nur Windows Online Handbücher Scanner Benutzerhandbuch für ScanGear CanoScan Toolbox und Störungsbeseitigung Anleitungen für die im Lieferumfang enthaltene Software In diesem Handbuch werden Punkte die alle Betriebssysteme betreffen mit Screenshots von Windows XP illustriert Inhalt Verpackungsinhalt 1 Verwenden der Funktionstasten ...

Page 23: ...liert 4 Zum Installieren von den enthaltenen Softwareprogrammen befolgen Sie die Anweisungen am Bildschirm 5 Nach Abschluss der Installation klicken Sie auf Restart Neustart um den Computer neu zu starten Verbinden Sie den Scanner ERST NACH der Installation der Software mit dem Computer Falls der Scanner angeschlossen wurde und der Hardware Assistent angezeigt wird klicken Sie auf Cancel Abbrechen...

Page 24: ...hützen Den Scanner vor Transport oder Umpositionieren stets verriegeln Verwenden Sie ausschließlich das dem Scanner beiliegende USB Schnittstellenkabel Andere Kabel können Störungen zur Folge haben Bei Anschluss des Scanners an einen USB Port nach USB Norm 1 1 kann bei Windows XP die Meldung Hi Speed USB Gerät an USB Port angeschlossen der diese Geschwindigkeit nicht unterstützt erscheinen Ignorie...

Page 25: ... um ScanGear zu starten 5 Wählen Sie unter Select Source Quelle wählen die Art der zu scannenden Vorlage und klicken Sie auf Preview Vorschau 6 Richten Sie Destination Ziel und Output Size Ausgabeformat wunschgemäß ein 7 Klicken Sie auf Scan Scannen um den Scanvorgang zu starten 8 Sobald Sie der Computer zum Schließen von ScanGear auffordert klicken Sie auf OK 9 Speichern Sie das gescannte Bild in...

Page 26: ...oolbox Mac OS X 10 2 8 Klicken Sie bei When a scanner button is pressed open Bei Drücken von Scannertaste folgendes Programm öffnen auf Other Andere Wählen Sie CanoScan Toolbox und klicken Sie auf Open öffnen Klicken Sie auf OK und beenden Sie Image Capture Digitale Bilder dann Einzelheiten siehe unter Störungsbeseitigung im Scanner Benutzerhandbuch PDF Tasten Über die PDF Tasten können Sie auf ei...

Page 27: ...orlagenglas sanft 4 Starten Sie ArcSoft PhotoStudio und danach ScanGear Befolgen Sie nun die Schritte 2 bis 4 unter Testen des Scanners auf Seite 4 5 Wählen Sie unter Select Source Quelle wählen je nach der Art des zu scannenden Filmstreifens zwischen Negative Film Color Negativ film Farbe und Positive Film Color Positiv film Farbe Klicken Sie danach auf Preview Vorschau Vergewissern Sie sich dass...

Page 28: ...hließen von ScanGear auffordert klicken Sie auf OK 14 Speichern Sie das gescannte Bild in ArcSoft PhotoStudio und schließen Sie das Fenster Achten Sie beim Scannen von Filmstreifen darauf dass der Kalibrierungsschlitz an der Filmleiste nicht verdeckt wird Bei verdecktem Kalibrierungsschlitz werden Farben nicht ordnungsgemäß gescannt Der Vorlagendeckel berührt das Vorlagenglas nicht Den Vorlagendec...

Page 29: ...ke Vorlagen noch Film scannen Ziehen Sie den Ständer an der Unterseite des Scanners heraus bis er einrastet Stellen Sie dann den Scanner vertikal auf einer flachen stabilen Unterlage auf Öffnen Sie den Vorlagendeckel vorsichtig bis zum Anschlag bei ca 40q und schieben Sie das Dokument den Vorlagendeckel entlang nach unten Platzieren Sie keine Gegenstände von 2 0 kg oder mehr auf den Scanner Übermä...

Page 30: ...lösung 1 4800 x 9600 dpi Wählbare Auflösung 25 19200 dpi ScanGear Scan Bit Tiefe Farbe 16 Bit Eingabe 16 Bit oder 8 Bit Ausgabe pro Farbe Graustufen 16 Bit Eingabe 16 Bit 2 oder 8 Bit Ausgabe Scangeschwindigkeit 3 Foto oder Dokument Farbe 34 3 ms Zeile 2400 dpi 34 3 ms Zeile 4800 dpi Graustufen Schwarzweiß 11 4 ms Zeile 2400 dpi 11 4 ms Zeile 4800 dpi Scangeschwindigkeit 3 Film 5 6 223 9 ms Zeile ...

Page 31: ...B durch Rückgabe beim Kauf eines ähnlichen Produkts oder durch Abgabe bei einer autorisierten Sammelstelle für die Wiederaufbereitung von Elektro und Elektronik Altgeräten geschehen Der unsachgemäße Umgang mit Altgeräten kann aufgrund potentiell gefährlicher Stoffe die häufig in Elektro und Elektronik Altgeräte enthalten sind negative Auswirkungen auf die Umwelt und die menschliche Gesundheit habe...

Page 32: ...nibile per Windows 98 First Edition Adobe RGB 1998 solo per Windows Manuali elettronici Guida alla scansione per ScanGear CanoScan Toolbox e risoluzione dei problemi Manuali per programmi di applicazioni multiple In questa guida per illustrare le spiegazioni comuni a tutti i sistemi operativi vengono utilizzate le videate di Windows XP Indice Verifica del contenuto della confezione 1 Uso dei pulsa...

Page 33: ... Per le applicazioni multiple seguire i messaggi sullo schermo per eseguire l installazione 5 Quando l installazione è completa fare clic su Restart Riavvia per riavviare il computer Accertarsi di avere installato i programmi software PRIMA di collegare lo scanner al computer Se quando si collega lo scanner appare la finestra Installazione guidata nuovo hardware fare clic su Cancel Annulla Prima d...

Page 34: ...sciarlo cadere Bloccare sempre lo scanner durante il trasporto Utilizzare esclusivamente il cavo USB in dotazione con lo scanner L uso di altri cavi può causare un funzionamento non corretto Se mentre si è collegati alla porta USB 1 1 su Windows XP compare il messaggio HI SPEED USB Device Plugged into non HI SPEED USB Hub Periferica USB HI SPEED collegata a hub di tipo non HI SPEED ignorarlo In qu...

Page 35: ...e ScanGear 5 Selezionare il tipo di documento di cui si vuole effettuare la scansione in Select Source Seleziona origine e fare clic su Preview Anteprima 6 Impostare eventualmente Destination Destinazione e o Output Size Formato stampa 7 Fare clic su Scan Scansione per avviare la scansione 8 Alla richiesta di chiusura di ScanGear fare clic su OK 9 Salvare l immagine ottenuta dalla scansione in Arc...

Page 36: ...emuto apri Mac OS X 10 2 8 Selezionare Other Altro su When a scanner button is pressed open Quando un pulsante dello scanner viene premuto apri Selezionare CanoScan Toolbox e fare clic su Open Apri Fare clic su OK e uscire da Image Capture Cattura immagine Per ulteriori informazioni fare riferimento alla sezione Risoluzione dei problemi nella Guida alla scansione Pulsanti PDF I pulsanti PDF permet...

Page 37: ...enti 4 Avviare ArcSoft PhotoStudio quindi avviare ScanGear Seguire le procedure 2 4 della Prova di scansione a pag 4 5 Selezionare Negative Film Color Pellicola negativa A colori o Positive Film Color Pellicola positiva A colori in Select Source Seleziona origine per selezionare il tipo di pellicola che si desidera acquisire quindi fare clic su Preview Anteprima Accertarsi che il vetro dei documen...

Page 38: ...a di ScanGear fare clic su OK 14 Salvare l immagine ottenuta dalla scansione in ArcSoft PhotoStudio e chiudere la finestra Non bloccare la fessura per la calibrazione sulla guida della pellicola mentre si acquisisce una pellicola Se la fessura della calibrazione è ostruita i colori non verranno acquisiti in modo corretto Il coperchio dei documenti non deve toccare il vetro Non forzare troppo in ba...

Page 39: ...sione di pellicole o documenti spessi in questa posizione Estrarre il supporto sulla parte inferiore dello scanner fino a sentire un clic e mettere lo scanner in posizione verticale su una superficie piana e stabile Aprire delicatamente il coperchio dei documenti finché è possibile fermarsi a circa 40q e far scorrere in basso il documento lungo il coperchio Non collocare elementi del peso di 2 0 k...

Page 40: ... 25 19200 dpi ScanGear Profondità di scansione Colore Entrata a 16 bit uscita a 16 bit o 8 bit per ogni colore Scala di grigi entrata a 16 bit uscita a 16 bit 2 o a 8 bit Velocità di scansione 3 fotografia o documento Colore 34 3 msec linea 2400 dpi 34 3 msec linea 4800 dpi Scala di grigi Bianco e nero 11 4 msec linea 2400 dpi 11 4 msec linea 4800 dpi Velocità di scansione 3 Pellicola 5 6 223 9 ms...

Page 41: ...troniche La gestione impropria di questo tipo di rifiuti può avere un impatto negativo sull ambiente e sulla salute umana causato dalle sostanze potenzialmente pericolose prodotte dalle apparecchiature elettriche ed elettroniche Un corretto smaltimento di tali prodotti contribuirà inoltre a un uso efficace delle risorse naturali Per ulteriori informazioni sui centri di raccolta e recupero dei rifi...

Page 42: ...tion Adobe RGB 1998 sólo para Windows Manuales en pantalla Guía de escaneado para ScanGear CanoScan Toolbox y la sección Solución de problemas Manuales de los programas de aplicación suministrados En esta guía se utilizan las capturas de pantalla de Windows XP para ilustrar las explicaciones comunes para todos los sistemas operativos Tabla de contenido Contenido del paquete 1 Utilización de los bo...

Page 43: ...gramas de software y los manuales en pantalla 4 Para instalar las aplicaciones suministradas siga las instrucciones en pantalla 5 Cuando haya finalizado la instalación haga clic en Restart Reiniciar para reiniciar el ordenador NO conecte el escáner al ordenador antes de instalar el software Si ha conectado el escáner y aparece el Asistente para nuevo hardware encontrado haga clic en Cancel Cancela...

Page 44: ...jarlo caer Bloquee siempre el escáner cuando lo mueva o transporte Utilice sólo el cable USB suministrado con el escáner La utilización de otros cables puede provocar un fallo de funcionamiento en la unidad Si el escáner está conectado al puerto USB 1 1 en Windows XP y aparece el mensaje Dispositivo USB de alta velocidad conectado en un concentrador USB no de alta velocidad ignórelo El escáner fun...

Page 45: ...ic en el icono Acquire Adquirir para iniciar ScanGear 5 Seleccione el tipo de documento que está escaneando en Select Source Selección del origen y haga clic en Preview Vista preliminar 6 Ajuste las opciones Destination Destino y o Output Size Tamaño de salida según sea necesario 7 Haga clic en Scan Escanear para iniciar el escaneado 8 Cuando se le pregunte si desea cerrar ScanGear haga clic en OK...

Page 46: ...botón del escáner abrir Mac OS X 10 2 8 seleccione Other Otros en When a scanner button is pressed open Cuando se pulse un botón del escáner abrir Seleccione CanoScan Toolbox y haga clic en Open Abrir Haga clic en OK Aceptar y cierre Image Capture Para obtener más información consulte Solución de problemas en la Guía de escaneado Botones PDF Permiten crear archivos PDF fácilmente según sus necesid...

Page 47: ...ocumentos 4 Inicie ArcSoft PhotoStudio y a continuación inicie ScanGear Siga los pasos del 2 al 4 de la sección Escaneado de prueba en la página 4 5 Seleccione Negative Film Color Película negativa Color o Positive Film Color Película positiva Color en Select Source Selección del origen según la película que desee escanear y a continuación haga clic en Preview Vista preliminar Asegúrese de que el ...

Page 48: ...neado 13 Cuando se le pregunte si desea cerrar ScanGear haga clic en OK Aceptar 14 Guarde la imagen escaneada en ArcSoft PhotoStudio y cierre la ventana No bloquee la ranura de calibración de la guía de películas durante el escaneado de una película Los colores no se escanearán correctamente si la ranura de calibración se encuentra obstruida La tapa de documentos no toca el cristal de documentos P...

Page 49: ...n Tire del soporte de la parte inferior del escáner hasta que se escuche un clic y coloque el escáner en posición vertical sobre una superficie estable y plana Abra completamente la tapa de documentos con suavidad hasta que forme aproximadamente un ángulo de 40q y deslice el documento por la tapa de documentos No coloque elementos que alcancen o superen los 2 0 kg de peso sobre el escáner Es posib...

Page 50: ...d de bits de escaneado Color Entrada de 16 bits salida de 16 bits u 8 bits para cada color Escala de grises Entrada de 16 bits salida de 16 bits 2 o de 8 bits Velocidad de escaneado 3 fotografíaodocumento Color 34 3 ms línea 2400 ppp 34 3 ms línea 4800 ppp Escala de grises blanco y negro 11 4 ms línea 2400 ppp 11 4 ms línea 4800 ppp Velocidad de escaneado 3 película 5 6 223 9 ms línea Velocidad de...

Page 51: ... un lugar de recogida autorizado para el reciclado de equipos electrónicos EEE La manipulación inapropiada de este tipo de desechos podría tener un impacto negativo en el entorno y la salud humana debido a las sustancias potencialmente peligrosas que normalmente están asociadas al EEE Al mismo tiempo su cooperación a la hora de desechar correctamente este producto contribuirá a la utilización efec...

Page 52: ...s ScanSoft OmniPage SE não suportado no Windows 98 Primeira Edição Adobe RGB 1998 somente Windows Manuais na tela Guia de digitalização para o ScanGear CanoScan Toolbox e solução de problemas Manuais para aplicativos incluídos Neste manual foram usadas imagens do Windows XP para ilustrar explicações comuns a todos os sistemas operacionais Índice analítico Conteúdo do pacote 1 Usar os botões do sca...

Page 53: ... no seu computador 4 Para os aplicativos incluídos siga as instruções na tela para executar a instalação 5 Quando a instalação estiver completa clique em Restart Reiniciar para reiniciar seu computador NÃO conecte o scanner a um computador antes de instalar o software Se você conectar o scanner e o Assistente para Configurar Novo Hardware Encontrado for exibido clique em Cancel Cancelar Feche todo...

Page 54: ...pre trave o scanner ao carregá lo ou transportá lo Use somente o cabo USB fornecido com o scanner A utilização de outros cabos poderá causar mau funcionamento Quando o scanner estiver conectado à porta USB 1 1 no Windows XP e for exibida uma mensagem avisando que um dispositivo USB HI SPEED está ligado a um hub que não é USB HI SPEED ignore a O scanner funciona nessa condição sem problemas O scann...

Page 55: ...ra iniciar o ScanGear 5 Selecione o tipo de documento que está digitalizando em Select Source Selecionar origem e clique em Preview Visualizar 6 Defina o Destination Destino e ou Output Size Tamanho da Saída conforme necessário 7 Clique em Scan Digitalizar para começar a digitalizar 8 Quando for solicitado a fechar o ScanGear clique em OK 9 Salve a imagem digitalizada no ArcSoft PhotoStudio e fech...

Page 56: ...utton is pressed open Ao pressionar um botão do scanner abrir No Mac OS X 10 2 8 Selecione Other Outro em When a scanner button is pressed open Ao pressionar um botão do scanner abrir Selecione CanoScan Toolbox e clique em Open Abrir Clique em OK e feche a Image Capture Captura de imagem Para obter mais informações consulte Solução de problemas no Guia de digitalização Botões PDF Os botões PDF per...

Page 57: ...ntos 4 Inicie o ArcSoft PhotoStudio e em seguida o ScanGear Siga as etapas de 2 a 4 em Digitalizar na página 4 5 Selecione Negative Film Color Filme negativo colorido ou Positive Film Color Filme positivo colorido em Select Source Selecionar origem para encontrar o tipo de filme correspondente ao que está sendo digitalizado e clique em Preview Visualizar Verifique se o vidro de documentos está lim...

Page 58: ...13 Quando for solicitado a fechar o ScanGear clique em OK 14 Salve a imagem digitalizada no ArcSoft PhotoStudio e feche a janela Não bloqueie a abertura de calibração da guia de filme quando estiver digitalizando um filme As cores não serão digitalizadas corretamente se a abertura estiver obstruída A tampa de documentos não toca o vidro de documentos Cuidado para não forçar a tampa de documentos p...

Page 59: ...m ser digitalizados nessa posição Puxe o apoio na parte inferior para fora do scanner até ele se encaixar e coloque o scanner na posição vertical em uma superfície plana estável Abra a tampa de documentos cuidadosamente o máximo possível pára a aproximadamente 40q e deslize o documento para baixo na tampa de documentos Não coloque itens que pesem 2 0 kg ou mais no scanner O scanner poderá deixar d...

Page 60: ...s de saída para cada cor Escala de cinza 16 bits de entrada 16 bits 2 ou 8 bits de saída Velocidade da digitalização 3 foto ou documento Colorido 34 3 milissegundos linha 2400 dpi 34 3 milissegundos linha 4800 dpi Escala de cinza Preto e branco 11 4 milissegundos linha 2400 dpi 11 4 milissegundos linha 4800 dpi Velocidade de digitalização 3 Filme 5 6 223 9 milissegundos linha Velocidade de visuali...

Page 61: ...íduos de equipamentos eléctricos e electrónicos EEE O tratamento inadequado deste tipo de resíduo poderá causar um impacto negativo no ambiente e na saúde humana devido às substâncias potencialmente perigosas normalmente associadas aos equipamentos eléctricos e electrónicos Simultaneamente a sua cooperação no tratamento correcto deste produto contribuirá para a utilização efi caz dos recursos natu...

Page 62: ...oft OmniPage SE niet compatibel met Windows 98 First Edition Adobe RGB 1998 enkel voor Windows Online handleidingen Handleiding Scannen voor ScanGear CanoScan Toolbox en Problemen oplossen Handleidingen voor gebundelde applicatieprogramma s In deze handleiding worden Windows XP schermafdrukken gebruikt als illustratie bij de uitleg die geldt voor alle besturingssystemen Inhoudsopgave Inhoud van he...

Page 63: ...omputer 4 Voor gebundelde programma s volgt u de instructies op het scherm om de installatie uit te voeren 5 Nadat de installatie is voltooid klikt u op Restart Opnieuw opstarten om uw computer opnieuw op te starten Sluit de scanner NIET aan op een computer voordat u de software heeft geïnstalleerd Als u de scanner aansluit en de wizard Nieuwe hardware verschijnt klikt u op Cancel Annuleren Sluit ...

Page 64: ...iet valt Vergrendel altijd de scanner voordat u deze verplaatst of vervoert Gebruik enkel de USB kabel die bij de scanner is geleverd Het gebruik van andere kabels kan de scanner beschadigen Het bericht Snel USB apparaat op trage USB hub aangesloten dat verschijnt wanneer de scanner onder Windows XP is aangesloten op de USB 1 1 poort mag u gewoon negeren In deze omstandigheden werkt de scanner zon...

Page 65: ...gram Acquire Ophalen om ScanGear te starten 5 Selecteer het documenttype dat u wilt scannen in Select Source Bron selecteren en klik op Preview Voorbeeld 6 Stel Destination Doel en of Output Size Uitvoerformaat in 7 Klik op Scan Scannen om het scannen te starten 8 Klik op OK als u wordt gevraagd om ScanGear te sluiten 9 Sla de gescande afbeelding in ArcSoft PhotoStudio op en sluit het venster Onde...

Page 66: ...n scannerknop wordt gedrukt open Mac OS X 10 2 8 Selecteer Other Andere in When a scanner button is pressed open Als er op een scannerknop wordt gedrukt open Selecteer CanoScan Toolbox en klik op Open Klik op OK en sluit Image Capture Beeld vastleggen Voor meer informatie zie Problemen oplossen in de Handleiding Scannen PDF knoppen Met de PDF knoppen kunt u gemakkelijk PDF bestanden maken naargela...

Page 67: ...mentklep voorzichtig 4 Start ArcSoft PhotoStudio en vervolgens ScanGear Volg stap 2 tot 4 van Scannen op pagina 4 5 Selecteer Negative Film Color Negatieve film kleur of Positive Film Color Positieve film kleur in Select Source Bron selecteren om het filmtype aan te duiden dat u wilt scannen en klik dan op Preview Voorbeeld Zorg ervoor dat de glasplaat schoon is geveegd voordat u de filmadapter op...

Page 68: ...als u wordt gevraagd om Scangear te sluiten 14 Sla de gescande afbeelding in ArcSoft PhotoStudio op en sluit het venster Blokkeer de kalibratiegleuf op de filmgeleider niet tijdens het scannen van de film Kleuren worden niet juist gescand als de kalibratiegleuf geblokkeerd is De documentklep raakt de glasplaat niet Duw de documentklep niet te ver naar beneden Raak de scanner tijdens het scannen ni...

Page 69: ...of film kunnen niet worden gescand in deze positie Trek de standaard aan de onderkant van de scanner naar buiten tot hij klikt en plaats de scanner rechtop op een stabiele vlakke ondergrond Open de documentklep voorzichtig tot hij stopt op ongeveer 40q en schuif het document langs de documentklep Plaats geen items zwaarder dan 2 0 kg op de scanner Het is mogelijk dat de scanner niet werkt of dat u...

Page 70: ...r 16 bits invoer 16 bits of 8 bits uitvoer voor iedere kleur Grijswaarden 16 bits invoer 16 bits 2 of 8 bits uitvoer Scansnelheid 3 Foto of document Kleur 34 3 msec lijn 2400 dpi 34 3 msec lijn 4800 dpi Grijswaarden Zwart wit 11 4 msec lijn 2400 dpi 11 4 msec lijn 4800 dpi Scansnelheid 3 Film 5 6 223 9 msec lijn Voorbeeldsnelheid 3 4 Ongeveer 9 sec Interface USB 2 0 Hi Speed Maximale documentgroot...

Page 71: ...lektronische apparatuur EEA Een onjuiste afvoer van dit type afval kan leiden tot negatieve effecten op het milieu en de volksgezondheid als gevolg van potentieel gevaarlijke stoffen die veel voorkomen in elektrische en elektronische apparatuur EEA Bovendien werkt u door een juiste afvoer van dit product mee aan het effectieve gebruik van natuurlijke hulpbronnen Voor meer informatie over waar u uw...

Page 72: ...s no guarantee that interference will not occur in a particular installation If this equipment does cause harmful interference to radio or television reception which can be determined by turning the equipment off and on the user is encouraged to try to correct the interference by one or more of the following measures Reorient or relocate the receiving antenna Increase the separation between the eq...

Page 73: ...TNAM IMPRIME AU VIETNAM Quick Start Guide Guide de démarrage rapide Schnellstart Referenz Guida rapida all installazione Guía de inicio rápido Guia de Início Rápido Aan de Slag gids English Deutsch Italiano Nederlands Français Español Português ...

Reviews: