background image

EN-28 


2.


The hob will not be installed directly above a dishwasher, fridge, freezer, 

washing machine or clothes dryer, as the humidity may damage the hob 
electronics 

3.The induction hotplate shall be installed such that better heat radiation can be 

ensured to enhance its reliability. 

4.


The wall and induced heating zone above the table surface shall withstand heat. 

5.


To avoid any damage, the sandwich layer and adhesive must be resistant to 

heat. 


Connecting the hob to the mains power supply 


This hob must be connected to the mains power supply only by a suitably qualified person. 

Before connecting the hob to the mains power supply, check that: 

1.


the domestic wiring system is suitable for the power drawn by the hob. 

2.


the voltage corresponds to the value given in the rating plate 

3.


the power supply cable sections can withstand the load specified on the rating plate. 

To connect the hob to the mains power supply, do not use adapters, reducers, or branching 

devices, as they can cause overheating and fire. 

The power supply cable must not touch any hot parts and must be positioned so that its 

temperature will not exceed 75˚C at any point. 


Check with an electrician whether the domestic wiring system is suitable without alterations. 

Any alterations must only be made by a qualified electrician. 


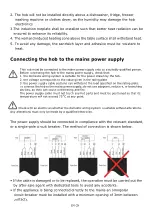
The power supply should be connected in compliance with the relevant standard, 
or a single-pole circuit breaker. The method of connection is shown below. 


If the cable is damaged or to be replaced, the operation must be carried out the 

by after-sale agent with dedicated tools to avoid any accidents. 


If the appliance is being connected directly to the mains an omnipolar 

circuit-breaker must be installed with a minimum opening of 3mm between 
contacts. 

Summary of Contents for CIS633SCTTWIFI

Page 1: ...ire attentivement ce manuel d utilisation avant d utiliser la table de cuisson et conservez le dans un endroit s r pour r f rence ult rieure Instruction Manual For Induction Hob ENGLISH Thank you for...

Page 2: ...mity is available at the following internet address www candy group com Safety Warnings Your safety is important to us Please read this information before using your cooktop Installation Electrical Sh...

Page 3: ...s In order to avoid a hazard this appliance must be installed according to these instructions for installation This appliance is to be properly installed and earthed only by a suitably qualified perso...

Page 4: ...implants will not be affected by the electromagnetic field Failure to follow this advice may result in death Hot Surface Hazard During use accessible parts of this appliance will become hot enough to...

Page 5: ...pliance as a work or storage surface Never leave any objects or utensils on the appliance Do not place or leave any magnetisable objects e g credit cards memory cards or electronic devices e g compute...

Page 6: ...mselves or their surroundings Do not repair or replace any part of the appliance unless specifically recommended in the manual All other servicing should be done by a qualified technician Do not use a...

Page 7: ...ce can be used by children aged from 8 years and above and persons with reduced physical sensory or mental capabilities or lack of experience and knowledge if they have been given supervision or instr...

Page 8: ...ructions for installation WARNING Use only hob guards designed bythe manufactuer of the cooking appliance or indicated by the manufacture of the appliance in the instruction for use as suitable or hob...

Page 9: ...plate 5 Control panel 1 Heating zone selection controls 2 Timer control 3 Timer regulating key 4 keylock control 5 ON OFF control 6 Boost function control 7 Pause function 8 Direct cook button 9 WiFi...

Page 10: ...an eventually warms it up Before using your New Induction Hob Read this guide taking special note of the Safety Warnings section Remove any protective film that may still be on your Induction hob Usin...

Page 11: ...is suitable Cookware made from the following materials is not suitable pure stainless steel aluminium or copper without a magnetic base glass wood porcelain ceramic and earthenware Do not use cookware...

Page 12: ...ay vary according to the quality of the pan used Using your Induction Hob To start cooking 1 Touch the ON OFF control After power on the buzzer beeps once all displays show or indicating that the indu...

Page 13: ...e heat setting This means that you have not placed a pan on the correct cooking zone or the pan you re using is not suitable for induction cooking or the pan is too small or not properly centred on th...

Page 14: ...to 2 5kW 3 0kW 4 5kW 6 5kW and 7 4kW The default total power setting is the maximum power level Setting the total power level to fit your requirement 1 Make sure the cooktop is turned off Note you can...

Page 15: ...ndicator light will flash then you can start the enrollment Once the WIFI module connects the router successfully the WiFi indicator light will be on all the time Otherwise the WiFi indicator light wi...

Page 16: ...D EQUIPMENT Product information for networked equipment power consumption of the product in networked standby if all wired network ports are connected and all wireless network ports are activated N A...

Page 17: ...Boost mode The power display will show P to indicate that the zone is boosting 3 The Boost power will last for 5 minutes and then the zone will go back to the power stage 9 4 If you want to cancel th...

Page 18: ...the keep warm touch the heating zone selection button and then touch the button for 3 second The heating zone will go back to 0 power stage Using the Pause function Pause function can be used at any t...

Page 19: ...can now start using your Induction hob When the hob is in the lock mode all the controls are disable except the ON OFF you can always turn the induction hob off with the ON OFF control in an emergency...

Page 20: ...ir doctor before using this unit Using the Timer You can use the timer in two different ways You can use it as a minute minder In this case the timer will not turn any cooking zone off when the set ti...

Page 21: ...ne 1 2 Touch timer control The minder indicator will start flashing and 30 will show in the timer display 3 Set the time by touching the or control Hint Touch the or control once will decrease or incr...

Page 22: ...o more than one heating zone the timer indicator will show the shortest time e g zone 1 setting time of 2 minutes zone 2 setting time of 5 minutes the timer indicator shows 2 NOTE The flashing red dot...

Page 23: ...but beware of hot cooking zone surfaces 1 Switch the power to the cooktop off at the wall 2 Hold the blade or utensil at a 30 angle and scrape the soiling or spill to a cool area of the cooktop 3 Cle...

Page 24: ...r clicking noises This may be caused by the construction of your cookware layers of different metals vibrating differently This is normal for cookware and does not indicate a fault The induction hob m...

Page 25: ...corresponding protective codes Problem Possible causes What to do F3 F4 Temperature sensor of the induction coil failure Please contact the supplier F9 FA Temperature sensor of the IGBT failure Please...

Page 26: ...to improve our products we may change specifications and designs without prior notice Installation Selection of installation equipment Cut out the work surface according to the sizes shown in the dra...

Page 27: ...in cooling fan the installation will comply with all clearance requirements and applicable standards and regulations a suitable isolating switch providing full disconnection from the mains power supp...

Page 28: ...easily accessible by the customer Before locating the fixing brackets The unit should be placed on a stable smooth surface use the packaging Do not apply force onto the controls protruding from the h...

Page 29: ...ing plate 3 the power supply cable sections can withstand the load specified on the rating plate To connect the hob to the mains power supply do not use adapters reducers or branching devices as they...

Page 30: ...follow a few basic rules the WEEE should not be treated as domestic waste the WEEE should be taken to dedicated collection areas managed by the town council or a registered company In many countries d...

Page 31: ...es X Induction cooking cooking areas radiant cooking zones solid plates For circular cooking zones or areas diameter of useful surface area per electric heated cooking zone rounded to the nearest 5mm...

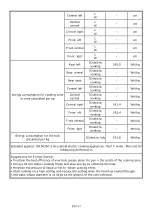
Page 32: ...ntral ECelectric cooking Wh kg Front right ECelectric cooking Wh kg Energy consumption for the hob calculated per kg ECelectric hob 191 8 Wh kg Standard applied EN 60350 2 Household electric cooking a...

Page 33: ...a d claration de conformit de l UE est disponible l adresse internet suivante www candy group com Consignes de s curit Votre s curit est importante pour nous Veuillez lire ces informations avant d uti...

Page 34: ...t riau ou produit combustible ne doit tre plac sur cet appareil aucun moment Veuillez mettre cette information la disposition de la personne responsable de l installation de l appareil afin de r duire...

Page 35: ...n lectrique du r seau interrupteur mural et contactez un technicien qualifi Coupez l alimentation r seau de la table de cuisson avant le nettoyage ou l entretien Le non respect de ces consignes peut e...

Page 36: ...pri entrer en contact avec le verre induction jusqu ce que la surface soit froide Les objets m talliques tels que couteaux fourchettes cuill res et couvercles ne doivent pas tre pos s sur la surface d...

Page 37: ...areil sans surveillance lorsqu il est utilis L bullition cause des vapeurs et des d bordements graisseux qui peuvent s enflammer N utilisez jamais votre appareil comme surface de travail ou de rangeme...

Page 38: ...s d int r t pour les enfants dans des armoires au dessus de l appareil Les enfants qui montent sur la table de cuisson peuvent tre gravement bless s Ne laissez pas les enfants seuls ou sans surveillan...

Page 39: ...nez pas de casseroles sur la surface du verre induction car cela pourrait rafler le verre N utilisez pas de ponges m talliques ou d autres produits abrasifs agressifs pour nettoyer votre table de cuis...

Page 40: ...ans et plus par des personnes dont les capacit s physiques sensorielles ou mentales sont r duites ou par des personnes d nu es d exp rience et de connaissances mais qui ont t inform es sur la mani re...

Page 41: ...de nettoyeur vapeur Cet appareil n est pas con u pour tre actionn par une minuterie externe ou un syst me de commande distance s par PRUDENCE La cuisson doit tre surveill e Les cuissons de courte dur...

Page 42: ...s vous f licitons de votre choix de la table de cuisson induction Nous vous recommandons de prendre le temps de lire ce manuel d instruction d installation afin de bien comprendre comment l installer...

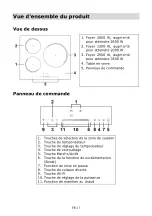
Page 43: ...verre 5 Panneau de commande Panneau de commande 1 Touches de s lection de la zone de cuisson 2 Touche du temporisateur 3 Touche de r glage du temporisateur 4 Touche de verrouillage 5 Touche Marche Arr...

Page 44: ...ection Consignes de s curit Enlevez tout film protecteur qui pourrait encore se trouver sur votre table de cuisson induction Utilisation des commandes tactiles Les commandes r pondent au toucher vous...

Page 45: ...riaux suivants ne sont pas adapt es acier inoxydable pur aluminium ou cuivre sans base magn tique verre bois porcelaine c ramique et gr s N utilisez pas d ustensiles de cuisson dont les bords sont den...

Page 46: ...asserole utilis e Utilisation de votre table induction Comme commencer la cuisson 1 Appuyez sur la touche Marche Arr t Apr s la mise en marche l avertisseur sonore retentit une fois et toutes les touc...

Page 47: ...cuisson Cela signifie que vous n avez pas pos votre casserole sur la bonne zone ou que la casserole que vous utilisez n est pas pr vue pour la cuisson induction ou que la casserole utilis e est trop p...

Page 48: ...lez faire attention ne pas toucher la surface de cuisson m me quand H n est plus affich lorsque l alimentation est de retour Utilisation du r glage de la puissance Gr ce la gestion de la puissance vou...

Page 49: ...gles de r glage de la puissance Si la puissance globale d passe la limite de 2 5 kW 3 0 kW 4 5 kW ou 6 5 kW en fonction du niveau que vous avez r gl vous ne pouvez augmenter la puissance d aucun foyer...

Page 50: ...son sur l application il vous faudra appuyer sur la touche Marche Arr t avant d appuyer sur la touche de Cuisson directe Une fois tous les voyants teints vous avez 10 minutes pour terminer le r glage...

Page 51: ...ignoter 2 Appuyez sur la touche b et maintenez la enfonc e pendant 3 secondes la zone de cuisson commencera fonctionner en mode de suralimentation Boost La touche affichera P pour indiquer que le foye...

Page 52: ...fonction Maintien au chaud pour obtenir une temp rature stable 1 Appuyez sur la touche de s lection de la zone de cuisson que vous souhaitez utiliser pour la fonction de maintien au chaud et le voyant...

Page 53: ...t de pause appuyez sur le bouton Fonction de mise en pause et la zone de cuisson reviendra au niveau de cuisson que vous aviez d fini pr c demment Verrouillage des touches de commande Vous avez la pos...

Page 54: ...tion d ustensiles trop petits Lorsqu une casserole de taille inappropri e ou non magn tique par ex en aluminium ou tout autre ustensile trop petit par ex couteau fourchette cl a t laiss sur la table d...

Page 55: ...e Remarque vous pouvez utiliser le minuteur m me sans s lectionner de zone de cuisson 2 Appuyez sur la touche du temporisateur l indicateur de la minuterie commence clignoter et 30 s affiche 3 R glez...

Page 56: ...i le temps de r glage d passe 99 minutes la minuterie revient automatiquement 0 minute 4 Une fois le temps r gl le d compte commence imm diatement L cran affiche le temps restant et le temporisateur c...

Page 57: ...s de l indicateur de niveau de chauffe signifie que l indicateur de temps affiche le temps de ce foyer de cuisson Si vous voulez contr ler le temps de cuisson r gl sur un autre foyer de cuisson appuye...

Page 58: ...es des zones de cuisson 1 Coupez l alimentation r seau de la table de cuisson 2 Tenez la lame ou l ustensile un angle de 30 et raclez la salet ou le d versement vers un endroit frais de la table de cu...

Page 59: ...lorsque vous touchez la touche de commande Assurez vous que la zone de commande tactile est s che et utilisez le bout de votre doigt lorsque vous touchez les commandes Le verre est rafl Batterie de c...

Page 60: ...er la casserole car elle n est pas adapt e la cuisson induction Utilisez une batterie de cuisine adapt e la cuisson induction Voir la section Choisir une bonne batterie de cuisine La table de cuisson...

Page 61: ...tacter le fournisseur E1 E2 Tension d alimentation anormale Veuillez v rifier si l alimentation lectrique est normale La mise sous tension apr s l alimentation est normale E3 Temp rature lev e d tect...

Page 62: ...continuellement d am liorer nos produits nous pouvons modifier les sp cifications et les conceptions sans pr avis Installation Choix du mat riel d installation D coupez la surface de travail selon le...

Page 63: ...r si la plaque est install e au dessus d un four le four est quip d un syst me de ventilation interne l installation soit conforme toutes les exigences de d gagement et aux normes et r glementations e...

Page 64: ...de cuisson est install e au dessus d un tiroir ou d un placard une barri re thermique de protection est install e sous la base de la table l interrupteur sectionneur est facilement accessible par le c...

Page 65: ...ne doit tre connect e au r seau d alimentation que par du personnel qualifi Avant de connecter la table de cuisson au r seau d alimentation v rifiez que 1 le circuit domestique est suffisant pour la...

Page 66: ...DEEE Les appareils WEEE contiennent des substances polluantes qui peuvent avoir des effets n gatifs sur l environnement et des l ments de base pouvant tre r utilis s Il est important que les DEEE sub...

Page 67: ...yers cuisson rayonnante Plaques massives Pour les foyers ou zones de cuisson circulaires diam tre de la surface utile des zones de cuisson lectrique arrondi 5 mm pr s Arri re gauche mm 18 0 cm Arri re...

Page 68: ...r kg Table de cuisson lectrique CE 191 8 Wh kg Norme appliqu e EN 60350 2 pour les appareils de cuisson lectriques usage domestique Partie 2 Table de cuisson M thodes de calcul des performances Consei...

Reviews: