background image

10

11

Turbidity Filter 

(NEX) NexSand 

Media Bed 

nextSand

(Green)

Support Bed

(when supplied)

Fine, and/or Coarse

Gravel

Greensand 

(IF/GS/ISF) 

Media Bed 

Greensand

(Grey)

Pot 

Feeder

Support Bed

(when supplied)

Fine, and/or Coarse

Gravel

D-Tube

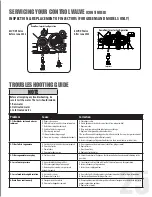
Unscrew Spill Cap

Internal O-ring

Upper cone on 

TO models only

Tank Seal O-ring

PREPARATIONS 

(CONTINUED)

4. 

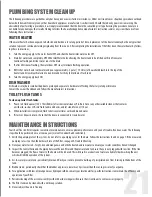
Apply the supplied lubricant (part #92360) to the internal O-ring at the bottom of the control valve.  

  Apply lubricant to the larger O-ring on the bottom of the valve that seals with the tank threads.

5. 

Remove the tape from the top of the riser tube. Carefully position the valve over the riser tube, inserting riser into the internal O-ring.  

  Turn the valve clockwise into the threads of the tank until secure. 

NOTICE

Make sure the quick connect power cord is not yet 

connected to prevent the cord getting caught between 

the threads of the tank and the valve.

NOTICE

Do NOT use petroleum-based  

lubricants as they will cause  

swelling of the O-ring seals.

Summary of Contents for 85DF

Page 1: ...manual in full and follow all instructions carefully before operation 4 Avoid pinched O rings during installation by applying NSF certified lubricant to all seals provided with install kit 5 This sys...

Page 2: ...UNPACKING INSPECTION 8 BEFORE INSTALLATION 9 PREPARATIONS 10 PLANNING YOUR INSTALLATION 12 INSTALLATION STEPS 14 GREENSAND STARTUP 16 UNDERSTAND THE SCREEN KEYPAD CONFIGURATION 17 START UP INSTRUCTION...

Page 3: ...he warranty The warranty provided gives you specific legal rights and otherwise limits your legal rights to the extent permitted by law By installing and or using this product you are accepting these...

Page 4: ...Records Contacts section as they will be important if you need to troubleshoot NOTE For cabinet models the model number and the system serial number are located under the salt lid FIND AND RECORD VAL...

Page 5: ...s between 4 C 43 C or 40 F 110 F Do NOT expose filter to freezing temperatures or vacuum Discharge lines exposed to freezing temperatures should be positioned with a downward slope Potassium permangan...

Page 6: ...he valve so that it will regenerate at a standard pre set time Taste Odor Filters TO TOK models Chlorine and organic matter can make your water smell and taste bad The taste odor filter uses high qual...

Page 7: ...backwash flow rate Taste and Odor Chloramines NexSand Maximum Iron 0 0 ppm ferrous clear water iron Maximum Hydrogen Sulfide 0 0 ppm Maximum Manganese 0 0 ppm ferrous clear water pH 6 5 to 7 5 Neutra...

Page 8: ...or parts loss Also note damage to the shipping cartons Contact the transportation company for all damage and loss claims The manufacturer is not responsible for damages in transit Small parts needed...

Page 9: ...e g pipe adapters All plumbing must be completed according to local codes Soldering connections should be done before connecting any plastic pieces to the pipe as excessive heat can damage them TOOLS...

Page 10: ...Birm Grey Support Bed when supplied Fine and or Coarse Gravel PREPARATIONS MEDIA INSTALLATION WHEN NECESSARY When larger units cannot be loaded due to weight restrictions media will be shipped pre mea...

Page 11: ...O ring at the bottom of the control valve Apply lubricant to the larger O ring on the bottom of the valve that seals with the tank threads 5 Remove the tape from the top of the riser tube Carefully po...

Page 12: ...drain and a 120 volt AC electrical outlet 6 Filters should be located before the water heater on the supply line If closer than three 3 metres 10 feet install a check valve in accordance with local p...

Page 13: ...120V 10A Current Protect Socket Inlet Outlet 5 8 Drain Line Laundry Stack MainTank Drain Elbow Assembly Bypass Assembly AC 120V 10A Current Protect Socket Pot Perm Feeder GREENSAND INSTALLATION WITH...

Page 14: ...92360 to the O rings of the fittings 4 Connect the supplied elbow plumbing adaptors to the bypass with red clips 5 Connect the inlet and outlet of the water filter to the plumbing of the house 6 For t...

Page 15: ...pipes i e the black marks in the vertical position See SERVICE below To isolate the filter simply rotate the knobs as indicated to the CLOSE position until they lock You can continue to use your wate...

Page 16: ...bypass inlet very slowly until there is a steady stream of water at the drain Opening the bypass inlet too quickly could result in resin being expelled from the unit and into the plumbing lines With...

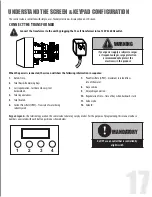
Page 17: ...KEYPAD CONFIGURATION Keypad Legend the terminology used on the conrol valve label may vary by model For the purpose of programming this manual will use numbers associated with each button position as...

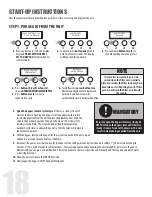
Page 18: ...y placed in service the filter tank may have been laid on its side during transit If this occurs backwash the filter to reclassify the media STEP 1 PURGE AIR FROM THE UNIT 7 Open the bypass inlet very...

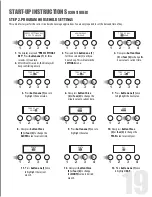
Page 19: ...KEY 3 SEC TO UNLOCK AUG 30 2019 12 15AM 1 The display may read PRESS SETTINGS KEY Press button one 1 for three seconds 3 to unlock 2 After three 3 seconds the display will beep confirming unlock 3 Pr...

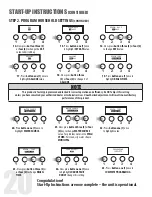
Page 20: ...ue For problem water set to WELL OTHER For clean city water choose MUNICIPAL REGEN TIME 12 00 PM LOAD DEFAULT NO REGEN TIME 02 00 PM PROGRAMING COMPLETE 23 Now press button three 3 or or four 4 to cha...

Page 21: ...anks 1 Pour 4 to 6 fluid ounces 120 175 millilitres of resin mineral cleaner Pro Rust Out or any other suitable cleaner that contains a mild acid such as CLR into flush tanks and bowls and let stand f...

Page 22: ...ften the media should be replenished or replaced Check with your water treatment expert for the media bed change frequency Maintenance materials Please see Common Spare Parts REPLACING MEDIA BED TO un...

Page 23: ...iron To be entered by the user gallons between regenerations See step 5 of User Programming gallons reserve capacity 5 people x 75 gallons GALLONS BETWEEN REGENERATIONS Calculated by valve IRON CONTE...

Page 24: ...PECTION REPLACEMENT OF PISTON ASSEMBLY AND SEAL SPACER KIT To remove the powerhead 1 Remove screw washer from piston rod link 3 Remove powerhead from body 2 Remove two 2 bolts securing powerhead to bo...

Page 25: ...ck the mechanical linkage on the timer control to eliminate possible binding in the gear train 4 Loss of water pressure A Iron or turbidity build up in filter B Filter not regenerating often enough C...

Page 26: ...h elbow with O ring 60010025 Locking clip large 60010069 Locking clip small 60010006 Bypass tool 60010052 Transformer 12 volt 60010382 Problem water injector kit 92360 100 silicone based lubricant 500...

Page 27: ...Page intentionally blank...

Page 28: ...y any force of nature is not covered in this warranty At our sole discretion we will repair or replace defective parts if our warranty department determines it to be defective under the terms of this...

Reviews: