background image


Camus ProtoNode Start-up Guide


Page 26 of 87


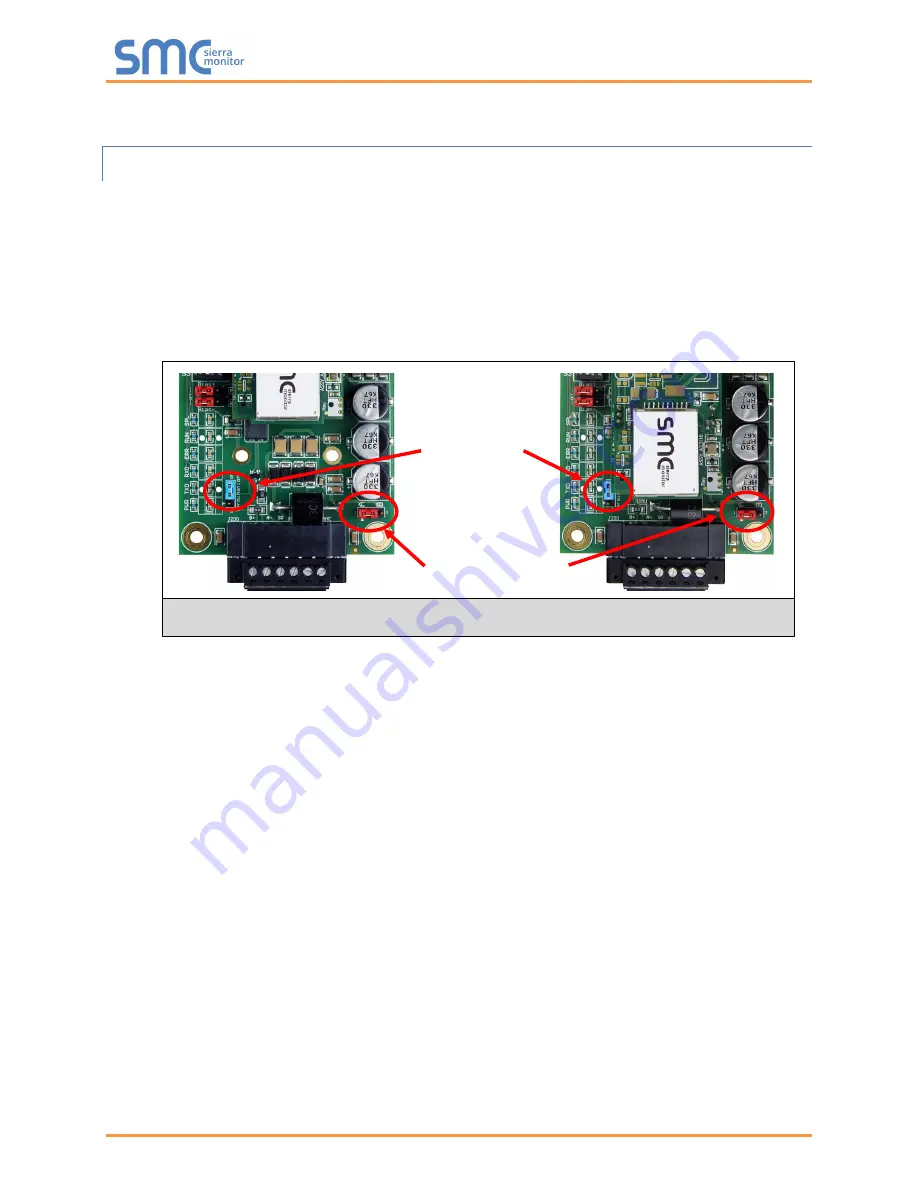
4.6.2  End of Line Termination Switch for the RS-485 Device Network 

  On long RS-485 cabling runs, the RS-485 trunk must be properly terminated at each end. 

  The ProtoNode has an end of line (EOL) blue jumper. The default setting for this blue EOL switch 

is OFF with the jumper straddling the pins closest to the inside of the board of the ProtoNode. 

o

  On short cabling runs the EOL switch does not to need to be turned ON 


If the ProtoNode is placed at one of the ends of the trunk, set the blue EOL jumper to the ON 

position straddling the pins closest to the outside of the board of the ProtoNode. 


Always leave the single red jumper in the A position (default factory setting).


RS-485 EOL 

Switch 

(off) 

Leave in Position A 

Figure 12: RS-485 End-Of-Line Termination Switch on the ProtoNode N34 (Left) and  

ProtoNode N35 (Right) 

Summary of Contents for ProtoNode FPC-N34

Page 1: ...up Guide For Interfacing Camus Products Sola DynaFLO Valiant To Building Automation Systems BACnet MS TP BACnet IP Metasys N2 Modbus TCP IP LonWorks and SMC Cloud APPLICABILITY EFFECTIVITY Explains P...

Page 2: ...echnical support of the ProtoNode product MSA Safety does not provide direct support If Camus needs to escalate the concern they will contact MSA Safety for assistance Support Contact Information Camu...

Page 3: ...de FPC N34 3 pin RS 485 port to the field protocol cabling Section 4 3 or connect the ProtoNode FPC N35 2 pin LonWorks port to the field protocol cabling Section 4 4 8 Connect power to the ProtoNode 6...

Page 4: ...85 Device Network 25 4 6 2 End of Line Termination Switch for the RS 485 Device Network 26 4 7 Serial Network FPC N34 Wiring Field Port to RS 485 Network 27 4 8 LonWorks FPC N35 Wiring LonWorks Device...

Page 5: ...7 Sola Modbus RTU Mappings to BACnet Metasys N2 Modbus TCP IP LonWorks 57 DynaFLO Modbus RTU Mappings to BACnet Metasys N2 Modbus TCP IP LonWorks 61 Valiant Modbus RTU Mappings to BACnet Metasys N2 Mo...

Page 6: ...Figure 20 Web Configurator Showing Available Profile Selection 33 Figure 21 Web Configurator Showing Active Profile Additions 33 Figure 22 Web Configurator Screen with Active Profiles 34 Figure 23 Ch...

Page 7: ...for more information about the BACnet Testing Laboratory Click here for the BACnet PIC Statement LonMark International is the recognized authority for certification education and promotion of interop...

Page 8: ...JCI Modbus TCP IP or LonWorks 3 It is not necessary to download any configuration files to support the required applications The ProtoNode is pre loaded with tested profiles configurations for the sup...

Page 9: ...d provides the following capabilities for any registered devices in the field Remotely monitor and control devices Collect device data and view it on the SMC Cloud Dashboard and the SMC Smart Phone Ap...

Page 10: ...N34 FPC N34 0565 ProtoNode FPC N35 FPC N35 0566 Figure 1 ProtoNode Part Numbers FPC N34 units have the following 3 ports RS 485 Ethernet RS 485 FPC N35 units have the following 3 ports LonWorks Ether...

Page 11: ...odbus RTU Modbus RTU Modbus RTU Baud Rate 38400 9600 19200 Parity None None None Data Bits 8 8 8 Stop Bits 1 2 1 Figure 4 COM Settings 3 3 2 Set Node ID for Any Device Attached to the ProtoNode Set No...

Page 12: ...do not use the S bank DIP switches S0 S3 to select a field protocol o On ProtoNode FPC N35 units these switches are disabled the field protocol is always LonWorks ProtoNode FPC N34 S Bank DIP Switche...

Page 13: ...BMS front end can find ProtoNode via BACnet Auto Discovery NOTE Never set a BACnet MS TP MAC Address of the ProtoNode to a value from 128 to 255 Addresses from 128 to 255 are Slave Addresses and canno...

Page 14: ...lt refer to Section 5 6 3 5 3 FPC N34 Setting the Baud Rate for BMS Network DIP switches B0 B3 can be used to set the field baud rate of the ProtoNode to match the baud rate required by the BMS for BA...

Page 15: ...DE TO DEVICES 4 1 Connection from DynaFlame Dynaforce Advantus Avenger to ProtoNode The DynaFlame Dynaforce terminals J3 MB2 are connected to the Protonode as shown Boiler 1 MB1 Modbus Address MB2 Mod...

Page 16: ...de Start up Guide Page 16 of 87 Activating Comm Port 2 on Sola Display Select Gateway tab 1 Select Gateway tab 2 Check Enable Modbus gateway 3 Select Gateway on COM2 port 1 Select COM2 tab 2 Check Ena...

Page 17: ...Camus ProtoNode Start up Guide Page 17 of 87 Verify activity on COM2 port COM1 Modbus data between Diana and SOLA COM2 Modbus data between Diana and front end Modbus or ProtoNode...

Page 18: ...ng DynaMaxHS Place Local Modbus toggle switch in LOCAL Press and select Login enter sola Select Advanced Setup Select System Select System ID Access Verify MB1 Modbus address 1 To be in sequential ord...

Page 19: ...Setup password 3232 Modbus Assign a network ID or slave address to DynaFLO s controller by pressing Network ID and inserting a number Make sure the Modbus ON is switched to Modbus ON When Modbus ON O...

Page 20: ...s PLC Pin Number Function 1 A signal TX RX 6 B signal TX RX Having access to pins 1 and 6 of Port2 on DynaFLO by using the RJ11 6POS2C cable make connections to the Protonode according to the above t...

Page 21: ...n from Valiant to ProtoNode The RS 485 connection is made by connecting wires from the Protonode to the terminal block located under the Valiant s control panel The designated BMS terminals are labell...

Page 22: ...address can be changed from the Valiant s pushbutton screen To change the slave address go to Menu Settings General Settings Other Settings Modbus Address Note Do not change Modbus Stopbits Please re...

Page 23: ...Camus ProtoNode Start up Guide Page 23 of 87 4 5 ProtoNode FPC N34 and FPC N35 Showing Connection Ports Figure 9 ProtoNode FPC N34 Top and ProtoNode FPC N35 Bottom...

Page 24: ...PC N35 LonWorks Pins 1 through 3 are for RS 485 devices o Use standard grounding principles for RS 485 GND Pins 4 through 6 are for power Do not connect power until Section 4 5 Device Pins ProtoNode P...

Page 25: ...biasing jumpers are OFF The OFF position is when the 2 red biasing jumpers straddle the 4 pins closest to the outside of the board of the ProtoNode Figure 11 Only turn biasing ON o IF the BMS cannot...

Page 26: ...the pins closest to the inside of the board of the ProtoNode o On short cabling runs the EOL switch does not to need to be turned ON If the ProtoNode is placed at one of the ends of the trunk set the...

Page 27: ...o enable the EOL termination turn the EOL switch ON switch position left side If more than one RS 485 device is connected to the network then the field bias resistor switch needs to be enabled to ensu...

Page 28: ...LonWorks FPC N35 Wiring LonWorks Devices to the LonWorks Terminal Wire the LonWorks device network to the ProtoNode LonWorks Terminal o Use approved cable per the FT 10 installation guidelines o LonW...

Page 29: ...se values are nominal and a safety margin should be added to the power supply of the host system A safety margin of 25 is recommended Figure 16 Required Current Draw for the ProtoNode Apply power to t...

Page 30: ...on the 192 168 1 xxx network For Windows 10 Find the search field in the local computer s taskbar usually to the right of the windows icon and type in Control Panel Click Control Panel click Network a...

Page 31: ...vered using the FS Toolbox utility See Appendix A 1 for instructions 5 3 Selecting Profiles for Devices Connected to ProtoNode NOTE If Modbus TCP IP was selected in Section 3 4 for the Field BMS proto...

Page 32: ...Camus ProtoNode Start up Guide Page 32 of 87 Figure 19 Web Configurator Showing no Active Profiles...

Page 33: ...lected from the drop down list enter the value of the device s Node ID which was assigned in Section 3 3 2 Then press the Submit button to add the Profile to the list of devices to be configured Repea...

Page 34: ...IP Address for the Field Network Follow the steps outlined in Section 5 1 to access the ProtoNode Web Configurator To access the FS GUI click on the Diagnostics Debugging button in the bottom right c...

Page 35: ...IP Address of that managed switch router Click the System Restart button at the bottom of the page to apply changes and restart the ProtoNode Unplug Ethernet cable from PC and connect it to the networ...

Page 36: ...d Node_Offset Node_ID For example if the desired Device Instance for the device 1 is 50 001 and the following is true Device 1 has a Node ID of 1 Device 2 has a Node ID of 22 Device 3 has a Node ID of...

Page 37: ...ofiles Follow the steps outlined in Section 5 1 to access the ProtoNode Web Configurator At the bottom left of the page click the Clear Profiles and Restart button Once restart is complete all past pr...

Page 38: ...Browser Connect a Cat 5 Ethernet cable straight through or cross over between the PC and ProtoNode The default IP Address for the ProtoNode is 192 168 1 24 Subnet Mask is 255 255 255 0 If the PC and P...

Page 39: ...rties window Open a web browser and go to the following address IP Address of ProtoNode fserver xif o Example 192 168 1 24 fserver xif If the web browser prompts to save the file save the file onto th...

Page 40: ...ng on BACnet without having to ask the BMS integrator to test the unit To access the embedded BACnet Explorer go to the FS GUI page and click the Explorer button Then login to the BACnet Explorer page...

Page 41: ...the BACnet Explorer landing page click on the BACnet Explorer button on the left side of the screen to go to the BACnet Explorer page To discover the devices connected to the same subnet as the BACne...

Page 42: ...or optimal performance Any discovery or explore process will cause a green message to appear in the upper right corner of the browser to confirm that the action is complete 7 2 View Device Details and...

Page 43: ...1 and click the Explore button that appears to the right of the highlighted device as a magnifying glass icon or double click the highlighted device o Now additional device details are viewable howeve...

Page 44: ...indow If changes are expected since the last explore simply press the Refresh button that appears to right of individual properties to refresh the value NOTE The Explorer Search Bar will find devices...

Page 45: ...s are editable such as object name object description etc however this is not recommended because the BACnet Explorer is a discovery tool not a Building Management System BMS To edit the present value...

Page 46: ...t up Guide Page 46 of 87 Enter the appropriate change and click the Write button The window will close When the BACnet Explorer page appears the present value will be changed as specified Figure 39 Up...

Page 47: ...able file and complete the installation Connect a standard Cat 5 Ethernet cable between the user s PC and ProtoNode Double click on the FS Toolbox Utility and click Discover Now on the splash page Che...

Page 48: ...into the web browser or use the FieldServer Toolbox to connect to the ProtoNode Click on Diagnostics and Debugging Button then click on view and then on connections If there are any errors showing on...

Page 49: ...d rate parity data bits stop bits o Check device address o Verify wiring o Verify the Modbus device s were listed in the Web Configurator Section 5 3 Field COM problems o If Ethernet protocols are use...

Page 50: ...ormal operation ERR A steady red light will indicate there is a system error on the unit If this occurs immediately report the related system error shown in the error screen of the FS GUI interface to...

Page 51: ...en the Diagnostic Capture is performed via the gateway s on board system Access the FieldServer Diagnostics page via one of the following methods o Open the FieldServer FS GUI page and click on Diagno...

Page 52: ...i Fi cannot be captured if a network diagnostic is needed take a Wire Shark capture Once the Diagnostic Capture is complete email it to technical support The Diagnostic Capture will accelerate diagnos...

Page 53: ...o Click on the Start Diagnostic button o Wait for the capture period to finish and the Diagnostic Test Complete window will appear Step 2 Send Log o Once the diagnostic test is complete a zip file is...

Page 54: ...ft hand side do the following a Click on Setup b Click on File Transfer c Click on the General tab 5 In the General tab click on Choose Files and select the web img file extracted in step 1 6 Click on...

Page 55: ...restart the ProtoNode The password needs to be a minimum of eight characters and is case sensitive If the password is lost click cancel on the password authentication popup window and email the passwo...

Page 56: ...sers are supported Chrome Rev 57 and higher Firefox Rev 35 and higher Microsoft Edge Rev 41 and higher Safari Rev 3 and higher NOTE Internet Explorer is no longer supported as recommended by Microsoft...

Page 57: ...frost protection 8 No demand due to burner switch turned off 9 DHW storage 10 Reserved 11 Warm weather shutdown Outlet sensor R 0007 0007 AI 3 AI nvoXOutletSensor SNVT_temp_p 40 130o C 0 1o C precisio...

Page 58: ...outCode SNVT_count_f 0 No lockout 1 4096 See Appendix D 1 Alarm reason R 0023 0035 AI 18 AI nvoXAlarmReason SNVT_count_f 0 None 1 Lockout see register hex 0015 for lockout code 2 Alert Refer to Append...

Page 59: ...21 0545 AV 64 AO nvoXLdLgMstrEnbl SNVT_count_f 0 Not a Lead Lag master 1 Lead Lag master Lead Lag setpoint R W 0222 0546 AV 65 AO nvi nvoXLdLgSetpoint SNVT_temp_p 40 200o F1 Burner cycle count R 0080...

Page 60: ...its type the parameter has 0 RPM 1 If modulation output parameter doesn t match with the setting of this bit then the parameter setting is invalid 4 For binary fraction format commanded rate is a bina...

Page 61: ...ite SNVT_temp_p Only Possible when the control is set to Remote Setpoint Actuator Position Write W 0061 0097 AV 5 Ana_Output nviX Actuator Position Write SNVT_count_f Only Possible when the control is...

Page 62: ...M_Boiler_1_Active R AI 16 AI 20133 nvoBM1Act_XXX SNVT_count_f In Cascade mode only BM_Boiler_2_Active R AI 17 AI 20134 nvoBM2Act_XXX SNVT_count_f In Cascade mode only BM_Boiler_3_Active R AI 18 AI 201...

Page 63: ...5 AI 30101 nvoBMUn11Avl_XXX SNVT_count_f In Cascade mode only BM_Unit_12_available R AI 56 AI 30102 nvoBMUn12Avl_XXX SNVT_count_f In Cascade mode only BM_Unit_13_available R AI 57 AI 30103 nvoBMUn13Av...

Page 64: ...ID R AI 99 AI 34025 nvoError2ID_XXX SNVT_count_f Error_2_DoW R AI 100 AI 34026 nvoError2DoW_XXX SNVT_count_f Error_2_DoM R AI 101 AI 34027 nvoError2DoM_XXX SNVT_count_f Error_2_M R AI 102 AI 34028 nvo...

Page 65: ...ToBnHr_XXX SNVT_time_hour BM_Unit_12_CurrentState R AI 133 AI 40101 nvoU12CrSt_XXX SNVT_count_f In Cascade mode only BM_Unit_12_Error R AI 134 AI 40102 nvoU12Err_XXX SNVT_count_f In Cascade mode only...

Page 66: ...U15ClSP_XXX SNVT_temp_p In Cascade mode only BM_Unit_15_PowerLevel R AI 169 AI 40404 nvoU15PwLv_XXX SNVT_count_f In Cascade mode only BM_Unit_15_GenPumpStatus R AI 170 AI 40407 nvoU15GnPmSt_XXX SNVT_c...

Page 67: ...voU18CrSt_XXX SNVT_count_f In Cascade mode only BM_Unit_18_Error R AI 200 AI 40702 nvoU18Err_XXX SNVT_count_f In Cascade mode only BM_Unit_18_CalcSetpoint R AI 201 AI 40703 nvoU18ClSP_XXX SNVT_temp_p...

Page 68: ...due to safety relay OFF Lockout 17 Internal fault Safety relay test failed due to safety relay not OFF Lockout 18 Internal fault Safety relay test failed due to feedback not ON Lockout 19 Internal fau...

Page 69: ...to IAS Lockout 59 Internal fault Mux pin shorted Lockout 60 Internal fault HFS shorted to LFS Lockout 61 Anti short cycle Hold 62 Fan speed not proved Hold 63 LCI off Hold 67 ILK off Hold 68 ILK on H...

Page 70: ...out 145 Internal fault Flame bias out of range 3 Lockout 146 Internal fault Flame bias out of range 4 Lockout 147 Internal fault Flame bias out of range 5 Lockout 148 Internal fault Flame bias out of...

Page 71: ...er up with lockout setting Lockout 212 Invalid preignition time setting Lockout 213 Invalid prepurge rate setting Lockout 214 Invalid prepurge time setting Lockout 215 Invalid purge rate proving setti...

Page 72: ...could not be determined 21 Invalid safety group verification table was not accepted 22 CRC errors were found in application configuration data blocks 23 Backup Alert PCB was restored from active one 2...

Page 73: ...75 Absolute max fan speed was out of range 76 Absolute min fan speed was out of range 77 Fan gain down was invalid 78 Fan gain up was invalid 79 Fan minimum duty cycle was invalid 80 Fan pulses per r...

Page 74: ...nge in RUN 128 Modulation rate was limited due to IAS was open 129 Slow start ramp setting of zero will result in no modulation rate change 130 No forced rate was configured for slow start ramp 131 CH...

Page 75: ...d Lag ON hysteresis was invalid 188 Lead Lag slave enable was invalid 189 Lead Lag hysteresis step time was invalid 190 No Lead Lag Modbus port was assigned 191 Lead Lag base load common setting was i...

Page 76: ...ture was invalid 239 Lead Lag ODR outdoor temperature range was too small minimum 12 C 22 240 Lead Lag ODR water temperature range was too small minimum 12 C 22 F 241 Lead Lag DHW setpoint was invalid...

Page 77: ...ormal Recycle Interrupted air flow switch was off during Measured Purge 298 Abnormal Recycle Interrupted air flow switch was off during Drive to Lightoff 299 Abnormal Recycle Interrupted air flow swit...

Page 78: ...cle Invalid zero crossing 352 Abnormal Recycle fault stack sensor 353 Abnormal Recycle stack limit 354 Abnormal Recycle delta T limit 355 Abnormal Recycle fault outlet sensor 356 Abnormal Recycle outl...

Page 79: ...473 Internal error PM parameter address was invalid 474 Internal error PM safety parameter address was invalid 475 Internal error Invalid record in lockout history was removed 476 Internal error EEPRO...

Page 80: ...alid 529 Mix temperature was invalid 530 Mix sensor was invalid 531 Mix PID setpoint was invalid 532 STAT may not be a Mix demand source when Remote Stat is enabled 533 539 RESERVED 540 Delta T inlet...

Page 81: ...ap detect ON hysteresis was invalid 595 Inlet DHW tap stop degrees was out of range 596 Outlet Inlet tap stop degrees was out of range 597 DHW tap detect on threshold was invalid 598 DHW plate preheat...

Page 82: ...st protection is active 103 On due to Lead Lag CH frost protection is active 104 On due to local DHW frost protection is active 105 On due to Lead Lag DHW frost protection is active 106 On from local...

Page 83: ...On Off Off 39 On On On Off Off On Off Off 40 Off Off Off On Off On Off Off 41 On Off Off On Off On Off Off 42 Off On Off On Off On Off Off 43 On On Off On Off On Off Off 44 Off Off On On Off On Off O...

Page 84: ...136 Off Off Off On Off Off Off On 137 On Off Off On Off Off Off On 138 Off On Off On Off Off Off On 139 On On Off On Off Off Off On 140 Off Off On On Off Off Off On 141 On Off On On Off Off Off On Ad...

Page 85: ...17 On Off Off On On Off On On 218 Off On Off On On Off On On 219 On On Off On On Off On On 220 Off Off On On On Off On On 221 On Off On On On Off On On 222 Off On On On On Off On On 223 On On On On On...

Page 86: ...3 2 x 1 6 in Weight 0 2 kg 0 4 lbs Operating Temperature 40 C to 75 C 40 F to167 F Surge Suppression EN61000 4 2 ESD EN61000 4 3 EMC EN61000 4 4 EFT Humidity 5 90 RH non condensing Specifications subj...

Page 87: ...ected to accident improper maintenance installation or application or on which original identification marks have been removed or altered This Limited Warranty also will not apply to interconnecting c...

Reviews: