12
structure.
•
The vent cap should have a minimum clearance of 4
feet (1.25M) horizontally from and in no case above or
below, unless a 4-foot (1.25 m) horizontal distance is
maintained from electric meters, gas meters, regulators
and relief equipment. In all cases local codes take
precedence.
•
Flue gas condensate can freeze on exterior walls or on
the vent cap. Frozen condensate on the vent cap can
result in a blocked flue condition. Some discoloration to
exterior building surfaces can be expected. Adjacent
brick or masonry surfaces should be protected with a
rust resistant sheet metal plate.
•
The THRUWALL vent cap MUST be purchased as a kit
from the factory to ensure proper operation. Locally
purchased or fabricated THRUWALL vent caps should
not be used.
2.4.3
LOCATION OF A “THRUWALL” AIR INLET CAP
•
The termination point of the THRUWALL air inlet must
be installed a minimum of 3 feet above ground level
and above normal levels of snow accumulation.
•
The point of termination for the THRUWALL
combustion air inlet cap MUST be located a minimum
of 3 feet (1M) horizontally and 12 inches (0.30M) below
the point of flue gas termination (vent cap) if it is
located within a 10 foot (3M) radius of the flue outlet.
2.4.4
AIR INLET DAMPER
•
In warmer climates, during cold weather, the use of
ducted outdoor air may result in the formation of
condensation on the interior panels of the combustion
chamber. It may be possible for this condensation to
accumulate and drip out of the appliance jacket. If this
is not acceptable, it is advisable to install a motorized
combustion air damper in the combustion air duct
interlocked with the appliance’s start circuit. In cold
climates it is essential to provide a motorized air inlet
damper to control the supply of combustion air and
prevent nuisance condensation
2.4.5
LENGTH OF AIR INLET PIPE
The maximum total length of the THRUWALL or vertical
roof top combustion air inlet pipe as installed from the
appliance to the air inlet cap must not exceed (100 ft)
equivalent feet (30.5m) in length. Subtract 7 (2.13 m) to 19
feet (5.8 m) of equivalent length depending on centreline
radius for each 90° elbow installed in the air inlet pipe
system. Pressure drop in 45° elbow will be half as much.
Do not exceed limits for the combustion air inlet piping
lengths.
PART 3
GAS CONNECTION
Verify that the appliance is supplied with the type gas
specified on the rating plate. Consult factory for installations
at high altitude.
3.1
GAS CONNECTION
•
Safe operation of unit requires properly sized gas
supply piping. See gas line sizing data.
•
Gas pipe size may be larger than appliance
connection.
•
Installation of a union at the appliance gas line
connection is required for ease of service and removal
of the gas train.
•
Install a manual main gas shutoff valve, outside of the
appliance gas connection as require by local codes.
•
A trap (drip leg) MUST be provided in the inlet gas
connection to the appliance.
•
Optional gas controls may require routing of bleeds
and vents to the atmosphere, outside the building
when required by local codes.
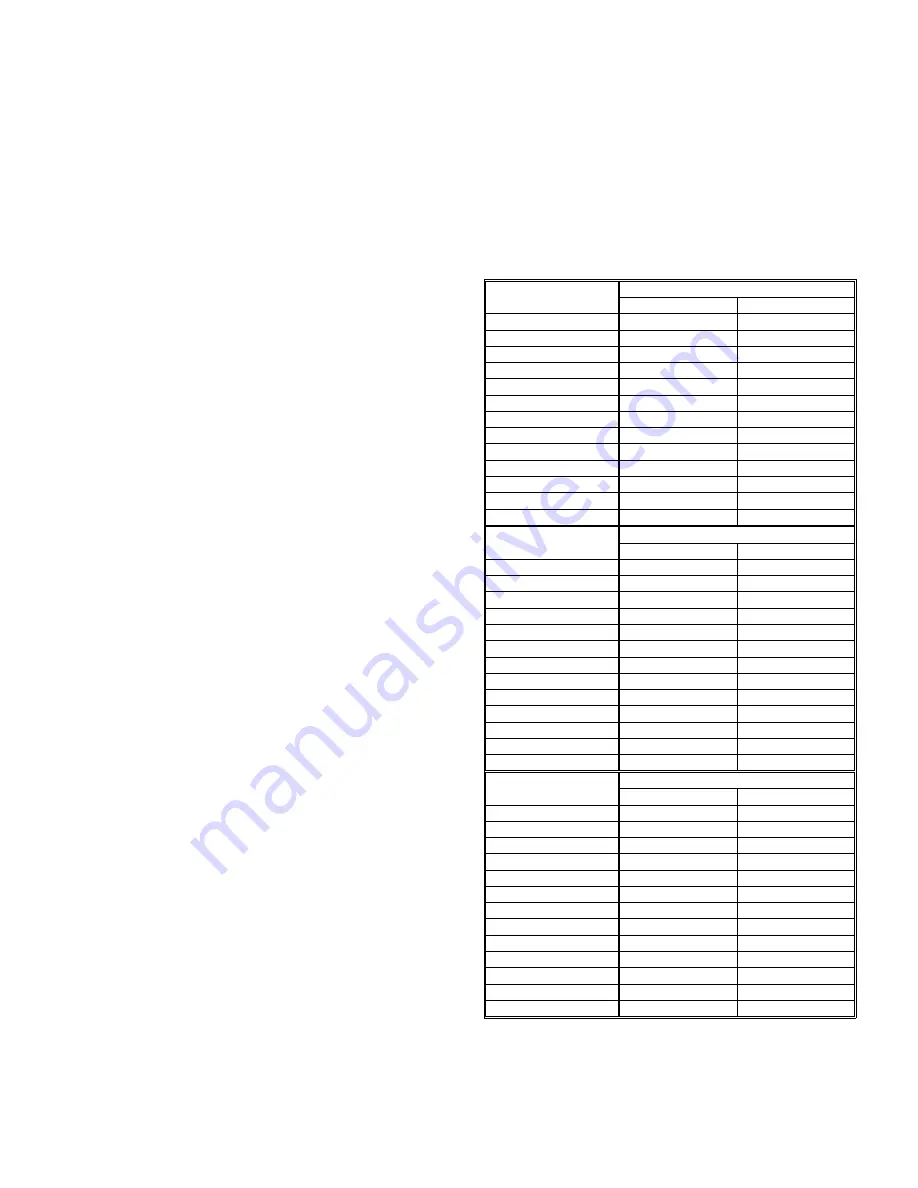
Table 6 – RECOMMENDED GAS PIPE SIZE
Single Appliance Installation
(For distance from natural gas meter or propane second
stage regulator)
0-100 FT
Input
Btu/Hr
NAT. L.P.
500,000
1 ½“
1 ¼“
750,000 2”
1
½“
1,100,000 2”
1
½“
1,200,000 2”
1
½“
1,500,000 2
½”
2”
1,750,000 2
½”
2”
2,000,000 2
½”
2”
2,500,000 3”
2
½”
3,000,000 3”
2
½”
3,500,000 3”
2
½”
4,000,000 3
½”
3”
4,500,000 3
½”
3”
5,000,000 4”
3
½”
101-200 FT
Input
Btu/Hr
NAT. L.P.
500,000 2”
1
½”
750,000 2”
1
½“
1,100,000 2”
1
½“
1,200,000 2
½”
2”
1,500,000 2
½”
2”
1,750,000 3”
2
½”
2,000,000 3”
2
½”
2,500,000 3”
2
½”
3,000,000 3”
2
½”
3,500,000 3
½”
3”
4,000,000 4”
3
½”
4,500,000 4”
3
½”
5,000,000 4”
3
½”
201-300 FT
Input
Btu/Hr
NAT. L.P.
500,000 2”
1
½”
750,000 2
½”
2”
1,100,000 2
½”
2”
1,200,000 2
½”
2”
1,500,000 3”
2
½”
1,750,000 3”
2
½”
2,000,000 3”
2
½”
2,500,000 3
1/2”
3”
3,000,000 3
1/2”
3”
3,500,000 4”
3
½”
4,000,000 4”
3
½”
4,500,000 4”
3
½”
5,000,000 5”
4”
Summary of Contents for DFH500
Page 31: ...28 PART 9 TROUBLE SHOOTING ...
Page 32: ...29 ...
Page 39: ...36 PART 12 EXPLODED VIEW ...
Page 40: ...37 ...
Page 41: ...38 ...
Page 46: ...43 PART 13 ELECTRICAL DIAGRAMS ...
Page 47: ...44 ...
Page 48: ...45 ...
Page 49: ...46 ...
Page 50: ...47 ...
Page 51: ...48 ...


