6-Sp
Manual de Instrucciones
Modelo NB0064
Clavos
Estos clavos para acabado de Campbell Hausfeld los puede comprar en su tienda más cercana. Si necesita ayuda para encon-
trar un artículo, comuníquese al 1-800-543-6400. Los clavos de Campbell Hausfeld cumplen o exceden el estándar ASTM F1667
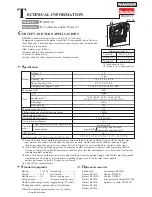
Calibre
Clavos por
Clavos por
Modelo #
Longitud
del cuerpo
Acabado
Cabeza
Unión
línea Caja
FB003060
3,18cm (1
1
⁄
4
”)
16 Galvanizado
De
puntilla
Adhesivo
50
2500
FB004060
3,81cm (1
1
⁄
2
”)
16 Galvanizado
De
puntilla
Adhesivo
50
2500
FB004560
4,45cm (1
3
⁄
4
”)
16 Galvanizado
De
puntilla
Adhesivo
50
2500
FB005060
5,08cm (2”)
16 Galvanizado
De
puntilla
Adhesivo
50
2500
FB006560
6,35 cm (2-1/2”)
16 Galvanizado
De
puntilla
Adhesivo
50
2500
Información de intercambio
Los clavos usados con la clavadora para acabado NB0064 de Campbell Hausfeld también se pueden usar con las clavadoras
Hitachi NT65A, Paslode 3250-F16, IM250F, Duo Fast LFN-764, Sears 18321, Porter Cable FN200 y FN250.
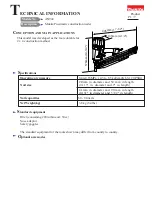
Cómo usar la
Clavadora
(Continuación)
7. Extienda el
pestillo de
alambre y
colóquelo
sobre los gan-
chos de la boquilla.
8. Cierre el pestil-
lo empujándo-
lo hacia aden-
tro hasta que
ajuste en su
posición.
9. Asegúrese que
el gatillo y el
Elemento de
Contacto de
Trabajo se
mueven libremente, hacia arriba y
hacia abajo sin pegarse o atascarse.
Servicio Técnico
Si desea hacer alguna pregunta refer-
ente a la reparación u operación de las
clavadoras, o para solicitar copias adi-
cionales de este manual, sírvase llamar
a nuestro número especial, 1-800-543-
6400.
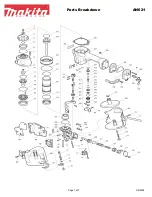
Clavos y Refacciones
Use solamente clavos Campbell
Hausfeld originales calibre 16 (o su
equivalente) - (vea la información sobre
intercambio de clavos). El desempeño
de las herramientas, la seguridad y la
duración pueden disminuir si no se
utilizan los clavos adecuados. Cuando
ordene partes de repuesto o clavos,
especifique el número de la parte.
!
ADVERTENCIA
Para reparar la clavadora
La herramienta deberá ser reparada
únicamente por personal calificado, y
deberán usar piezas de repuesto y
accesorios originales Campbell
Hausfeld, o piezas y accesorios que
funcionen de manera equivalente.
Para colocarle los sellos
Cada vez que repare una clavadora
deberá limpiarle y lubricarle las partes
internas. Le recomendamos que use
Parker O-lube o un lubricante equiva-
lente en todos los anillos en O. A cada
anillo en O se le debe dar un baño de
lubricante para anillos antes de instalar-
los. Igualmente, deberá ponerle un
poco de aceite a todas las piezas que se
mueven y muñones. Finalmente,
después de haberla ensamblado y antes
de probar la herramienta deberá pon-
erle unas cuantas gotas de aceite sin
detergente 30W u otro aceite similar,
en las líneas de aire.
movemiento
Recommended Hookup
Quick
Plug
Quick
Coupler
Air
Hose
Quick Plug
(Optional)
Quick
Coupler
(Optional)
Oiler
Regulator
Filter
3
General Safety
Information
(Continued)
●
Always assume the nailer contains
nails. Respect the tool as a working
implement; no horseplay. Always
keep others at a safe distance from
the work area in case of accidental
discharge of nails. Do not point the
tool toward yourself or anyone
whether it contains fasteners or not.
Accidental triggering of the nailer
could result in death or serious per-
sonal injury.
●
Do not drive a
nail on top of
other nails. The
nail could glance
and cause death
or a serious punc-
ture wound.
●
Do not operate
or allow anyone
else to operate
the nailer if any
warnings or
warning labels
are not legible. Warnings or warning
labels are located on the nailer maga-
zine and body.
●
Do not drop or throw the tool.
Dropping or throwing the tool can
result in damage that will make the
tool unusable or unsafe. If the tool
has been dropped or thrown, exam-
ine the tool closely for bent, cracked
or broken parts and air leaks. STOP
and repair before using or serious
injury could occur.
Caution indicates
a potentially haz-
ardous situation which, if not avoided,
MAY result in minor or moderate
injury.
●
Do not make any modifications to the
tool without first obtaining written
!
CAUTION
Standard B19.3-1991; Safety
Standard for Compressors for
Process Industries. Contact your air
compressor manufacturer for
information.
Operating The Nailer
LUBRICATION
This nailer requires lubrication before
using the nailer for the first time and
before each use. If an inline oiler is
used, manual lubrication through the
air inlet is
not
required on a daily basis.
The work surface
can become dam-
aged by excessive lubrication. Proper
lubrication is the owner’s responsibili-
ty. Failure to lubricate the nailer prop-
erly will dramatically shorten the life of
the nailer and void your warranty.
1. Disconnect the
air supply from
the nailer to
add lubricant.
2. Turn the nailer
so the air inlet
is facing up.
Place 4-5 drops
of 30 W non-
detergent oil into air inlet. Do not
use detergent oils, oil additives, or
air tool oils. Air tool oils contain sol-
vents which will damage the nailer's
internal components.
3. After adding oil,
run nailer briefly.
Wipe off any
excess oil from
the cap exhaust.
NOTICE
approval from Campbell Hausfeld. Do
not use the nailer if any shields or
guards are removed or altered. Do
not use the nailer as a hammer.
Personal injury or tool
damage may occur.
●
Avoid long extended periods of
work with the nailer. Stop using the
nailer if you feel pain in hands or
arms.
●
Always check that the Work Contact
Element (WCE)
is operating
properly. A nail
could acciden-
tally be driven
if the WCE is
not working
properly.
Personal injury
may occur (See "Checking the Work
Contact Element" Section).
●
Disconnect air supply and release
tension from the pusher before
attempting to clear jams because
fasteners can be ejected from the
front of the nailer. Personal injury
may occur.
Notice indicates
important infor-
mation, that if not followed, MAY
cause damage to equipment.
●
Avoid using the nailer when the
magazine is empty. Accelerated
wear on the nailer may occur.
●
Clean and check all air supply hoses
and fittings before connecting the
nailer to an air supply. Replace any
damaged or worn hoses or fittings.
Tool performance or durability may
be reduced.
●
Air compressors providing air to the
nailer should follow the require-
ments established by the American
National Standards Institute
NOTICE
Model NB0064
Operating Instructions
OIL
www.chpower.com
O I L
!
WARNING