background image

CV-940 Series

Page 18 of 19

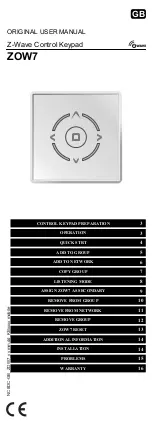
10. WIEGAND Protocol Description

The data is sent over the lines DATA 0 for the logic “0” 
and DATA 1 for the logic “1”. Both lines use inverted 
logic, meaning that a pulse low on DATA 0 indicates a “0” 
and a pulse low on DATA 1 indicates a “1”.When the lines 

are high, no data is being sent. Only 1 of the 2 lines  
( DATA 0 / DATA 1 ) can pulse at the same time.

Example: data 0010....

Data bit 0 = approximately 100 us (microseconds) 
Data bit 1 = approximately 100 us (microseconds)

Time between two data bits: approximately 1 ms 
(millisecond). Both data lines (D0 and D1) are high.

5V

0V

5V

1 ms

100 us

0V

D0

D1

1

0

0

0

Description for the 26 bits Wiegand format

Each data block consists of a first parity bit P1, a fixed 8 bits header, 16 bits of user code and a 2nd parity bit P2. Such 
a data block is shown bellow:

Parity bit (bit 1) + 8 bits header    

+  

16 bits user code = 2 bytes  

+  

Parity bit (bit 26) 

      P1  


 XXXXXXXX


 XXXX

YYYY YYYYYYYY   


          P2 

Example:  

      170  


   31527 


1  

1 0 1 0 1 0 1 0


0 1 1 1 

1 0 1 1 0 0 1 0 0 1 1 1       

           0

Note:

 Parity bits are calculated as follows:  

P1 = even parity calculated over the bits 2 to 13 (

X

P2 = odd parity calculated over the bits 14 to 25 (

Y

)

E   A    A   A   A   A   A   A   A   B   B   B   B   B   B   B   B   B   B   B   B   B   B   B   B   O

11. Safety Precautions

• 

Do not install the device in a place subject to direct sun  

  light without protective cover.

• 

Do not install the device and cabling close to a source  

  of strong electro-magnetic fields like radio-transmitting  
 antenna.

• 

Do not place the device near or above heating  

 equipments.

• 

If cleaning, do not spray or splash water or other  

  cleaning liquids but wipe it out with smooth cloth  
  or towel.

• 

Do not let children touch the device without supervision

Note:

 that if the sensor is cleaned by detergent, benzene 

or thinner, the surface will be damaged and the fingerprint 
can’t be entered.

Summary of Contents for CV-940 Series

Page 1: ...CV 940 Series Biometric Fingerprint Reader Installation Instructions...

Page 2: ...ingerprints from a Reader 08 8 3 Enrolling Fingerprints from Desktop Reader 09 8 4 Deleting Fingerprints 10 8 5 Uploading the Fingerprints to the Biometric Readers 10 8 6 Firmware Update 11 8 7 Sensor...

Page 3: ...unit from the wall Fingerprint capacity up to 9500 fingerprints Technology Biometry Authentication Finger Fingerprints per user 1 10 fingerprints Interface Wiegand 8 to 128 bits Default Wiegand 26bit...

Page 4: ...ensor1 Exit Button1 Exit Button2 GND GND Free In 2 Free In 2 Free In 1 Free In 1 Rx Tx Busy System OK Door 1 Door 2 Free Out 1 Free Out 2 TCP IP Earth 12Vdc Out 12V gnd D1 D0 12V gnd led2 led1 12V IN1...

Page 5: ...ted and shielded with a min 0 01 in 0 2 mm 2 cross section Connect the ground 0V of each unit in the RS485 Line using a third wire in the same cable The shield of the communication cable between two d...

Page 6: ...stablished The Biometric readers communicate with each other with a RS485 and with the PC Software through a Converter The RS485 Line should be configured in the form of a daisy chain NOT in a form of...

Page 7: ...l appear Biometric Go to that tab and put the serial number of the Biometric Reader 8 3 Important Note The serial number of the reader can be found on a sticker inside the reader on the packaging box...

Page 8: ...ave New and the fingerprint will be sent automatically to all Biometric Readers where that user has access i e to all the readers according to the Access Level assign to that user Example If the user...

Page 9: ...l be sent automatically to all Biometric Readers where that user has access i e to all the readers according to the Access Level assigned to that user If the reader is off line the fingers will be sen...

Page 10: ...Go to the fingertip that needs to be deleted right click and select Delete for one finger or Delete All for all fingers of the User Click Save Changes With this procedure the User s fingerprints are d...

Page 11: ...mmunication device in between during the entire process 8 18 8 19 8 20 8 21 Page 11 of 19 8 7 Sensor Calibration Right click on the biometric reader and select Calibrate and wait for confirmation mess...

Page 12: ...readers PIN Codes management and transfer PIN Code length configuration 1 to 8 digits and PIN Code transfer Wiegand Output Configuration The Wiegand output of the Biometric reader can be customized b...

Page 13: ...click on reader and select Check Version If reader is not online following line is added on top of the event table 9 3 Delete Reader 9 2 Edit Reader Right click on the reader and select Delete reader...

Page 14: ...10 4 In these 25 sec the reader will continuously blink in orange 6 Repeat point 4 5 for each finger that should be enrolled 7 Click on Save New and the fingerprint will be sent automatically to all B...

Page 15: ...ingerprint will be sent automatically to all Biometric Readers where that user has access i e to all the readers according to the Access Level assigned to that user If the reader is off line the finge...

Page 16: ...to the fingertip that needs to be deleted right click and select Delete for one finger or Delete All for all fingers of the User Click Save Changes With this procedure the User s fingerprints are del...

Page 17: ...t Select Wiegand menu from Settings Fig 10 12 At Wiegand setup window select one from customs Wiegand Fig 10 13 Set Wiegand parameter Click on Save button Note Wiegand settings are out of scope for co...

Page 18: ...ock is shown bellow Parity bit bit 1 8 bits header 16 bits user code 2 bytes Parity bit bit 26 P1 XXXXXXXX XXXXYYYY YYYYYYYY P2 Example 170 31527 1 1 0 1 0 1 0 1 0 0 1 1 1 1 0 1 1 0 0 1 0 0 1 1 1 0 No...

Page 19: ...the access is denied If the user is not deleted from the reader and the same user is enrolled again with new ID the reader will recognize the finger with the first ID To resolve this delete all users...

Reviews: